Our site is in soft launch as we enhance features and update content.
View Photos

Cholatse Peak Climbing - 20 Days

3 Reviews in TripAdvisor
23 Reviews in Google

Climbing Cholatse (6,446 m) is a true measure of an alpinist's ability, laden with challenges that make the summit a profound achievement.

  • Key Challenges:
    • Technical Difficulty: Classified as TD (Très Difficile / Very Difficult), the climb is relentless, with no easy sections. It requires a high level of competence in ice climbing, rope management, rotations and rest, and moving efficiently on steep, mixed terrain.
    • Approach: Guided expeditions follow the standard South-West arête. The ascent is a sustained and committing climb involving approximately 20 pitches on steep snow and ice slopes.  

The breakdown of the rotations via the South-West arête is as follows;

  • Rotation 1: Ascend from Base Camp, navigate the lower glacier and icefall, and climb the headwall to establish or stock Camp 1 at approximately 5,750m. After caching gear, descend back to Base Camp for the night. This rotation provides the first crucial experience on the route's technical terrain.
  • Rest Days: Following the first rotation, one ( or two) full rest day at Base Camp. This allows the body to recover and produce more red blood cells in response to the altitude stimulus.
  • Rotation 2 (Summit Push): After adequate rest, move up the mountain with the intention of going to the top. The ascent plan involves sleeping one night at Camp 1, climbing to and sleeping one night at Camp 2, and then making the summit push from Camp 2.
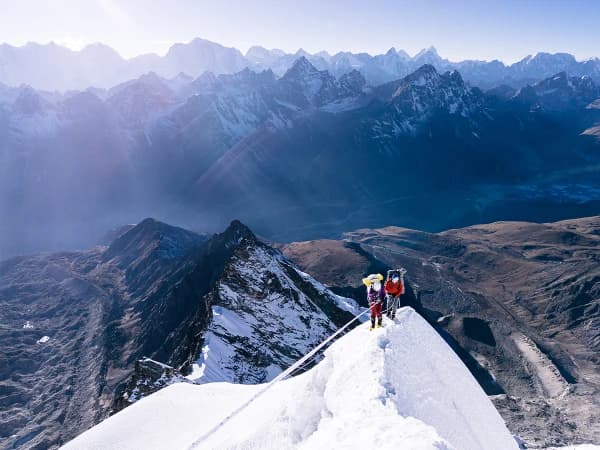
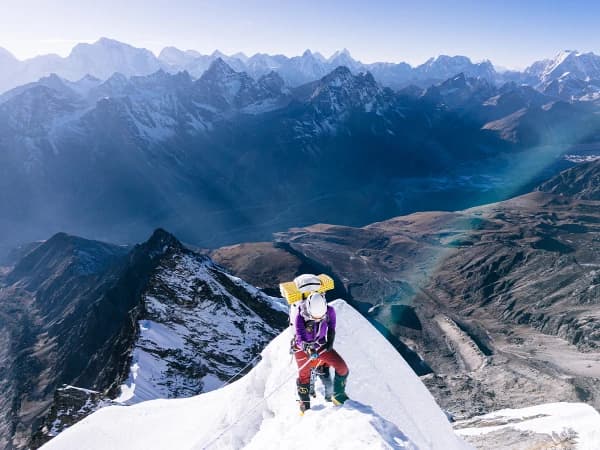
  • Exposure and Altitude: The route is incredibly exposed, with sheer drops on either side of the narrow ridges. Combined with the effects of high altitude, this creates a physically and mentally demanding environment.
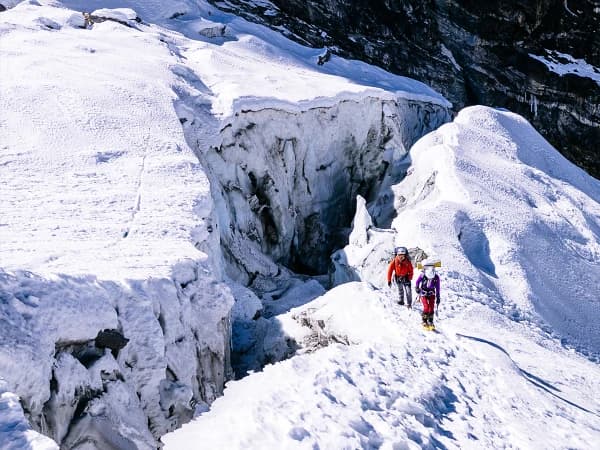
  • Objective Hazards: Like any major Himalayan peak, objective dangers such as serac fall, crevasses on the glacial approach, and the potential for sudden weather changes are prevelant.
Trip Overview
Duration20 Days
Trip GradeStrenuous
CountryNepal
Maximum Altitude6,446 m
Group Size2 to 12 members
StartsKathmandu
EndsKathmandu
ActivitiesExpedition, Peak Climbing, Trekking
Best TimeSpring (March - May) | Autumn (September - November)

Cholatse, known locally as Jobo Lhaptshan, is a visually spectacular peak rising to 6,446 m between the Khumbu and Gokyo valleys of Nepal. Geographically, it is connected to the higher Taboche (6,501m) by a long, dramatic ridge. The mountain's name is derived from Tibetan, translating to "lake pass peak," a direct reference to its proximity to the glacial lakes of the Gokyo valley and the high Cho La pass (5,420m) situated just to its north. 

The giants of Khumbu Everest, Lhotse, Nuptse are imposing and beckon a lot of climbers each year, but Cholatse (6,446 m) is a dream of the true alpinist. With its dramatic, knife-edge ridges, steep ice faces, and a profile that seems sculpted for adventure, this is not a trekking peak. It is a pure, technical, and immensely rewarding climb—a true test piece for those ready to step into the world of serious Himalayan mountaineering.

Cholatse At a Glance

Parameter Details
Altitude 6,440 meters
Location Khumbu Region, Sagarmatha National Park, Nepal
Climbing Grade TD (Très Difficile / Very Difficult)
Key Terrains Glacial travel, steep snow & ice (50-60°), mixed rock sections, exposed ridges
Best Season Spring (March-May) & Autumn (September-November)
Ideal For Experienced mountaineers with prior high-altitude and technical ice climbing skills.

A True Climber's Mountain: The Next Step Beyond Ama Dablam?

For many climbers, Ama Dablam is the benchmark for a technical Himalayan peak. Cholatse is the next logical—and more demanding—step. While sharing a similar altitude, Cholatse is widely regarded as a more sustained and technically intricate challenge. It has rightfully earned its reputation as a "climber's mountain" due to the complete absence of an easy route to its summit.

Unlike the often-crowded routes on its more famous neighbor, Cholatse offers a more exclusive and wild experience. Its history is a testament to its difficulty; it was the last named peak in the Khumbu to be summited, a feat not achieved until 1982. Choosing to climb Cholatse is choosing an objective prized for its technical purity, stunning aesthetics, and the profound sense of accomplishment that comes from succeeding on a route that remains respected and uncrowded.

For those who stand on its summit, the reward is an unparalleled 360-degree panorama of the world's highest mountains, including Everest, Lhotse, Nuptse, and Ama Dablam, from a perspective few ever get to witness. It is an achievement that places a climber in a select group that has conquered a route widely considered more challenging and exclusive than the standard routes on many other popular peaks in the region.

Cholatse Peak Climbing - 20 Days Itinerary

Flights in and out of Lukla, a STOL airport, can be uncertain because of weather conditions.
Hence, we recommned being prepared by opting for shared helicopter ride to/from Lukla which will cost an additional 225 per transfer.

Kathmandu to KathmanduExpand all
Accommodation: 3-star hotel in KathmanduTransportation: Private transfer from Tribhuvan International Airport to your hotel in Thamel
Max Altitude: 2,640 m Meals: Breakfast, Lunch & DinnerAccommodation: Local Lodge at PhakdingTransportation: Private transfer to Kathmandu domestic airport
Max Altitude: 3,440 m Meals: Breakfast, Lunch & DinnerAccommodation: Local Lodge at Namche
Max Altitude: 3,840 m Meals: Breakfast, Lunch & DinnerAccommodation: Local Lodge at Namche
Max Altitude: 4,110 m Meals: Breakfast, Lunch & DinnerAccommodation: Local Lodge at Dole
Max Altitude: 4,710 m Meals: Breakfast, Lunch & DinnerAccommodation: Local Lodge at Fangla
Max Altitude: 4,900 m Meals: Breakfast, Lunch & DinnerAccommodation: Tented Accommodation at Cholatse Base Camp
Max Altitude: 5,750 m Meals: Breakfast, Lunch & DinnerAccommodation: Tented Accommodation at Cholatse Base Camp
Meals: Breakfast, Lunch & DinnerAccommodation: Tented Accommodation
Max Altitude: 3,840 m Meals: Breakfast, Lunch & DinnerAccommodation: Local Lodge at Phortse
Max Altitude: 3,440 m Meals: Breakfast, Lunch & DinnerAccommodation: Local Lodge at Namche Bazar
Max Altitude: 2,880 m Meals: Breakfast, Lunch & DinnerAccommodation: Local Lodge at Lukla
Max Altitude: 1,400 m Meals: BreakfastAccommodation: 3-star hotel in KathmanduTransportation: Scheduled flight from Lukla to Kathmandu and private transfer to your hotel in Thamel
Meals: Breakfast and DinnerAccommodation: 3-star hotel in Kathmandu
Meals: BreakfastAccommodation: Private transfer to Tribhuvan International Airport

Trip Cost Details

Includes

The following are the list of services, also defined in the itinerary, included in the package cost for the 20-day Cholatse Peak Climbing Expedition:

Room and board in the city, transfers & flights

  • Airport Transfers: 4 airport transfers (international arrival & departure, and domestic drop & pickup) in a private air-conditioned vehicle
  • Accommodation in Kathmandu: 3 nights in a 3-star hotel at Hotel Thamel Park in Kathmandu
  • Meals in Kathmandu: 3 breakfast at your hotel and 1 complimentary farewell dinner
  • Scheduled Flights: Kathmandu-Lukla return flights

Room and board on the trek

  • Accommodation: Twin sharing room on local lodges as available on the trail
  • Meals: 3 meals a day with a cup of either tea or coffee or as defined in the itinerary
  • Additions: Seasonal fresh fruits, cookies, and water purification tablets (with advance notice)

Trek & Expedition Crew

  • Climbing Guide: An English-speaking professional, experienced and licensed climbing guide on a 1:2 basis
  • Support Staff: Assistance guide for groups above 6 and 1 porter for 2 guests (one porter carries maximum 25-kilogram baggage)
  • Crew Insurance: Life Insurance plus Medical and Evacuation Insurance for climbing guide, assistant guide/s, and porter/s per Nepal government rule

Expedition Setup and Equipment

  • Camp Equipment: Dome tent with mattress on a twin sharing basis, Kitchen and Dining tent, Kitchen equipments, EPI Gas for cooking, Toilet tent, Climbing rope: at least 6 coils of fixed and dynamic ropes (in total), Cooking pot for each member
  • High Food: Dehydrated instant high food above Base Camp

Communication & Backup

  • Communication: Walkie-Talkie for communication between Base Camp and Higher Camps, and a Satellite Phone for emergency communication which carried by the lead climbing Sherpa (also available for members at an additional cost),
  • Power/Electricity at the Base Camp: Solar panel for light (Generator can be provided at an additional cost to charge batteries, cell phone, camera, etc.)

Other Services

  • Permits: Sagarmath National Park (SNP) Permit, Khumbu Pasang Lhamu Rural Municipality (Trek Card), & Cholatse Peak Climbing Permit
  • Gear: 1 duffel bag - to be returned after the trek
  • First-aid: Comprehensive medical kit equipped with an oximeter, 1 gammow bag for group above 4 (for smaller groups availble on demand at an additional cost)

Excludes

  • International airfare, Nepal visa fees (two passport photographs), travel and medical insurance, emergency evacuation costs.
  • Meals not specified in the itinerary and inclusions.
  • Personal expenses on the trip (snacks, chocolate bars, alcoholic and non-alcoholic beverages, hot showers, telephone and internet services, electricity charges at higher altitudes, laundry, etc.).
  • Costs arising from natural calamities, mishaps, or anything beyond our control.
  • Any costs incurred due to your voluntary departure from the expedition, including early return, are non-refundable.
  • Tips for guides and porters (while not obligatory, it is expected by your staff at the end of their service).
  • Personal items including but not limited to trekking gear (hiking poles, gaiters, sunglasses, etc.), clothing (shorts, shoes, slippers, etc.), and hygiene and toiletries (sunscreen, toilet paper, hand sanitizer).
  • Any service not specifically mentioned in the 'Services Includes' section.

Oxygen tanks along with mask and regulator will be kept stock at Base Camp during the expedition. It will be availble to use during emergencies but additional cost will apply

Dates & Availability

Apr 2026
Oct 2026
Departure Date
Status
Price
Departure Date
Starts: April 15, 2026Ends: May 04, 2026
Status
Available
Generally stable weather with progressively warming temperatures, clearer skies. Permit is $ 175 expensive than in autumn
Price
US$4250

We also operate private expeditions if you don't want to join a fixed departure group. Please email us info@himalayanecstasynepal.com for more details.

We also have renting facilities for technical gear. The following is inlcuded for $120.00 per person;

  • Harness,
  • Jummer, (Ascender),
  • F-8 (descender),
  • Crampons,
  • Carabineers lock & unlock,
  • Ice-screw,
  • Rock piton,
  • Ice -Axe,
  • Helmet 

Essential Information

Essential Information for Cholatse Peak Climbing Expedition 

Planning a climb to over 6,000 meters requires careful preparation. This guide covers the key details you need to know before you go, from physical readiness to what to expect on the mountain.


Trip Difficulty & Required Experience

This expedition is graded as strenuous, and it's a significant step up from a standard high-altitude trek. Here’s what that means for you:

  • Physical Fitness: You need an exceptional cardiovascular endurance and strength, built through a dedicated, months-long training program that simulates the demands of carrying heavy packs at high altitude. Be prepared for long trekking days, often lasting 6-8 hours, on steep and rugged terrain.
  • Technical Skill: You must be comfortable and efficient leading on steep alpine ice (up to AI3) and mixed ground (M4). You'll need to have flawless ropework skills, build secure anchors in snow and rock, and manage multi-pitch rappels in harsh conditions.
  • Mentally Resilience: You need to be psychologically prepared for extreme cold, the debilitating effects of high altitude, and the mental strain of sustained exposure on a precipitous and committing route. Cholatse is not an objective for a novice or for a climber accustomed to being short-roped up a commercial route; it is a true test piece for the committed, experienced, and self-sufficient mountaineer.

Best Seasons to Climb

Timing is critical for a safe and successful climb in the Himalayas. We operate this trip during the two main climbing seasons for the best weather conditions.

  • Spring (March to May): This season offers warmer temperatures and longer days. The landscape is vibrant, with rhododendron forests often in full bloom at lower elevations.
  • Autumn (September to November): Following the monsoon, autumn brings stable weather systems, crisp air, and generally the clearest skies for spectacular mountain views.

Accommodation

Your accommodation will change as you gain altitude, moving from comfortable lodges to expedition-style camps.

  • In Kathmandu: You will stay in a comfortable hotel with standard amenities.
  • On the Trek: At lower elevations, you'll sleep in teahouses. These are local lodges with basic twin-sharing rooms and a communal dining area where you can relax and socialize.
  • On the Mountain: As you move above Base Camp, you will stay in tented camps. Our crew will manage all camping logistics, including setting up tents and preparing meals.

Food & Water

  • Food: You'll be served nutritious and high in energy food throughout the trip. In Kathmandu, breakfast is included at your hotel. At lodges/teahouses, you will have a choice of Nepali and western cuisine, and at base camp our expert cook will prepare a staple of traditional Nepali, Tibetan, and continental dishes. At higher camps, dehydrated instant high food will be provided.
  • Water: You can purhcase bottled water at lodges/tea houses on the trail, although we recommend using purification systems like straw or tablets to decrease plastic waster and enviornmental strain. When camping, boiled water will be provided.

Safety and Acclimatization

Your safety is the top priority. Our itinerary is specifically designed to minimize the risks associated with high-altitude climbing.

  • Proper Acclimatization: We have included crucial rest days in Namche Bazaar, Fangla and at the Base Camp to allow your body to adjust to the lower oxygen levels, significantly reducing the risk of altitude sickness.
  • Experienced Guides: Your expedition will be led by professional, licensed Sherpa guides who have extensive climbing experience on Cholatse and other Himalayan peaks. They are trained in first aid and emergency response.
  • Emergency Preparedness: A comprehensive medical kit is carried at all times. It is mandatory for all climbers to have their own travel insurance that specifically covers high-altitude trekking and helicopter rescue.

Equipment and Gear

While we provide all group climbing equipment (ropes, snow bars, etc.), you are responsible for your own personal gear.

Key personal gear include:

Technical Hardware:
  • Ice Climbing: Two technical ice tools, step-in crampons with anti-balling plates.
  • Safety & Ropework: An alpine climbing harness, climbing helmet, ascender (Jumar or Tibloc), and a belay/rappel device (ATC Guide or Figure 8).
  • Protection: A personal rack should include several ice screws of varying lengths, snow pickets/stakes, and a small selection of rock protection (cams, wires, and pitons) for the mixed sections.
Footwear:
  • Climbing: High-altitude double boots (e.g., La Sportiva Spantik, Scarpa Phantom 6000) are mandatory for warmth and performance.
  • Trekking Sturdy, waterproof trekking boots for the multi-day approach to base camp.
Clothing System:A modern layering system is essential for managing a wide range of temperatures.
  • Base & Mid-Layers: Multiple sets of synthetic or merino wool base layers (lightweight and heavyweight), and fleece or active insulation mid-layers.
  • Outerwear: A durable softshell jacket and pants for versatile protection, and a full GORE-TEX (or equivalent) hardshell jacket and pants with full-length side zippers for storm protection.
  • Insulation: A high-quality, expedition-weight down parka with a hood is a critical piece of safety equipment for use at high camps and on summit day. Insulated down or synthetic pants are also highly recommended.
Extremities:
  • Handwear: A three-part glove system consisting of thin liners, warmer softshell gloves, and fully waterproof, insulated expedition mittens.
  • Headwear: A warm hat, balaclava or neck gaiter, sun hat, high-quality glacier glasses, and ski goggles for storm conditions.
Camping & Personal Equipment:
  • Pack & Bags: An expedition backpack of 65-75 liters. Duffel bags will be provided by Himalayan Ecstasy Nepal (to be returned after completion of the trip).
  • Sleeping: A down sleeping bag rated to at least −30∘ C (−20∘ F), and two sleeping pads (one foam, one inflatable) for insulation from the cold ground.
  • Essentials: A reliable headlamp with spare batteries, two 1-liter wide-mouth water bottles with insulating parkas, a pee bottle, and a personal first-aid kit.

Equipment Lists

Success and comfort on your Cholatse Peak Climbing Expedition hinge on proper preparation, and your equipment list is central to this. This comprehensive guide outlines every essential item, from high-performance apparel to specialized trekking tools, ensuring your safety and readiness for the diverse Himalayan environment. We urge you to review this list thoroughly; having the right gear is non-negotiable for an enjoyable and secure adventure.

Gear required for Kyajo Ri Peak Climbing

Sun Hat (Wide-Brimmed or Baseball Cap):

hat for trekking

  • Purpose: Essential for protection from the strong Himalayan sun at lower altitudes and even at higher altitudes where UV radiation is intense. A wide-brimmed hat offers more comprehensive face and neck protection.
  • Material: Lightweight, breathable, quick-drying.

Beanie / Warm Fleece Hat:

beanie for trek

  • Purpose: For warmth, especially in the mornings, evenings, and at higher altitudes where temperatures drop significantly.
  • Material: Fleece, wool, or synthetic insulation. Something that covers your ears well.

Buff / Neck Gaiter / Balaclava:

Buff, Neck Gaiter, and Balaclava

  • Purpose: Highly versatile. Can be used as a neck warmer, pulled up over the face for dust/wind protection, worn as a headband, or even as a light hat. A full balaclava is excellent for extreme cold and wind, especially at higher camps or on pass days.
  • Material: Fleece, merino wool, or synthetic stretch fabric.

Headlamp (with extra batteries):

head lamp

  • Purpose: Absolutely crucial for early morning starts (especially for Kala Patthar), navigating around the lodge at night, or if you're delayed on the trail.
  • Features: Brightness levels, red light option (preserves night vision), long battery life.

Headband (Optional but useful):

head band

  • Purpose: For managing hair, wicking sweat, or providing light ear warmth without the bulk of a full hat.

Key Considerations for all Headgear:

  • Layering: Just like clothing, you'll layer your headgear. You might start with a beanie and a buff in the morning, switch to a sun hat during the day, and put the beanie back on in the evening.
  • Protection: The sun's intensity at altitude is often underestimated. Ensure good UV protection. Wind can also be a major factor, causing significant heat loss.
  • Comfort: Choose items that fit well and don't chafe, as you'll be wearing them for long periods.
  • Quick-Drying: Essential, especially for beanies or buffs that might get damp from sweat or light precipitation.

Base Layers (Wicking/Thermal Undershirts):

thermal undershirt

  • Purpose: Wicks sweat away from your body to keep you dry and regulate temperature. This is the foundation of your comfort.
  • Material: Lightweight and mid-weight merino wool or synthetic (polyester, polypropylene). Avoid cotton entirely, as it absorbs moisture and will chill you.
  • Recommended: 2-3 long-sleeved base layers; optionally, 1 short-sleeved for warmer days at lower altitudes.

Mid-Layers (Insulating/Fleece Jackets):

fleece jacket

  • Purpose: To provide warmth by trapping air. You'll add or remove these layers as the temperature fluctuates throughout the day.
  • Material:
    1. Lightweight Fleece (100-200 weight): Ideal for active trekking and mild cold. (1 piece)
    2. Mid-weight Fleece (200-300 weight) or a thin synthetic insulated jacket: For colder conditions and higher altitudes. (1 piece)
  • Recommended: 2 versatile fleece or insulating jackets of varying thickness.

Outer Shell (Waterproof & Windproof Jacket):

outer shell

  • Purpose: Your primary protection against wind, rain, and snow. It doesn't primarily add warmth, but it keeps you dry and protects your insulating layers from the elements.
  • Material: High-quality waterproof and breathable fabric (e.g., Gore-Tex, eVent, or similar). Look for features like sealed seams, an adjustable hood, and pit zips for ventilation.
  • Recommended: 1 durable, waterproof, and windproof hardshell jacket.

Down Jacket (or Heavy Synthetic Puffy Jacket):

down jacket

  • Purpose: Your essential warmth layer for extreme cold, especially in the evenings, mornings, and at high camps (above 4,000 meters), or during breaks.
  • Material: High-fill power down (e.g., 600-800 fill) for excellent warmth-to-weight ratio and packability, or a very warm, high-quality synthetic equivalent.
  • Recommended: 1 very warm, packable down or synthetic insulated jacket.

Key Considerations for Upper Body Protection:

  • Layering is Key: The ability to add or shed layers is paramount for comfort and safety. Never rely on just one or two thick items.
  • "Cotton Kills": Avoid cotton clothing at all costs, as it retains moisture and dramatically increases heat loss.
  • Zippers and Vents: Ensure your layers have full or half zippers, and your shell jacket has pit zips for quick ventilation during strenuous activity.
  • Fit: Layers should fit comfortably over each other without being too bulky or restrictive, allowing for good circulation.

Gloves

Lightweight Liner Gloves (Fleece or Merino Wool):

  • Purpose: These are your base layer. They provide a surprising amount of warmth, wick away sweat, and allow for dexterity for tasks like operating cameras, adjusting zippers, or handling trekking poles without exposing bare skin to cold.
  • Material: Thin fleece, merino wool, or synthetic wicking fabric.

Warm Fleece Gloves / Softshell Gloves:

  • Purpose: Your mid-layer. These provide more insulation than liners and are good for colder days at mid to higher altitudes when you still need some dexterity. They offer decent wind resistance.
  • Material: Mid-weight fleece, softshell fabric, or a blend.

Insulated Mittens (Waterproof/Windproof):

  • Purpose: Your outer, warmest layer, especially for early morning ascents (Kala Patthar), and evenings at higher camps. Mittens are generally warmer than gloves because they allow your fingers to share warmth.
  • Material: Outer shell should be waterproof and windproof (e.g., Gore-Tex, Pertex). Inner insulation should be down or high-loft synthetic. They should be large enough to wear over your liner gloves.

Heavy Duty Gloves (Optional but recommended for very cold sensitive hands or harsher conditions):

  • Purpose: A heavier, more insulated version of the fleece or softshell gloves, offering more warmth than typical mid-layers but still some dexterity compared to full mittens. Can be an alternative to or complement mittens.

Key Considerations for Hand Protection:

  • Layering: The most important concept. You'll layer your gloves just like your clothing. On a cold morning, you might wear liners inside your fleece gloves, or fleece gloves inside your mittens.
  • Waterproof/Windproof Outer Layer: Essential for high altitudes where snow, strong winds, and freezing temperatures are common. Wet hands lose heat rapidly.
  • Dexterity: While warmth is key, ensure you can still perform basic tasks. You'll find yourself taking gloves off less often if you have liners for fine motor skills.
  • Fit: Gloves and mittens should fit well – not too tight (restricts circulation) and not too loose (reduces warmth and dexterity).
  • Backup Pair: It's always a good idea to have a spare pair of liner gloves or a basic warm glove, as gloves can get wet or lost.

Base Layers (Thermal Leggings / Long Underwear):

  • Purpose: To wick sweat away from your skin, keeping you dry and preventing chafing. They provide foundational warmth.
  • Material: Lightweight and mid-weight merino wool or synthetic (polyester). Crucially, avoid cotton, as it retains moisture and chills you.
  • Recommended: 2-3 pairs for rotation.

Trekking Trousers (Durable & Quick-Drying):

  • Purpose: Your primary outer layer for trekking in most conditions.
  • Material: Made from durable, quick-drying nylon or a nylon/spandex blend for comfort and flexibility. Look for features like reinforced knees or articulated (pre-shaped) knees for better movement.
  • Recommended: 1-2 pairs. Convertible trousers (with zip-off legs) can offer versatility for warmer days at lower altitudes.

Softshell Trousers (Optional but Highly Recommended for Higher Altitudes):

  • Purpose: Provides excellent warmth and significant wind resistance, while offering more breathability and flexibility than a hard shell. They often have some water repellency. These are ideal for colder days at higher elevations or when crossing passes.
  • Material: Stretchy, durable softshell fabric.
  • Recommended: 1 pair, to be worn over base layers.

Hardshell / Rain Trousers (Waterproof & Windproof):

  • Purpose: Essential outer layer for complete protection against rain, snow, and severe winds.
  • Material: A high-quality waterproof and breathable membrane (e.g., Gore-Tex, eVent, or similar). Look for full-length side zippers, which are invaluable for putting them on/taking them off easily over boots and for ventilation.
  • Recommended: 1 pair.

Warm Camp Trousers (Optional but adds great comfort):

  • Purpose: A comfortable, warm pair of fleece pants, or lightweight down/synthetic insulated pants specifically for wearing around the teahouse in the evenings. They are excellent for warmth when static or for sleeping in on very cold nights.
  • Recommended: 1 pair (look for packable and compressible options).

Key Considerations for Lower Body Protection:

  • Layering System: The ability to combine or shed layers is paramount for adapting to the wide temperature swings and varying exertion levels.
  • Mobility: Choose pants that offer excellent freedom of movement, especially important on challenging ascents and descents.
  • Quick-Drying: All lower body layers should be quick-drying. Wet pants can lead to chafing and rapid heat loss.
  • Fit: Ensure layers fit comfortably over one another without bunching or being too tight (which can restrict blood flow and reduce warmth).
  • Durability: Trekking pants endure significant wear and tear. Invest in robust materials.
  • Avoid Cotton: Cotton material is unsuitable for trekking as it absorbs moisture, becomes heavy, and loses all insulating properties when wet.

Waterproof Trekking Boots (Mid to High-Cut):

  • Purpose: These are your most crucial piece of gear. They provide essential ankle support, stability on uneven and rocky trails, insulation from cold, and protection from moisture (snow, mud, stream crossings).
  • Features: Look for reputable brands known for their durability and comfort. Choose boots with a mid to high-cut design for optimal ankle support. They must be waterproof (e.g., with a Gore-Tex or similar lining) yet breathable. The sole should be stiff enough for rocky terrain but offer enough flex for comfortable walking.
  • Crucial Tip: Break-in Period: It is absolutely essential to break in your new boots thoroughly before the trek. Wear them on multiple long walks, ideally including some uphill and downhill sections, to mold them to your feet and identify any hot spots. New, unbroken-in boots are the leading cause of blisters.

Climbing Boots

  • Quality Single or Double Boots (insulated)

Camp Shoes / Lodge Shoes / Sandals:

  • Purpose: Provides immense relief for your feet after a long day of trekking. They are perfect for wearing around the teahouse, short strolls, or bathroom breaks at night, allowing your feet to breathe and recover.
  • Features: Lightweight, easy to slip on and off. Crocs, sturdy sandals, or comfortable slip-on shoes are popular choices.

Trekking Socks:

  • Purpose: Crucial for cushioning, wicking moisture away from your skin, regulating temperature, and preventing blisters.
  • Material: Opt for high-quality merino wool or good synthetic blends. Never wear cotton socks for trekking, as they absorb sweat, stay wet, and are a primary cause of blisters and cold feet.
  • Quantity: Bring 3-4 pairs of thick, warm trekking socks (for cushioning and warmth) and 2-3 pairs of thinner liner socks (optional, worn under thick socks, they can help reduce friction and prevent blisters).

Gaiters (Optional but Recommended):

  • Purpose: These are protective covers that attach to your boot and extend up your lower leg. They are excellent for preventing snow, scree, dirt, small rocks, or even leeches (at lower altitudes) from getting into your boots.
  • Features: Look for waterproof and breathable options. Mid-calf height is generally sufficient for most conditions.

Key Considerations for Your Footwear:

  • Fit is King: Ensure all footwear, especially your boots, fits perfectly with your trekking socks. Boots that are too tight restrict circulation (leading to cold feet), while boots that are too loose cause rubbing and blisters.
  • Moisture Management: While waterproof boots keep external water out, moisture-wicking socks are vital to keep your feet dry from sweat. Change socks regularly.
  • Blister Prevention: Be proactive! Address any hot spots immediately with moleskin or blister plasters. Carry a small personal blister kit.
  • Foot Hygiene: Daily foot care, including washing and drying your feet thoroughly, is important for overall foot health on the trek.

Passport:

  • Purpose: Your primary identification for international travel to and from Nepal, and for various trek permits.
  • Details: Must be valid for at least six months beyond your intended stay.

Nepal Visa:

  • Purpose: Required for legal entry into Nepal.
  • Details: Can be obtained upon arrival at Tribhuvan International Airport (TIA) in Kathmandu, or secured in advance from a Nepalese embassy or consulate in your home country. You'll typically need 2-4 passport-sized photographs for this.

Airline Tickets / E-tickets:

  • Purpose: For your international flights to and from Kathmandu, as well as your crucial domestic flights within Nepal (e.g., Kathmandu-Lukla-Kathmandu).
  • Details: Carry printouts and keep digital copies accessible on your phone or in cloud storage.

Travel and Medical Insurance Policy:

  • Purpose: Absolutely critical. This insurance should cover medical emergencies, emergency evacuation (especially helicopter evacuation from high altitudes), trip cancellation/interruption, and lost luggage.
  • Details: Carry a copy of your policy, emergency contact numbers for your insurance provider, and your policy number. Verify that high-altitude trekking up to your maximum elevation is explicitly covered.

Medical Information (Highly Recommended):

  • Purpose: Vital in case of a medical emergency.
  • Details: A small card or note listing any allergies (medications, food), existing medical conditions, current prescription medications (including generic names), and emergency contact information for your doctor.

Emergency Contact Information:

  • Purpose: For quick reference in unforeseen circumstances.
  • Details: List contact details for your next of kin, your tour operator's emergency number, and your country's embassy or consulate in Nepal.

Credit/Debit Cards & Cash (Nepalese Rupees):

  • Purpose: For payments for personal expenses, souvenirs, and tips. ATMs are generally scarce above Namche Bazaar, so cash is essential on the trail.
  • Details: Inform your bank about your travel dates to prevent card suspension. Keep emergency cash in a separate, secure location.

Passport-sized Photographs:

  • Purpose: Bring several extra copies (at least 4-6). They are frequently needed for permits, unexpected forms, or in case of lost documents.

Key Considerations for Your Travel Documents:

  • Originals and Copies: Always carry original documents, but keep high-quality photocopies (both physical and digital) stored separately from the originals. This is your safeguard if originals are lost or stolen.
  • Protection: Store all important documents in a waterproof and durable pouch or bag within your daypack and main luggage.
  • Accessibility: Keep your passport, visa, and trekking permits easily accessible, as they will be required for check-ins and checkpoints.
  • Digital Backups: Scan or photograph all critical documents and save them to a secure cloud service (like Google Drive, Dropbox) or email them to yourself and a trusted contact.
  • Security: Utilize a money belt or secure inner pockets for your passport, large sums of cash, and credit cards, especially in crowded areas.

Sunscreen (High SPF):

  • Minimum SPF 30, preferably 50+. The sun's UV radiation is significantly stronger at altitude. Opt for a broad-spectrum, water-resistant formula. A stick formula can be convenient for face and ears.

Lip Balm (with SPF):

  • Absolutely critical. High UV exposure, wind, and cold can cause severe chapping. Choose a lip balm with high SPF (30+). Bring at least two.

Toothbrush & Toothpaste:

  • A lightweight toothbrush and a small, travel-sized tube of toothpaste. Consider a biodegradable option.

Biodegradable Soap / All-in-One Wash:

  • A small bar of biodegradable soap or a travel-sized bottle of biodegradable all-in-one body wash/shampoo. This is crucial for minimizing environmental impact when water might drain into local ecosystems.

Dry Shampoo / Cleansing Wipes:

  • Highly recommended for waterless hair washing when showers are unavailable or too cold. Biodegradable body wipes are excellent for quick "sponge baths."

Moisturizer / Lotion:

  • A small tube is essential. The high altitude and dry, cold air can severely dehydrate and chafe your skin.

Hand Sanitizer:

  • Indispensable for maintaining hygiene, especially before meals and after using teahouse facilities where water for handwashing may be limited or freezing cold.

Toilet Paper:

  • Essential to carry your own. While some lodges provide it, it's not guaranteed, especially for use on the trail. Pack it in a waterproof bag. Remember to pack out all used paper (do not leave it on the trail).

Small Quick-Drying Towel (Microfiber):

  • A lightweight, compact microfiber towel is great for quick washes or drying after the occasional hot shower (which usually comes with an extra charge).

Personal Medications:

  • Any prescription medications you require, plus a small supply of over-the-counter essentials like pain relievers, blister treatment, antiseptic wipes, and cold/flu remedies.

Feminine Hygiene Products (if applicable):

  • Pack an adequate supply, as availability in remote villages is extremely limited. Be prepared to pack out all used products.

Key Tips for Trekking Toiletries:

  • Go Minimalist: Every gram counts on the trek. Opt for travel sizes or decant into smaller containers.
  • Leak-Proof: Pressure changes at altitude can cause liquids to leak. Ensure all bottles are tightly sealed and ideally double-bagged.
  • Cold Protection: Keep liquids that can freeze (like toothpaste or contact lens solution) inside your sleeping bag at night.
  • Leave No Trace: Always pack out everything you pack in, including all waste from toiletries.

Energy Bars / Granola Bars:

  • Purpose: Provide quick, sustained energy.
  • Recommendation: Look for bars with a good balance of carbohydrates, protein, and healthy fats. Choose options that aren't overly reliant on sugar, to avoid energy crashes.

Nuts & Seeds:

  • Purpose: Excellent source of healthy fats, protein, fiber, and concentrated calories.
  • Recommendation: Almonds, walnuts, cashews, peanuts, pumpkin seeds, and sunflower seeds are all great choices. A mixed bag offers variety.

Dried Fruits:

  • Purpose: Deliver a quick energy boost from natural sugars, along with fiber and vitamins.
  • Recommendation: Raisins, apricots, dates, figs, cranberries, and mango slices are popular options.

Trail Mix (DIY or Pre-packaged):

  • Purpose: A versatile combination, often blending nuts, seeds, dried fruit, and sometimes a few chocolate pieces.
  • Recommendation: Customize your own mix with your favorite components or choose a high-quality pre-made blend.

Hard Candies / Gummy Bears / Jelly Beans:

  • Purpose: Offer an instant sugar rush for quick energy, can help with dry mouth or a sore throat, and provide a welcome morale boost.
  • Recommendation: Small, easy to carry, and non-messy options.

Chocolate (Dark Chocolate Recommended):

  • Purpose: High in calories, provides energy, and is a fantastic psychological pick-me-up. Dark chocolate offers additional antioxidants.
  • Recommendation: Pack robust bars that won't easily crush or melt (though melting is less of an issue at higher, colder altitudes).

Protein Bars / Jerky:

  • Purpose: Essential for muscle recovery and sustained fullness.
  • Recommendation: High-protein bars specifically designed for active individuals, or beef/vegan jerky for a savory protein source.

Nut Butter Packets:

  • Purpose: A super-dense source of calories and healthy fats.
  • Recommendation: Single-serving packets of peanut butter, almond butter, or other nut butters. Can be eaten directly or with crackers.

Crackers / Biscuits:

  • Purpose: Good carbohydrate source and can be a comforting, bland option if your stomach is sensitive at altitude.
  • Recommendation: Plain crackers or digestive biscuits.

Key Considerations for Your Trekking Snacks:

  • Taste at Altitude: Your taste buds can change at high altitudes. Bring a variety, as what you normally love might not appeal to you on the trek. Sometimes salty or blander foods are preferred.
  • Calorie-to-Weight Ratio: Prioritize snacks that pack a lot of energy for their weight, as every gram counts in your pack.
  • Durability & Packaging: Choose snacks that won't easily crush, melt, or make a mess. Ensure all packaging is airtight.
  • Pack Out All Waste: Always carry out all your snack wrappers and any other trash. Leave no trace in the pristine Himalayan environment.

Sleeping bag liner and a Synthetic/Down Sleeping Bag:

  • Purpose: To guarantee you stay warm in freezing mountain temperatures.
  • Recommendation: Aim for a sleeping bag with a "comfort rating" of at least -45°C (-49°F). This rating indicates the temperature at which an average person can sleep comfortably. If you're plaaning for a winter ascent, a bag rated for -73°C (-99°F) might be necessary. Always prioritize the "comfort" or "limit" rating over the "extreme" rating.

Key Considerations for Your Sleeping Bag:

  • Teahouse Nights: Lodges on the trail provide warm duvets, and are sufficient for summer/spring treks. For winter, especially at higher altitudes, your sleeping bag is your primary source of warmth at night.
  • Protection: Always keep your sleeping bag in a waterproof stuff sack (even inside your duffel bag) to protect it from moisture.
  • Rental Option: If you don't plan to trek frequently in cold conditions, you can also rent a high-quality sleeping bag with Himalayan Ecstasy Nepal. Please contact us to inquire about availability
  • Air Out: Whenever possible, air out your sleeping bag during the day (e.g., at lunch stops if sunny) to remove moisture.

For summer a fleece or silk sleeping liner will be enough till Fangla as most teahouses offering warm duvets and if available will also provide an additional (if available).
For winter, we recomment you choose a good quality light sleeping bag that can be compressed down into a small stuff sack.

Your Bagpack: The Essential Trail Companion

Your bagpack is your constant partner on the Cholatse Peak Climbing expedition, carrying all the immediate essentials you need for comfort, safety, and convenience during your daily hikes. Unlike your main duffel, which is carried by porters, your daypack stays with you, ensuring quick access to vital items. This is where you'll keep everything you might need between teahouse stops. Think of it as your portable base for a day's adventure – from staying hydrated and fueled to adapting to sudden weather changes.

Key Features to Look For:

  • Comfortable Fit: Paramount for multi-day trekking. Seek out adjustable padded shoulder straps, a breathable and padded back panel, and a functional hip belt. A good hip belt is vital for distributing the pack's weight comfortably onto your hips, taking pressure off your shoulders.
  • Hydration Compatible: A dedicated internal sleeve for a hydration reservoir (like a CamelBak) and a port for the drinking tube are highly convenient. This allows you to stay hydrated without constantly stopping to pull out a water bottle.
  • Accessible Pockets: Well-placed pockets are invaluable. Look for side pockets (ideal for water bottles or quick-grab items), a front stash pocket (for maps or a lightweight layer), and a top lid pocket (perfect for small items like a hat, gloves, lip balm, or sunscreen you need often).
  • Integrated Rain Cover: Essential protection for your daypack and its contents. Many quality daypacks come with a built-in, stowable rain cover. If not, purchase one separately.
  • Harness
  • Crampons
  • Ice-Axe
  • Carabiner: lock/ unlock
  • Ice-screws
  • Snow Anchor
  • Rock Piton
  • Helmet
  • Ascender (Jumar)
  • Figure-8 Descender
  • Sling/Tape
  • Climbing Boot
  • Poncho or Umbrella
  • Plastics for cover your personal bag
  • Camera /memory stucks
  • Mosquito protect creams (required only summer)

Cholatse Peak Climbing - 20 Days FAQs

Climbing Cholatse Peak (6,446 m) is technically demanding and strenuous.

It is a challenging 6,000 m expedition peak that is significantly harder than even Ama Dablam (6,812 m), and requires an excellent level of cardiovascular fitness, significant mountaineering experience with ice axes, crampons, and ropes, and the ability to handle steep, mixed terrain of rock, snow, and ice. The climb involves long, strenuous days at high altitude, often in thin air, making acclimatization crucial to prevent Acute Mountain Sickness (AMS).

The standard climbing route is the South-West face of the mountain, but some extreme adventure enthusiasts undertake the North-East face of Cholatse - a feat only possible by world's top climbers who're adapated to alpine styple climbing.

Below is the technical Breakdown and Grading of the Southwest Ridge

Route Section Key Features Vertical Gain (m) Angle (°) Alpine Grade (French) Challenges
BC to Camp 1 Glacier travel, icefall, 150-200m ice/snow headwall ~750 45-50 AD+ Crevasse navigation, sustained steep snow/ice climbing.
Camp 1 to Camp 2 Exposed rock slabs, knife-edge snow arête, serac/ice mushroom navigation ~450-600 45-60 D+ / TD- Sustained and extreme exposure, loose rock, technical mixed climbing.
Camp 2 to Summit Narrow snow ridge, final summit mushroom ~240 40-60 D High altitude, continued exposure, potentially unstable summit cone.

While the South-West face of the mountain is the defacto for guided expeditions, it is still very technical and challening.

The following are the hazards on the SW ridge:

  • Crevasses: Significant crevasse fields exist on the glacier approach to the headwall below Camp 1 and reappear on the upper ridge between Camp 2 and the summit. Mitigation is standard: roped travel, knowledge of crevasse rescue techniques, and probing suspect snow bridges.
  • Icefall/Serac Fall: The route navigates through an icefall below Camp 1 and passes through a zone of seracs and ice mushrooms just below Camp 2. While the Southwest Ridge is generally safer than the heavily glaciated West Face, which has significant serac danger, these specific zones pose a real threat. Mitigation involves moving through these areas as quickly and efficiently as possible, ideally during the coldest parts of the day (early morning) to minimize the risk of ice collapse.
  • Avalanche: The long, steep snow slopes on the route are potential avalanche paths. The 150-200m headwall below Camp 1 is a primary concern, especially after new snowfall. The sustained snow arêtes higher on the route also carry this risk. Mitigation requires diligent assessment of the snowpack, paying attention to wind loading, temperature changes, and signs of instability.
  • Extreme Exposure: Perhaps the most persistent and defining hazard of the route is the phenomenal exposure. The ridge between Camp 1 and Camp 2, and the final push to the summit, feature sheer drops of hundreds of meters. This is a profound psychological challenge that can amplify the consequences of any minor slip. Mitigation relies on flawless ropework, secure anchoring, and unwavering concentration.
  • Rockfall: The mixed climbing sections contain sections of "chossy" and "unstable" rock. This presents a significant hazard, particularly if other teams are climbing above. A helmet is mandatory at all times above base camp, and climbers must move with care to avoid dislodging rock onto their partners or teams below.

For your safety and protection, a comprehensive travel insurance is mandatory for climbing Cholatse Peak. Infact, a permit won't be issued unless your insurance matches the following prerequisites:

  • High-Altitude Trekking and Climbing: Coverage for activities up to 6,500 meters.
  • Emergency Medical Treatment: Protection against medical costs incurred during the trip.
  • Helicopter Evacuation: Coverage for emergency evacuation from remote areas, which is often the only option for a medical emergency.

No, it is't possible to climb Cholatse without prior mountaineering experience; the peak is very-technical and requires prior experience with high-altitude trekking and climbing smaller peaks, and proficiency with basic climbing gear like crampons, an ice axe, and ropes.

The best seasons for Cholatse Peak climbing is either in Spring (March to May) or Autumn (September to November).

These periods offer stable weather, clearer skies, and more comfortable temperatures, significantly increasing the chances of a successful and enjoyable summit. Winter (December to February) is only possible for highly experienced climbers, but it's much colder with more snow and higher risks. Monsoon (June to August) is generally avoided due to heavy rain, slippery trails, and potential landslides and avalanches.

Himalayan Ecstasy Nepal will only provide experienced, professional, and NMA certified peak climbing and mountaineering guides.

Most of our guides are locals and have extensive knowledge of the Himalayan terrain and weather patterns. They possess certifications from recognized mountaineering associations, often including basic and advanced mountaineering training. Many have summited Mera Peak multiple times and are proficient in first aid, high-altitude rescue techniques, and the use of all climbing equipment to ensure your safety and success.

Plan Your Trip