Our site is in soft launch as we enhance features and update content.

Everest 3 Peak Challenge - 30 Days

2 Reviews in TripAdvisor
22 Reviews in Google

Mera Peak (6,461 m)

  • Difficulty: Graded as Alpine Grade PD (Peu Difficile or "a little difficult"). The climb itself is generally not highly technical, but the high altitude is the primary challenge. It is considered a good choice for a first Himalayan climbing experience.
  • Requirements: While not as technical as other peaks, it still requires proficiency in using mountaineering equipment like crampons, ice axes, and fixed ropes. The final 30-meter section of the summit push involves a steep ascent of a snow dome at a 50° angle, which requires using a jumar on a fixed rope.
  • The route mainly involves walking on a glacier with a moderate degree of steepness.

Amphu Lapcha Pass (5,845 m)

  • Difficulty: Rated as a very strenuous and highly technical pass crossing. It is considered one of the most challenging passes in the Everest region.
  • Requirements: Significant mountaineering skills and technical climbing equipment. The pass involves navigating a glacier, steep ascents and descents, and traversing a steep rock face. Fixed ropes are essential for safe passage. This is not a trek for beginners.
  • The pass connects the remote Hinku Valley to the Imja Valley. Due to its remoteness and difficulty, it requires careful planning, proper equipment, and experienced guides to ensure a safe crossing.

Island Peak (6,189 m)

  • Difficulty: Graded as PD+ (Per Difficult or Peu Difficile Plus), meaning it involves moderately technical sections and strenuous climb.
  • Requirements: A good level of physical fitness and technical mountaineering skills - proficiency in using crampons, ice axes, harness, and fixed ropes. The final 150-meter headwall is the most challenging part, a steep ascent requiring the use of a jumar (ascender) on fixed ropes. Descending this section using a figure-of-eight device is also critical.
  • The climb is physically demanding, requiring excellent endurance and mental resilience.

Lobuche East Peak (6,119 m)

  • Difficulty: Considered moderately challenging with an Alpine Grade of PD+. It is considered tougher than both Island Peak and Mera Peak due to its more technical nature.
  • Requirements: A good level of physical fitness and technical mountaineering skills, including a solid knowledge of fixed-line mountaineering, using a harness, crampon and ice axe techniques, and rappelling with a figure-of-eight device. The route includes a steep, exposed ridge and a 45° snow slope that requires technical climbing.
  • The ascent to the summit is very strenuous and physically demanding, and the route to the summit is a mix of rocky terrain and icy slopes. The climb is a good stepping stone for those aiming for more challenging high-altitude peaks.
Trip Overview
Duration30 Days
Trip GradeStrenuous
CountryNepal
Maximum Altitude6,476 m
Group Sizeminimum 2 pax
StartsKathmandu
EndsKathmandu
ActivitiesMountaineering in Nepal, Peak Climbing in Nepal
Best TimeMar - May | Sep - Nov

The Everest 3 peak challenge encompasses the three most popular trekking peaks in the Everest region; Mera Peak (6,476 m), Island Peak (6,189 m) and Lobuche East Peak (6,119 m).

Highlights of the Everest 3 Peak challenge

  • Extreme Himalayan Adventure: You've previously hiked in Nepal, and seen the mountains up-close. But now, you want to go even higher, if possible, to the top-of-the-world. The Everest 3 Peak challenge will prepare you for new mountainnering obession.
  • Introduction to mountaineering: You'll familiarize with moutaineering terminology, equipment, and technical gear - a must for 7,000 m and 8,000 m peaks.
  • Understand your limits: We've seen many people attempt 7,000 m and 8,000 m peaks in Nepal either without prior experience or a very basic grasp of mountainnering, and sometimes without adequte training or expertise. This can be disastrous (even deadly), as a basic understanding of mountaineering isn't enough to face the challenges associated with high altitude. That's where our Everest 3 peak challenge comes in - after completing this challenge, you will have accquired and understood the extensive fitness and mental preparedness required for above 7,000 peaks.

Nepal is a paradise for mountaineers, but different mountains require different level of expertise. That's why, after lot of research, we have curated the Everest 3 Peak climbing challenge suitable for novice mountaineers. Unlike extreme expeditions like climbing Annapurna, Mount Everest, Manaslu, etc., the Everest 3 Peak is beginner friendly.

Himalayan Ecstasy's 3 Peak Challenge is an a meticulously crafted program that has been possible through years of experience.

For example, we've opted to drive-in to the trailhead instead of fly-in to Lukla to mitigate the uncertanties associated with Lukla flights. But participants can choose to fly-in if the weather windows affords an opportunity without any change in trip costs. Additionally, you also have the option to charter a private helicopter, either to Lukla or Pangom, at an additional cost.

For more details, please email us at info@himalayanecstasynepal.com

  1. Mera Peak
    It may have been underestimated in the past, but today, Mera Peak is celebrated by all novice trekkers. Unsurprisingly, it is hailed as Nepal's most adventurous climbing peak for beginners, with towering cliffs and glaciers. The landscapes along the route are more a matter of imagination, as they are so varied. The rugged trails are to be savored than the ensuing struggle through picturesque forests and chortens. The winding 13.6-mile Solukhumbu trail encounters historic monasteries and traditional villages. Located in the Hinku Valley, Mera Peak encompasses three mountains: North, South, and Central. With a normal ascent and 360-degree views of Mount Everest, the Central Mera is the most popular trek of all. Although labeled easy, it is mostly done in autumn due to the stable weather. Altitude sickness can be a major drawback, so be informed and take a day or two off. Finally, enjoy the panoramic view of Lhotse, Cho Oyu, Kanchenjunga and Makalu.
     
  2. Island Peak
    Until a few decades ago, Island Peak was overlooked for its off-the-beaten-track nature and unpredictable weather. But these days, it has become a favorite among beginners due to its easy access and short trekking time. The sheer beauty of Island Peak needs no explanation as it is always magnificent. However, trekkers should definitely study the routes and plan the trek in advance. Although it is less difficult than other climbing peaks, preparation is essential for climbing rugged routes. Island Peak, also known as Imja Tse, lies above the Khumbu Valley in eastern Nepal. It sits at an altitude of 6,189 meters and resembles an island in a sea of ice when viewed from Dingboche. The best months to climb Island Peak are September and October, as the weather is perfect. In addition, it minimizes the threat from the headwall crevasses and the Imja Glacier.
     
  3. Lobuche East Peak
    Lobuche Peak is located right next to the small village of Lobuche and the Khumbu Glacier. Standing at the summit, climbers can easily enjoy views of the stunning Mounts Everest and Nuptse.

    Unique in both its geography and terrain, Lobuche Peak is one of the many hidden gems in the Khumbu region. Few people know that this mountain is also an excellent climbing peak in Nepal for beginners. It is embraced by all other trekkers waiting to become trekking professionals. Some of them even climb Lobuche's snowy terrain to prepare for Mount Everest. And it's understandable why, as the summit presents challenges at a height of 6,119 meters. The best way to access Lobuche's dynamic landscapes and wilderness is via a rugged 30.7 km route. It starts from Lukla and passes through important villages and prehistoric monasteries before reaching the summit.

Everest 3 Peak Challenge - 30 Days Itinerary

This formidable challenge is only for experienced hikers who've completed mutiple high pass trekking in Nepal (Everest 3 Pass Trek, Throng La, Larke La, etc) or who've climbed at least one 6,000 m mountain. For more details about the challenges of this trip, please read the FAQ section.

Kathmandu to KathmanduExpand all

Depending on how you plan to arrive at Kathmandu, we will arrange for you to rendezvous at your hotel in Thamel. In most cases, you will arrive at Kathmandu via Tribhuvan International Airport where you will meet your guide who will accompany you to your hotel.

In the evening, you will join for a program briefing with your group members. In case you arrive late at night, you will meet your group members the next day at breakfast during which you will also be briefed about your program.

Accommodation: 3-star hotel in ThamelTransportation: Private transfer from Tribhuvan International Airport to your hotel in Thamel

Your Mera Peak adventure kicks off with a smooth and comfortable drive from the lively streets of Kathmandu, taking you towards the serene riverside haven of Mulkot. We'll pick you up from your hotel in Thamel in a private jeep, ensuring a personalized start to your expedition.

Leaving the vibrant bustle of Kathmandu, we’ll navigate the city's initial traffic before joining the well-maintained B.P. Koirala Highway. This modern road offers a refreshing escape, immediately treating you to picturesque views of Nepal’s central hills. As we drive, the urban sprawl gives way to rolling green landscapes, dotted with charming terraced farmlands and glimpses of traditional Nepali village life.

Your destination today is the Taj Riverside Resort & Adventure, a beautiful property located right beside the majestic Sunkoshi River.

This comfortable drive to Mulkot is a deliberate choice, designed to enhance your expedition experience. By spending your first night at Taj Riverside Resort, you effectively cut down on the driving distance for the following day, bypassing the need for an extremely early start from Kathmandu to catch the unpredictable Ramechhap flights to Lukla. Instead, you'll wake up closer to your climbing plan, fresh and ready to proceed with a smoother, more predictable journey towards Phaplu, putting you directly on track for your Mera Peak ascent without unnecessary travel hassles.

Max Altitude: 515 m Meals: Breakfast, Lunch & DinnerAccommodation: Taj Riverside Resort & AdventureTransportation: Private 4 wheel transfer to Mulkot

Building on the comfort of your first night, day 03 of your Mera Peak expedition promises another engaging drive, taking you deeper into Nepal's scenic heartland towards Phaplu.

After a refreshing night at Taj Riverside Resort & Adventure in Mulkot, you'll embark on a journey that further transitions you from the more accessible plains into the mountainous terrain of the Solukhumbu region. From Mulkot, we will continue on the B.P. Koirala Highway before turning onto the Khurkot-Ghurmi Madhya Pahadi Highway, which eventually becomes the Pushpalal Highway/Siddhicharan Highway. This section of the road is known for its winding nature, carving its way through rolling hills and valleys.

As we progress, you'll notice the landscape becoming increasingly rugged. The views will shift from the wider river plains to more enclosed valleys, with hillsides clad in dense forests and interspersed with small, traditional villages. You'll witness daily life in rural Nepal unfolding outside your window, with terraced fields clinging to slopes and local markets bustling in small towns along the route.

While the exact route may vary slightly based on current road conditions, the journey involves a significant ascent as we gain altitude towards Phaplu. Some sections of the road may be paved, while others might be graveled or unpaved, particularly as you delve deeper into the less developed mountain areas. The drive, lasting approximately 5 to 6 hours, offers continuous visual engagement with the changing topography and increasing sense of remoteness.

Finally, you'll arrive in Phaplu (2,413 m), a significant administrative and transit hub in the lower Solukhumbu region. Phaplu is home to a domestic airport, making it a crucial gateway for those venturing into the Everest region without flying directly into Lukla. Here, you'll check into a comfortable tea house lodge, ready to immerse yourself in the authentic mountain atmosphere and prepare for the next stage of your exciting Mera Peak climbing journey

Max Altitude: 2,413 m Meals: Breakfast, Lunch & DinnerAccommodation: Local Lodge at PhapluTransportation: Private 4 wheel transfer to Phaplu

Continuing your remarkable journey deeper into the Solukhumbu, Day 04 brings a thrilling transition from the well-established hub of Phaplu to the more remote trekking start point of Pangom, via Khari Khola. This segment of your drive truly immerses you in the authentic, rugged terrain of the lower Everest region.

Leaving behind Phaplu, your private 4x4 jeep will navigate roads that become increasingly less conventional. While sections might be graveled, expect a significant portion to be an exhilarating off-road experience. The vehicle will traverse winding mountain tracks, sometimes narrow, sometimes rocky, demanding skilled driving and offering a raw, visceral connection with the landscape.

You'll descend towards the Dudh Koshi River valley, passing through scattered hamlets and patches of dense sub-tropical and temperate forests. The air grows crisper, and the sounds of distant rivers and local life replace the hum of larger towns. A key point on this drive is Khari Khola, a notable village that serves as a common waypoint for trekkers in this region. This is where many traditional walking routes from the lower Solu-Khumbu began.

From Khari Khola, the road becomes even more indicative of the wilder, less-traveled paths ahead. The jeep will climb steadily, often through switchbacks, offering increasingly grand vistas of the surrounding valleys and distant hills. You'll gain significant altitude on this leg, as Pangom sits at a higher elevation.

This drive is a vital part of your acclimatization, subtly preparing your body for the higher altitudes to come. It's an adventurous ride that showcases the resilience of both the local infrastructure and the communities living amidst these challenging yet beautiful mountains. Upon arrival in Pangom, a quaint village known for its traditional Sherpa culture, you'll settle into a local tea house lodge, marking the true commencement of your trekking adventure and the gateway to the remote Hinku Valley

Max Altitude: 2,948 m Meals: Breakfast, Lunch & DinnerAccommodation: Local Lodge at PangomTransportation: Private 4 wheel transfer to Pangom

Following a truly immersive drive, Day 05 marks the beginning of your genuine trekking experience as you embark on the path from Pangom to the aptly named Ramailo Danda, or "Joyful Hill." This is where the remote beauty of the lower Khumbu begins to truly unfold.

After a hearty breakfast at your tea house in Pangom, you'll start your ascent. The trail immediately takes you upwards, often quite steeply, as you begin to gain significant altitude. The initial sections lead you through dense and vibrant rhododendron and bamboo forests, particularly stunning if you are trekking in the spring when these flowers are in bloom. The sounds of the forest, filled with birdsong and the rustle of leaves, will be your constant companion.

A key feature of this trek is crossing the Pangom La Pass (3,176 m), a prominent point that offers your first taste of expansive mountain views. From here, the trail turns north, meandering along a steady path that provides glimpses into the hidden valleys below. You'll traverse varied terrain, including uphill climbs and occasional downhill sections, all contributing to your gradual acclimatization.

Along the way, you'll cross small streams like the Peseng Kharka Khola and pass through small settlements, including Ningsow village. These moments offer a peek into the simple, traditional lifestyle of the local Sherpa communities, far removed from the hustle of modern life. The absence of heavy tourist traffic on this route allows for a more serene and authentic trekking experience.

The final push to Ramailo Danda (3,276 m) can be a rewarding climb, but your efforts are amply compensated by the views. As its name suggests, Ramailo Danda truly lives up to its "joyful" moniker, offering incredibly beautiful and sweeping vistas of the surrounding peaks, including distant views of the majestic Numbur Himal, Kongde, and Manju Peak. This is often where trekkers catch their very first, exciting glimpse of Mera Peak itself, standing proudly in the distance, a preview of the grand objective ahead. You'll spend the night in a basic but welcoming tea house lodge, allowing you to rest and soak in the breathtaking evening panorama.

Max Altitude: 3,276 m Meals: Breakfast, Lunch & DinnerAccommodation: Local Lodge at Ramailo Danda

Day 06 of your Mera Peak expedition takes you further into the serene wilderness, trekking from the elevated vistas of Ramailo Danda to the more secluded Chhatra Khola. This day is characterized by a significant descent and a deep immersion into the natural beauty of the lower Hinku Valley.

Setting off from Ramailo Danda, you'll begin a substantial downhill trek. The trail will lead you through a landscape dominated by dense forests of rhododendron, pine, and oak. In spring, these forests burst into a riot of color, creating a truly enchanting environment. The path can be rugged and sometimes uneven, with roots and stones underfoot, requiring careful footing.

As you descend, the air will become noticeably warmer and more humid. You'll pass by numerous small streams and rivulets, their gentle murmur adding to the tranquility of the surroundings. This section of the trek is particularly remote, with very few villages or permanent human settlements. It’s a chance to truly disconnect and appreciate the pristine nature of the Himalayas.

This part of the route also skirts the periphery of the Makalu Barun National Park, a protected area renowned for its biodiversity. While deep forest trekking, keep an eye out for diverse birdlife and, if you're incredibly lucky, you might spot rare wildlife such as the elusive red panda or Himalayan black bear. The trail, sometimes referred to as a segment of the "Pasang Lhamu trail," offers continuous views of the lush, untamed valleys.

Your journey will eventually bring you to Chhatra Khola (2,800 m), a remote and often basic teahouse or camp location situated beside a stream. Its name, "Chhatra Khola," literally means "umbrella stream," reflecting the dense canopy that often covers this area. Here, surrounded by the sights and sounds of the forest, you'll settle in for the night, having embraced another full day of trekking and further preparing your body for the higher altitudes that lie ahead.

Max Altitude: 2,800 m Meals: Breakfast, Lunch & DinnerAccommodation: Local Lodge at Chhatra Khola

Today marks a significant shift in your Mera Peak journey as you trek from the deep forests of Chhatra Khola to the charming riverside settlement of Kothe. This day sees you officially entering the renowned Hinku Valley, known for its pristine wilderness and dramatic mountain scenery.

Starting from Chhatra Khola, you'll initially continue along the path beside the Majang Khola. The trail, still largely through dense, captivating forests of bamboo, rhododendron, and pine, is less about significant altitude gain and more about covering distance through varied terrain. You'll continue to experience the tranquil solitude of this less-trodden route, often accompanied only by the sounds of the forest and distant streams.

As you progress, the trail gradually begins to follow the course of the Hinku Khola (River). This is a pivotal moment, as you are now truly entering the heart of the Hinku Valley, which flows directly from the glaciers and peaks of the Mera range. The valley starts to open up in places, offering tantalizing glimpses of the higher peaks that will soon dominate your views.

You might pass by seasonal tea shops or small clearings, indicating the occasional presence of yak herders, though permanent settlements remain sparse. The path is often winding, hugging the contours of the valley, and can involve some undulating sections, but the overall feeling is one of moving steadily upstream into a wilder, more remote landscape. The vegetation remains lush, but you'll sense the gradual transition towards a more alpine environment as you gain elevation.

Finally, after approximately 6 to 7 hours of trekking, you'll arrive at Kothe (3,691 m). Nestled on the banks of the Hinku Khola, Kothe is a slightly larger settlement with more established tea houses, serving as a crucial stop for all trekkers heading towards Mera Peak. It's often where the Makalu Barun National Park check post is located, confirming your entry into this spectacular protected area. From Kothe, you can already start to feel the proximity of the towering peaks, and on clear days, you may even catch your first clear, imposing view of Mera Peak itself to the north, a truly inspiring sight that sets the stage for the days to come

Max Altitude: 3,691 m Meals: Breakfast, Lunch & DinnerAccommodation: Local Lodge at Kothe

Day eight of your Mera Peak expedition offers a shorter but highly rewarding trek from Kothe to Thaknak, marking your deeper immersion into the high-alpine environment of the upper Hinku Valley. This day is crucial for both acclimatization and soaking in increasingly dramatic mountain vistas.

Departing from Kothe, the trail primarily follows the western bank of the Hinku Khola. The path is relatively gentle compared to previous days, involving a gradual ascent as you move upstream. You'll continue to trek through thinning forests, where the trees become more stunted and give way to open, expansive landscapes.

As you walk, the immense scale of the valley becomes more apparent. You'll pass through several open spaces that are often used as seasonal yak pastures (kharkas). These areas are characterized by vast meadows and small stone shelters, offering a glimpse into the traditional high-altitude grazing practices. The air here is noticeably cooler and crisper, and the feeling of wilderness intensifies.

A significant highlight of this segment is passing Lungsumgba Gompa, an ancient Buddhist monastery believed to be around 200 years old. This serene spiritual site, often with prayer flags fluttering in the breeze, provides a moment of reflection amidst the grandeur of the mountains. You might also spot ancient rock carvings or "Mani stones" with Buddhist inscriptions, adding to the cultural richness of the journey.

Throughout this 3 to 4-hour trek, the views grow increasingly spectacular. Towering peaks, still snow-capped even in the warmer months, begin to loom larger in the distance. The most striking sight will be the magnificent Mera Peak itself, whose formidable face becomes more prominent and inspiring as you approach. You'll see parts of the massive glaciers that feed the Hinku River, a testament to the raw power of the Himalayas.

Upon arrival at Thangnag (4,358 m), you'll find a small cluster of teahouses nestled against a backdrop of impressive cliffs and glaciated slopes. This quiet settlement serves as another vital acclimatization stop, allowing your body to further adjust to the increasing altitude. From Thaknak, you're perfectly positioned to continue your ascent towards the higher camps, with the grand objective of Mera Peak now directly in your sights

Max Altitude: 4,358 m Meals: Breakfast, Lunch & DinnerAccommodation: Local Lodge at Thangnag

After breakfast at your teahouse in Thangnag, the primary activity for the day will be a rewarding acclimatization hike to a nearby viewpoint, often referred to as Thangnag Ri - it is a prominent ridge above the settlement. This "climb high, sleep low" strategy is a cornerstone of safe mountaineering.

The hike itself will be a steady ascent from Thangnag, typically taking a few hours round trip. The trail winds upwards on rocky terrain, with sparse vegetation, offering increasingly expansive views with every step. You'll move slowly and deliberately, focusing on your breathing and listening to your body's signals, as your guide leads the way.

As you gain elevation on Thangnag Ri, the panorama that unfolds is truly breathtaking. You'll gain even better perspectives of the colossal Mera Peak and its surrounding glaciers, which will appear much closer and more imposing. The view encompasses the vastness of the Hinku Valley, stretching out below you, and the dramatic, ice-clad peaks that encircle it. You'll clearly see the rugged landscape that defines this remote part of the Himalayas, with moraines, rock formations, and the pristine wilderness stretching in all directions.

This acclimatization hike serves multiple purposes: it helps your body produce more red blood cells to cope with the thinner air, offers a chance to stretch your legs without overexertion, and provides unparalleled photo opportunities. Your guide will monitor your well-being and offer insights into the surrounding geography and the upcoming climbing route.

Max Altitude: 4,700 m Meals: Breakfast, Lunch & DinnerAccommodation: Local Lodge at Thangnag

Today is a pivotal day on your Mera Peak expedition, as you trek from Thaknak to Khare. This relatively short yet significant hike takes you to the final inhabited settlement before the higher camps, placing you directly at the doorstep of the climbing phase.

Leaving Thangnag  after a restorative night and morning, the trail immediately begins a steady, uphill climb. While not overly steep, the increasing altitude will make itself felt, emphasizing the importance of your previous acclimatization efforts. The landscape transforms dramatically here, shedding the last vestiges of dense vegetation and transitioning into a rugged, high-alpine environment dominated by moraines, rocks, and the glistening expanse of glaciers.

You'll traverse what feels like a moonscape, walking across the lateral moraines of the Dig Glacier. The path can be rocky and uneven, requiring careful foot placement. As you progress, you'll encounter the confluence of the mighty Hinku Nup and Shar Glaciers, vast rivers of ice flowing down from the surrounding peaks. The scale of the glacial landscape is truly awe-inspiring, a stark reminder of the powerful geological forces at play in the Himalayas.

Throughout this 3 to 4-hour trek, the views of Mera Peak itself become increasingly dominant and imposing. You'll gain new perspectives on its various ridges and faces, getting a clearer sense of the climb ahead. The air is thin and crisp, and the silence of the high mountains is profound, broken only by the crunch of your boots on the trail or the occasional distant rumble of ice.

Finally, you'll arrive at Khare (5,045 m). This small cluster of basic teahouses and tent sites is strategically positioned at the base of the Mera Glacier, making it the effective base camp for Mera Peak climbs. Its unique location offers direct views of the lower section of the climbing route. Here, you'll settle into your teahouse or possibly a tented camp setup, ready for your crucial acclimatization and pre-climb training day tomorrow, which will fully prepare you for the summit push

Max Altitude: 5,045 Meals: Breakfast, Lunch & DinnerAccommodation: Local Lodge at Khare

The primary focus of the day is thorough acclimatization. Your body will continue to adjust to the significant altitude of Khare. You'll have time to relax, hydrate, and conserve energy, allowing your physiology to adapt further to the reduced oxygen levels. Many trekkers might take a short, gentle walk around Khare itself to keep the blood flowing without overexertion.

Following a nourishing breakfast, your experienced climbing Sherpa guide will conduct a comprehensive pre-climb briefing. This session is crucial for understanding the specifics of the Mera Peak ascent. Your guide will detail the summit day plan, including the expected timings, the route from High Camp to the summit, and the descent strategy. They will discuss potential challenges, weather considerations, and safety protocols, giving you a clear picture of what to expect. This is also an excellent opportunity for you to ask any last-minute questions and voice any concerns.

Immediately following the briefing, you'll engage in essential pre-climb training. This hands-on session is typically conducted on the lower slopes of the Mera Glacier, easily accessible from Khare. Here, your guide will instruct and review the proper use of your mountaineering equipment, including:

  • Crampons: How to properly attach them to your boots and walk efficiently on snow and ice.
  • Ice Axe: Techniques for self-arrest (stopping a slide), balance, and general use on the glacier.
  • Harness: How to correctly wear and adjust your climbing harness.
  • Jumar (Ascender): Instructions on how to use this device for ascending fixed ropes, which will be crucial on the final summit section.
  • Figure-8/Descender: Basic instruction on how to use this for controlled descents on fixed ropes.

This practical training ensures everyone in the team is comfortable and proficient with the necessary skills, boosting confidence for the technical sections ahead.

Finally, a meticulous climbing gear check will be conducted. Your guide will inspect everyone's personal climbing equipment (boots, crampons, ice axe, harness, jumar, helmet, etc.) to ensure it is in good working order and correctly fitted. This helps identify any issues before you head to higher camps.

By the end of this comprehensive day, you'll feel well-prepared, both physically and mentally, for the challenging yet exhilarating climb that lies just ahead. Rest well, as tomorrow brings the move to Mera High Camp and the eve of your summit attempt!

Meals: Breakfast, Lunch & DinnerAccommodation: Local Lodge at Khare

Setting out from Khare, you'll immediately begin your ascent onto the Mera Glacier. This is where your pre-climb training from the previous day becomes essential. You'll don your crampons, and your guide will likely fix a rope in some sections, or you'll move roped together, depending on the conditions, to ensure safety on the glacial ice. The initial part of the trek involves navigating a combination of rocky moraine and snow-covered ice, which can be challenging underfoot.

The path is a continuous, though gradual, uphill climb across the vast expanse of the glacier. You'll be walking on snow and ice for the majority of the way, which, while physically demanding at this altitude, is undeniably exhilarating. The landscape is entirely dominated by the raw beauty of ice and rock, with the immense scale of the surrounding peaks becoming ever more apparent. The air is exceptionally crisp, and the sun reflecting off the snow can be intense, making good sun protection vital.

As you steadily gain altitude over approximately 5 to 6 hours, the panoramic views that unfold are increasingly dramatic. You'll be walking amidst a sea of towering peaks, feeling truly immersed in the heart of the Himalayas. The objective is to reach Mera High Camp, strategically perched on a rocky outcrop just below the main summit ridge.

Mera High Camp is a fully tented camp, a stark and exposed but incredibly vital staging point for the summit push. Here, your team will have set up sturdy tents, providing shelter from the biting cold and strong winds that are common at this elevation. Despite the austere conditions, the views from High Camp are utterly breathtaking, particularly at sunset, as the last light illuminates the colossal peaks around you, including a clear, commanding view of Mount Everest's majestic summit.

Tonight will be cold, but filled with anticipation. You'll have an early dinner and prepare your gear for the very early morning summit attempt. Resting at High Camp is crucial, as you conserve energy for what promises to be the most challenging yet rewarding day of your Mera Peak expedition.

Max Altitude: 5,780 m Meals: Breakfast, Lunch & DinnerAccommodation: Shared Tent at Mera High Camp

Your summit push begins remarkably early, typically between 2:00 AM and 3:00 AM, under the blanket of a star-filled sky. After a quick, light breakfast and hot drinks to warm you, you'll don all your layers, headlamps illuminating the path, and begin your ascent from Mera High Camp.

The climb starts immediately on the snow and ice of the glacier. Moving slowly and steadily, often roped together for safety, you'll utilize your crampons and ice axe, putting all your training into practice. The initial hours of the ascent are characterized by a gradual but persistent climb up the vast, open snow slopes. The thin, cold air at this altitude demands a controlled pace, focusing on deep, consistent breathing.

As the pre-dawn darkness slowly gives way to the first hints of sunrise, the magic truly begins. The sky will transform into a kaleidoscope of colors, painting the world's highest peaks in fiery hues of orange, red, and gold. This spectacular sunrise over the Himalayas, viewed from such an extreme altitude, is an experience that transcends words.

The final section to the summit is generally steeper and can involve navigating a short, exposed ridge. Here, fixed ropes are typically in place, installed by your Sherpa team or other expeditions, which you'll ascend using your jumar (ascender) for security and assistance. This is where your strength and mental fortitude are truly tested, but the thought of the panoramic views awaiting you at the top will fuel your every step.

Reaching the summit of Mera Peak (6,470 m) is an unparalleled triumph. From this incredible vantage point, you'll be greeted by one of the most breathtaking 360 degree panoramas on Earth. Directly before you, stretching across the horizon, stand five of the world's 8,000-meter giants: the majestic Mount Everest, the formidable Lhotse, the striking pyramid of Makalu, the vast bulk of Cho Oyu, and the distant grandeur of Kanchenjunga. Beyond these, a countless sea of other snow-capped peaks fills the horizon. Take your time to soak it all in, celebrate your achievement, and capture these indelible moments.

After a triumphant but brief stay on the summit, you'll begin the long descent back down. While downhill, it requires immense focus and energy, navigating the snow and ice. You'll retrace your steps to Mera High Camp, where a short rest and some refreshments will be welcome. From High Camp, you'll continue your descent, carefully navigating the glacial terrain, all the way back to Mera La. Now, instead of heading west towards Khare - you'll take a right and leave the Mera glacier heading eastwards towards a wide valley.

The trail descends on the sandy moraine till you arrive at a glacial lake, then changes to an icy glade with sparse vegetation. After crossing the edge of a moraine, the Hongku valley opens up and Makalu reapperas in the horizon. The trail eventually leads you to the seasonal settlement of a few teahouses at Kongma Dingma, a pristine grazing pasture seldom used, if only by shephards.

Max Altitude: 6,470 m Meals: Breakfast, Lunch & DinnerAccommodation: Tented accommodation at Kongma Dingma

The primary purpose of this day is to account for unforeseen circumstances that might have impacted your summit attempt. This could include:

  • Adverse Weather Conditions: The Himalayas are known for their unpredictable weather. If strong winds, heavy snowfall, or whiteout conditions prevented a safe summit push on the designated summit day (Day 13), this contingency day allows for a second attempt, provided the weather clears.
  • Slower Pace: Sometimes, due to individual acclimatization needs or the overall pace of the group, the ascent to High Camp or the summit itself might take longer than anticipated. This day provides the necessary buffer to maintain a safe and comfortable pace without rushing.
  • Health or Logistics Issues: Minor health concerns, equipment adjustments, or other logistical delays can arise on any expedition. This extra day allows for flexibility without compromising the overall schedule or safety.

What happens on a Contingency Day?

  • If Used for Summiting: If previous day's summit attempt was postponed, then today becomes your new Summit Day. You would repeat the early morning push from High Camp, aiming to reach the summit of Mera Peak, followed by the long descent back to Kongma Dingma, as described on day 13. This scenario ensures you still have the best possible chance to achieve your goal.
  • If Not Used for Summiting: If you successfully summited Mera Peak on Day 13 and the expedition is on schedule, today is a well-deserved rest and recuperation day at Kongma Dingma. This provides an invaluable opportunity for your body to recover from the immense physical exertion of the summit climb and the exposure to high altitude. You can sleep in, enjoy leisurely meals, rehydrate thoroughly, and simply relax amidst the stunning mountain scenery.

This Contingency Day underscores our commitment to a responsible and safe climbing experience, prioritizing your well-being and increasing your chances of a successful and memorable Mera Peak summit.

Meals: Breakfast, Lunch & Dinner

Bidding farewell to Kongme Dingma under the mighty Kongme Peak, you head east  along the right side of the valley. Amidst the scattered, collapsed rock blocks, you'll find a small trail beginning on your left. This trail climbs the flank of the moraine and enters a narrow gully, emerging 40 meters higher onto a moraine shoulder that overlooks Anda Pokhari (egg lake), a lake perfectly mirroring the majestic Chamlang. Behind you, the entirety of Mera Peak's summits are visible, with Naulekh displaying its beautiful stature to the left.

You skirt the lake on the left before crossing a ridge. From here, the upper Hunku Khola valley opens up, closed off on the horizon by Baruntse while the Kongme Peak stand guards to your right, and the Mera Peak massif which has been your close companion for the last week will disappear.

You'll traverse the mountainside, passing beneath cliffs, to reach a grassy plateau below. A little further on, you'll cross a scree slope that descends directly from the east face of Kongme Peak before briefly walking alongside the Hongku Khola. Across the river, the terminal moraine of the Chamlang Glacier gives an impressive perspective.

The trail contours through large, collapsed boulders before arriving at a vast meadow where the Hongku river eases out. The view dominated by Everest and the Lhotse in the horizon, and the waterfalls cascading from Kongme's vertical walls complete the stunning scene. You'd be hard-pressed to find a more dramatic mountain view! Keeping to the right side of the valley, you will face a challenging scree section which you cross and then follow the crest of a moraine, from which you can begin to scrutinize the vast North Face of Chamlang. Baruntse, briefly hidden by one of Chamlang’s moraines, reappears at the head of the valley.

After crossing a small hill, you'll overlook a moraine plateau. To the left, lies a deep, boxed-in glacial valley that descends from Hongku Peak. You continue a bit further to bypass a damp meadow and, cross the 5,000-meter mark. After a final push, you'll arrive at a basin holding Seto Pokhari (White Lake). You'll camp at the pasture just north of the lake after crossing it along it's right bank. When the lake is low, as it is in autumn, you can walk on fine sand (which is much easier than navigating moraine boulders!).

At the pasture, the valley widens and the magnificent North Face of Chamlang, with its distinct ice-flutes, dominates the view. To the east, only the upper section of the Hunku Himal emerges from the moraines, while to the north, Nuptse, Sagarmatha (Everest), and Lhotse still command the skyline. The ridge connecting the Baruntse and Ama Dablam opens up at the Amphu Lapcha pass, which is clearly visible even though it blends into one of Nuptse’s hanging glaciers. Below the pass are vast moraine fields. The Panch Pokhari (Five Lakes) which will be our base camp for the Amphu Lapcha pass are hidden in the hollows in the hollows of the moraine.

Max Altitude: 5,067 m Meals: Breakfast, Lunch & DinnerAccommodation: Tented accommodation at Seto Pokhari

You'll climb directly up the center of the valley on the right side of the river across a mix of grassy plains and rocky terrain, shadowed by the East Face of Hunku Peak. Ahead, the Lhotse Massif becomes more imposing, eventually obscuring the region's monarch, Everest.

As you approach a terminal moraine, you cross the river and pick up a well-marked trail on the left side, which ascends along the crest of a moraine.

Gaining elevation, a prominent glacier-covered summit to the left of Chamlang emerges from behind its massive moraines. A little further on, you reach a spectacular viewpoint where two valleys converge: to the left, Ombigaichan Peak dominates, at the foot of which lies the challenging Mingbo La pass (leading to the south basin of Ama Dablam); to the right, a string of moraine lakes ends at the base of Kali Himal and Baruntse.

You continue straight, staying on the right of the valley, skirting the lakes on the left and heading toward the base of a moraine descending from the Kali Himal. After crossing a grassy plateau that terminates at a collection of moraine boulders , the grass disappears here, giving way entirely to rock. You weave between the boulders, till you reach the crest of the moraine to reach another viewpoint. Baruntse is now fully visible to the right, marking the end of the Kali Himal chain—the same chain you must cross further to the left at Amphu Laptsa.

This spot offers a fantastic photographic composition: the long mountain chain anchored by a large moraine lake below. You head slightly left, following the crest of the moraine on the true right side of this large lake, with the sheer rock faces of the Lhotse peaks as your focus. The route is well-cairned, winding skillfully between precariously balanced boulders. You eventually leave the moraine crest to climb up the boulders on the left and cross a small col, marked by a cairn. This col is, in fact, the overflow spillway of a gigantic lake that belongs to the Panch Pokhari (Five Lakes) group.

You'll go around the lake on the righ and, 300m before reaching its end, go up the side of the grassy moraine which presents itself with in sight the passage of the Amphu Lapsa , recognizable by the large square seracs which punctuate the ascent route, after which you'll cross the outflow of a small lake situated in a hollow on your right. Continuing along the flank of the moraine - or on the crest if snow conditions allow - you eventually reach a rocky platform situated at the base of the moraine that guards the access to the pass.

The journey culminates at the pristine Panch Pokhari lakes, where a base camp is set on the edge of the lake facing Baruntse with brillant views of surrounding glaciers and rugged mountain terrain including the famous West Col (6,135 m) on the Barutse Peak climbing trail. This isolated campsite is a place of serene beauty, providing a critical acclimatization stop before the final, strenuous push to cross the Amphu Lapcha Pass. It is one of the most beautiful camps of this trek and perhaps of Nepal!

Max Altitude: 5,543 m Meals: Breakfast, Lunch & DinnerAccommodation: Tented accommodation at Amphu Laptsa Base Camp

Today is a significant milestone as you go across the Amphu Lapcha pass to Chukhung.

You start by climbing the white, rocky moraine directly behind the camp, following its crest to the left. A steep section follows, ascending in tight switchbacks until you reach a small platform. From here, there's a fantastic view plunging down into the mountain cirque where the Panch Pokhari (Five Lakes) are nestled. The trail then meanders across rocky benches, passing near a small, frozen pond. You climb further, keeping to the right over eroded red rocks. The trail isolated feels other-worldly, but the well-placed cairns guide you as you arrive beneath the large seracs that guard the final approach to the pass.

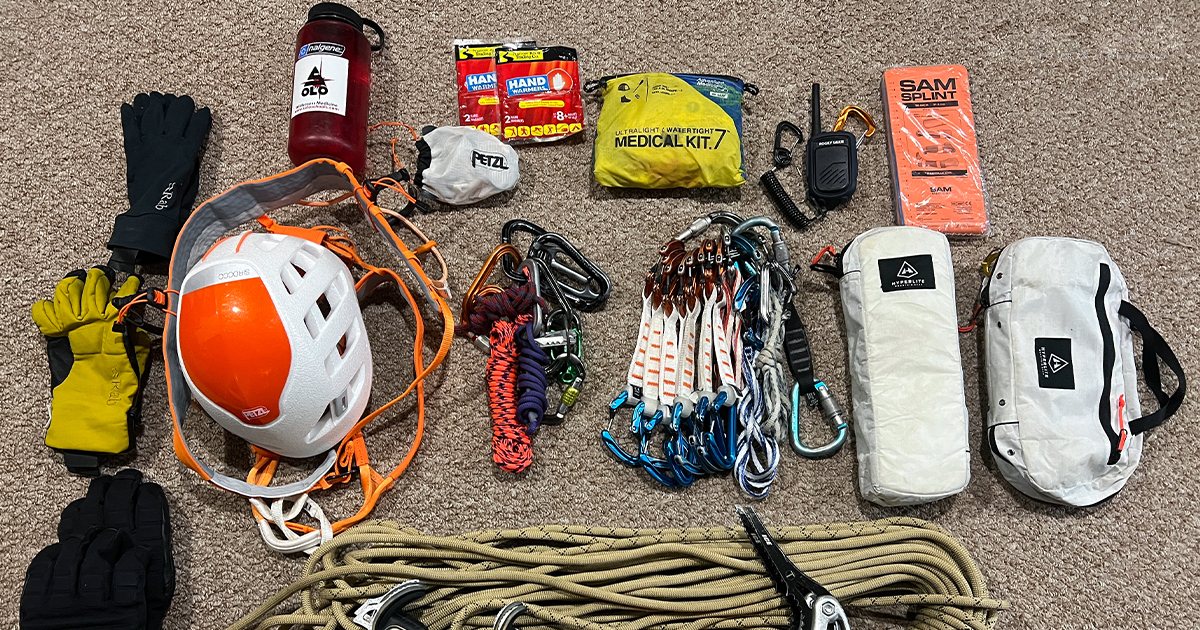
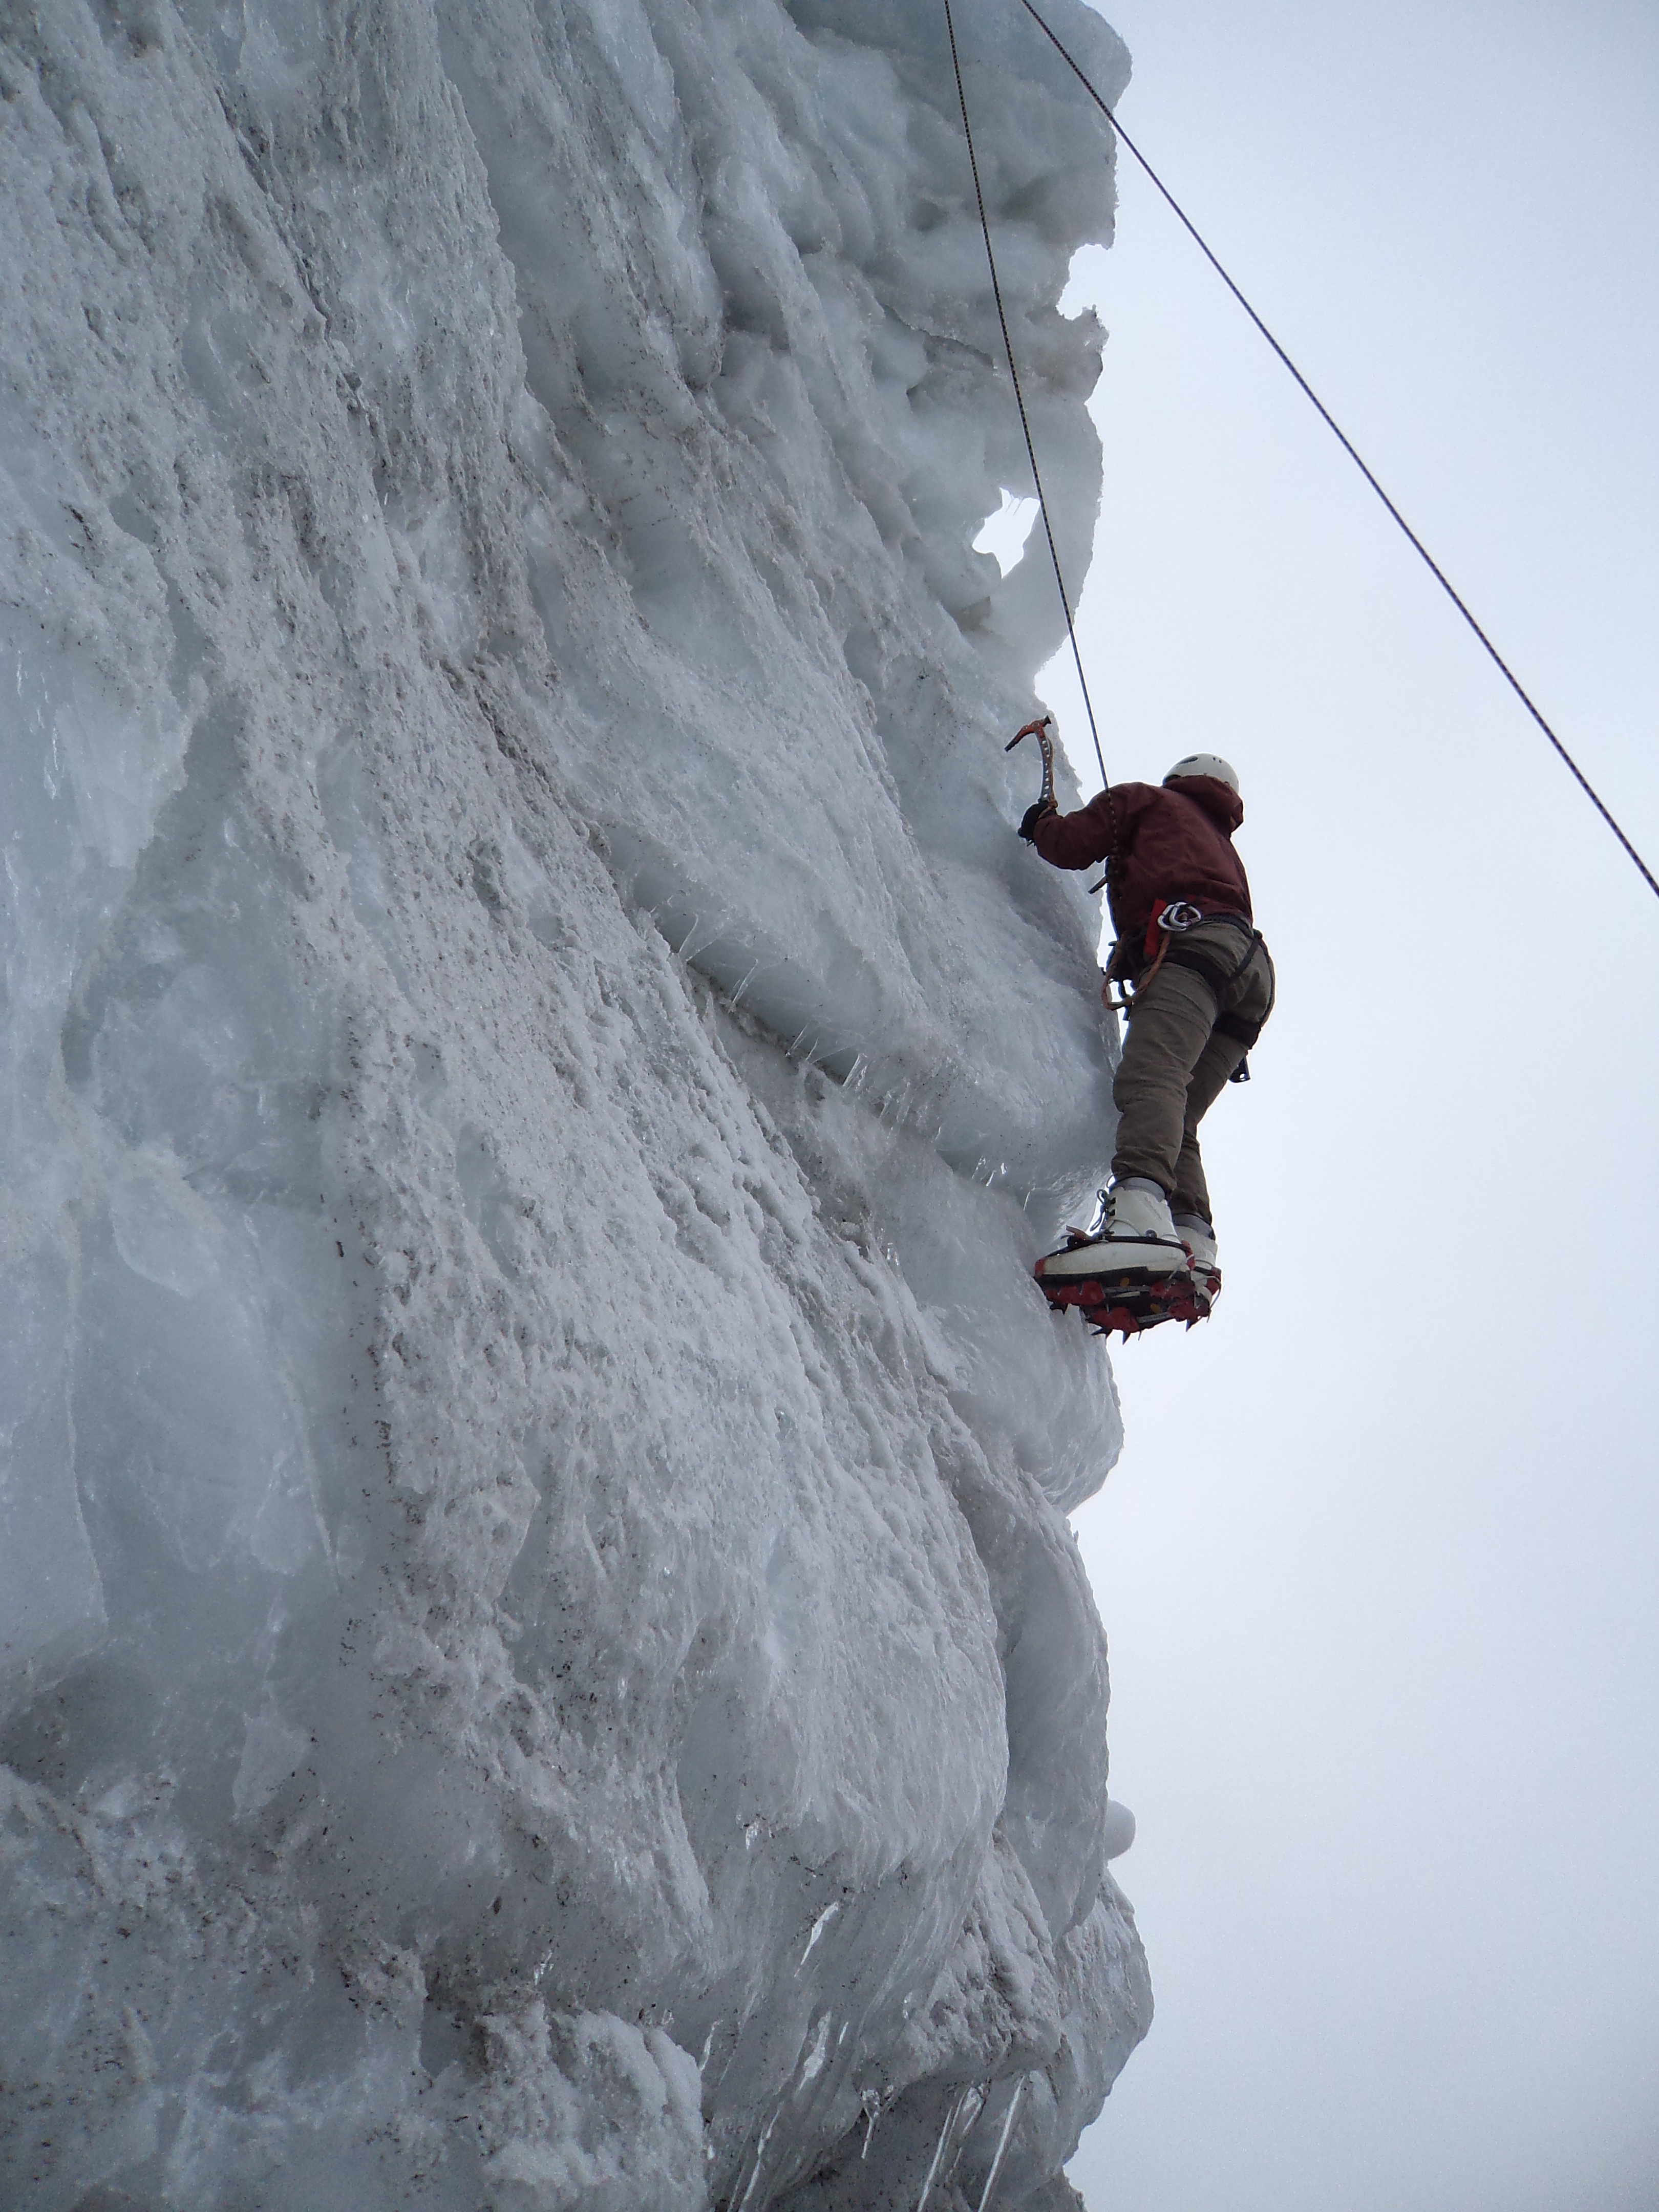
Here, you put on your crampons before hitting an imposing ice wall.

Navigating the Ice Wall

You will descend slightly to the left to find a passage—either an immediate ice run on the right or a slightly longer detour through the snow. Either solution allows you to gain the main glacial lip.

From here, you face the main climb, which involves a strenuous ascent in three sections, broken up by two steep steps. At the second step, you realize you will be nearly level with the crest. In about 10 minutes, you'll reach the highest point on the ridge from which you descend to the right toward the lowest point of the ridge. Congratulations - you've travered the Amphu Laptsa Pass.

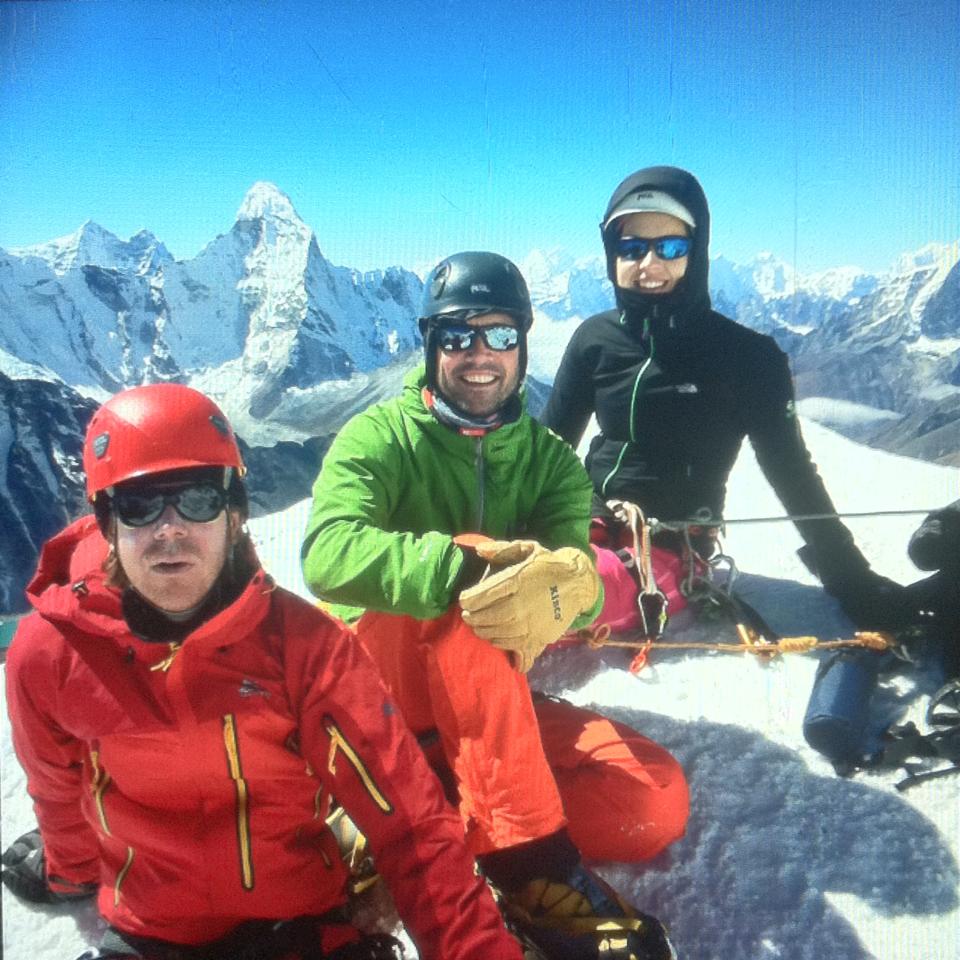
The Amphu Laptsa Pass (5,775m)

The view plunging into the feeding basin of the Imja Glacier is nothing short of extraordinary. The mountain cirque - featuring Everest, the two Lhotse peaks, Cho Polu, and the Kali Himal ridge terminating at the foot of Baruntse - is magnificent.

The descent route on the north side begins 20 meters to the left of the lungta (prayer flag) garlands. Depending upon snow condition, you'll descent without fixing a rope if there has been no recent, heavy snowfall.

However, if snow conditions are poor or hard, a fixed rope will be installed, as the descent becomes extremely technical.

The North Side Descent

After a slightly descending portion of the trail, you face a challenging downclimb beneath a rocky outcrop: a steep, 30-meter stony gully on which a short abseil or top-rope might be used in case of ice and snow.

Upon reaching the anchor point, you traverse left (in the direction of the descent) for 50 meters before finishing with a slightly less steep direct descent to a rocky spike at 5,655m.

From this point, the proper trail reappears, descending in wide switchbacks before leveling out onto 20-degree slopes that lead to the moraine plateau at 5,300m. For this entire effort, from the pass to the plateau, it's reasonable to allow a couple of hours; moving the entire team and the porters with their dokos (carrying baskets) is a significant operation.

Traversing the Glacier Basin

You cross the plateau, with cairns on the flank of a grassy moraine guiding you onto a defined trail along a moraine crest.

The moraine crest gradually bears left without losing much altitude. You overlook this 'end-of-the-world' glacial basin, which is almost entirely enclosed by Lhotse, Khumbakarna Himal, Cho Polu, Baruntse, and Kali Himal. As you gain a dominant position over the Imja Glacier (5,135m), the peak of Cholatse appears to the west on the horizon.

In the moraine valley, you can't miss Imja Tso lake. This famous lake was known long before the predicted GLOF (Glacial Lake Outburst Flood), where its frontal moraine is at risk of bursting and sending devastating floods through lower Nepalese valleys. It is bordered to the north by Lhotse, Everest, and Nuptse.

Further downstream, beyond gray mountain chains, Lobuche, Gyachung Kang, and Cho Oyu come into view. You descend diagonally onto a meadow wedged between two moraines, where Taweche meets its companion, Cholatse, on the horizon. The rest is rocky, navigating from one moraine to the next. Further down, you'll cross a grassy moraine, still on the right bank of the valley in which a cavity has been dug, now filled by a lake. On the right side of the valley, Nuptse shows off its stature with massive hanging glaciers that rival those of its neighbor, Lhotse. You then cross a stony plain to the right bank of the moraine, in the middle of which passes the outlet of the Imja Tso, on a wooden bridge.

The path to Chukhung is not yet finished, but the scenery improves with more mountains: first, to the right, Imja Tse (Island Peak); then, to the left, Ombigaichan and its impressive glacier; and finally, the elegant Ama Dablam.

You now follow the path along the crest of a moraine, which gives you a clear view over the Imja Glacier and the houses of Chukhung village downstream. The glacier’s frontal moraine ends less than 300 meters from the first buildings. Nuptse is the dominant peak here. From the moraine, you descend, cross the river, and arrive at the Chukhung village.

Max Altitude: 5,842 m Meals: Breakfast, Lunch & DinnerAccommodation: Local Lodge at Chukhung

You've the day at rest. If you want, you can go for an optional hike to Chukhung Ri.

Max Altitude: 5,546 m Meals: Breakfast, Lunch & DinnerAccommodation: Local Lodge at Chukhung

The journey from Chhukung to Island Peak Base Camp is a crucial, high-altitude segment of the expedition. The trail initially heads south, crossing the Chhukung Khola, before gradually ascending along the moraine of the Imja Glacier, following the Imja Valley eastward. This trek, typically taking 3-4 hours, offers increasingly dramatic views as you gain elevation, passing the turn-off for Amphu Lapcha. Upon arrival at the sprawling base camp, nestled near the Imja Tsho, the focus immediately shifts to active acclimatization.

The afternoon is spent entirely dedicated to final preparations. Your guide will lead refresher course on the use of equipments and a detailed summit briefing, outlining the ascent route, current weather forecasts, safety protocols, and the very early morning wake-up call. This comprehensive preparation is fundamental for a safe and successful attempt on Island Peak's summit.

Vertical Ice Climbing Traning on Island Peak
Max Altitude: 5,150 m Meals: Breakfast, Lunch, and DinnerAccommodation: Shared Tent at Island Peak Base Camp

Summit day on Island Peak begins in the pre-dawn darkness, often around midnight or 1 AM, to maximize the chances of reaching the summit before high winds or deteriorating conditions set in. The initial ascent from base camp is a steep, challenging climb up a rock gully. This section, while not highly technical, demands careful footing and endurance in the thin air, typically taking 2-3 hours to navigate. Upon reaching the top of the gully, climbers arrive at Crampon Point, where they don their technical gear: crampons are affixed to boots, and harnesses are connected to safety lines.

From Crampon Point, the route transitions onto the Imja Glacier. This section involves traversing across the glacier, which can be undulating and may require navigating small crevasses or snow bridges, sometimes using ladders depending on conditions. The most demanding part of the climb is the final headwall, a steep snow and ice slope typically ranging from 40 to 50 degrees for approximately 250 to 300 meters. Here, fixed ropes are generally installed by the climbing guides, and climbers ascend using their jumar (ascender) for a secure, strenuous pull to the summit ridge. After a brief, exposed walk along the ridge, the exhilarating summit is reached, offering unparalleled panoramic views of Everest, Lhotse, Makalu, and Ama Dablam.

After celebrating the achievement and capturing photographs at the summit, the descent begins immediately, following the same route. The descent requires extreme caution, especially on the fixed ropes of the headwall (using abseil/rappelling techniques) and through the rocky gully, as most accidents occur during the downclimb due to fatigue. The goal is to return to Island Peak Base Camp, pack up, and then continue the long descent back to Chhukung. This entire summit day, including the climb and the full descent to Chhukung, is an exceptionally long and physically draining endeavor, often taking 10-12 hours in total. Reaching Chhukung signifies the successful completion of the Island Peak climbing adventure.

Climbers celebrating at Island Peak Summit
Max Altitude: 6,189 m Meals: Breakfast, Lunch, and DinnerAccommodation: Local Lodge at Chhukung

After the arduous Island Peak summit, today's journey will be quite easy as you descend only for a short while along the Imja Valley.

The trail immediately heads south-west, following the curving course of the Imja Khola (river). This stretch is a welcome break, characterized by a gentle, steady descent of approximately 320 meters over 4.5 to 5 kilometers, making it a soothing walk after the rigors of high passes or Chhukung Ri. The terrain underfoot is a mix of dusty, rocky ground and open meadows dotted with low, scrubby juniper bushes—a landscape stripped bare by the altitude, resembling a rugged Martian surface under Nepal's crisp blue sky.

As you walk, the immense Himalayan peaks dominate the panorama. Looking behind you (north-east), the glacier-laden mass of Lhotse (8,516 m) commands attention. However, the most stunning view is to the south, where the spectacular, serrated ridge of Ama Dablam (6,812 m) comes into full view. Its towering presence, often described as the "Matterhorn of the Himalayas," grows more imposing with every step toward Dingboche. The trail is marked by prayer-flag-strewn chortens and long, low mani walls, guiding you as you weave through the wide valley. The sound of the rushing Imja Khola, often partially frozen in the shadows, accompanies your path until you arrive at Dingboche (4,410 m), a larger, more established village with visible fields and stone-walled paddocks, signifying your return to the main Everest Base Camp trail and civilization.

Max Altitude: 4,410 m Meals: Breakfast, Lunch, and DinnerAccommodation: Local Lodge at Dingboche

From Dingboche onwards, the settlements and vegetation is sparse, the air thin and the land dry, almost like a dessert, but you will find yourself inching closer to your next challenge, Lobuche, with every breath.

The morning doesn't offer much in terms of change in views. You will arrive at Thukla by taking the high trail above the Lobuche river, and spend some time waiting for lunch. After the ascent, you arrive at a wide field where an Everest memorial park has been established in memory of those who've perished while trying to summit Everest. Stone cairns adorn the field and add a touch of melancholy. You will now follow the Lobuche river all the way to Lobuche village, the last permanent settlement on the EBC trail.

Max Altitude: 4,920 m Meals: Breakfast, Lunch, and DinnerAccommodation: Local Lodge at Lobuche

Your adventure intensifies today as you ascend from Lobuche village towards Lobuche High Camp – a vital leap towards the summit. The trail winds along the valley floor before ascending a shoulder, passing an initial "Base Camp" near a lake. The path then narrows and steepens, featuring some sections with ropes for assistance. Reaching the main tented High Camp, nestled in a hollow with a small lake, marks a pivotal moment. Here, amidst the growing excitement, you'll conduct a thorough gear check, preparing for the early morning summit attempt. This segment is key physical and mental preparation for your thrilling climb.

Max Altitude: 5,260 m Meals: Breakfast, Lunch & DinnerAccommodation: Shared tent at Lobuche High Camp

Today, you conquer the final challenge on your Everest 3 Peak Challenge climbing expedition.

The Lobuche East Peak summit push from High Camp is a brutal, all-night affair demanding technical skill and sheer resolve. You'll follow start around 2:00 or 3:00 AM and follow the trail north-eastward, moving over a challenging, unstable mix of rock and scree for the first 2 hours. This rocky segment, traversed in darkness, requires careful footing until the route crosses onto the glacier proper. Here, at the crampon point (typically around 5,700m), the technical phase begins. The route shifts east and then north-west, involving long stretches of steep snow and glacial ice where you'll ascend using fixed ropes secured by your guides. This is a sustained climb on slopes that can reach 40∘ to 45∘, testing leg strength and acclimatization to the extreme.

As dawn breaks, the route involves tackling the most challenging feature: the summit ridge - an exposed snow or ice knife-edge, requiring you to utilize their technical skills and the fixed lines for safety, navigating steep, icy pitches. Reaching the summit, typically between 6 to 9 AM, is rewarded with a vast, glittering spectacle. To the west, the pyramid of Pumori stands sentinel, while directly east and north-east, the Himalayan giants—Everest, Lhotse, and Nuptse—fill the horizon, offering unparalleled proximity to the world's highest peaks. The overall climb to the top takes approximately 5 to 7 hours. Following the celebratory moments, the descent begins immediately. It involves a critical process of rappelling (abseiling) down the fixed ropes over the steep ice and carefully descending the rocky sections back to High Camp. After packing up, the long trek continues south off the mountain, descending steeply past Lobuche village and into the open, wide valley of Pheriche.

Max Altitude: 6,119 m Meals: Breakfast, Lunch & DinnerAccommodation: Local Lodge at Pheriche

This day will act as a buffer day incase of bad weather or other unforseen circumstances that might halt your summit push.

Meals: Breakfast, Lunch & Dinner

It's all about the getting down now.

The hike begins with a gentle descent over open, rocky plains to the villages of Pangboche and Deboche, followed by a 1.5-hour climb through a rhododendron forest to reach the spectacular viewpoint of Tengboche Monastery (3,860m), where Everest, Lhotse, and Ama Dablam are clearly visible. After a steep, zig-zagging drop to the Dudh Koshi River at Phungi Thenga, the final 2-hour climb up "Namche Hill"—a sustained ascent over a stony path through the forest—until the trail finally traverses into the welcoming, amphitheater-shaped town of Namche Bazaar.

Max Altitude: 3,440 m Meals: Breakfast, Lunch & DinnerAccommodation: Local Lodge at Namche Bazar

Alas, your trek comes to an end today as you hike through the scenic yet busting villages on the Everest Base Camp highway to Lukla.

The trail is undulating but rewarding as the mountains keep you company. During peak season, the trail is packed with tourists; a welcome sight for the eyes and ears after weeks of solitude in the Himalayas. 

Max Altitude: 2,880 m Meals: Breakfast, Lunch & DinnerAccommodation: Local Lodge at Namche

You’ll fly back to Kathmandu and drive back to your hotel in Kathmandu. The whole day is at leisure.

During peak season, flights to Kathmandu from Lukla can be divereted to Ramechhap. In case of such scenarios, you'll fly out to Namche and drive partway to Mulkot on the first day and drive to Kathmandu on the next day.

Meals: BreakfastAccommodation: 3-star hotel in ThamelTransportation: Scheduled flight from Lukla to Kathmandu and private transfer to your hotel in Thamel

You'll have the day by yourself. We recommend souvenir shopping, a relaxing massage and good food in Thamel.

In the evening, we'll get together for a farewell dinner celebrating your trip in Nepal

Meals: Breakfast & DinnerAccommodation: 3-star hotel in Thamel

Depending upon your exit plans, with the most probable being your return flight back home, your guide or a representative will accompany you to the Tribhuvan International Airport

Meals: BreakfastTransportation: Private transfer to Tribhuvan International Airport

Trip Cost Details

Includes

The following are the list of services, also defined in the itinerary, included in the package cost for the Everest 3 Peak Challenge:

Flights, Land Transfers, Accommodation, and Meals

  • Airport transfers: As indicated in the program - international arrival & departure, and domestic drop & pickup - in a private air-conditioned vehicle
  • Trailhead Transfers: Private transfer from Kathmandu to Mulkot in a car, van or bus (depending upon group size) and from Mulkot to Pangom in a 4x4 (6 members per jeep)
  • Scheduled Flights: Lukla-Kathmandu flight
  • Accommodation in Kathmandu: 3 nights in a 3-star hotel at Hotel Thamel Park in a twin sharing
  • Accommodation in Mulkot: 1 night at Taj Riverside Resort & Adventure on twin sharing
  • Meals in Kathmandu: 3 breakfast at your hotel and 1 complimentary farewell dinner
  • Meals in Mulkot: 1 breakfast at your hotel

On The Trek

  • Accommodation: Local lodges/tea houses as available on the trail on twin sharing
  • Meals: 3 meals a day with a cup of either tea or coffee or as defined in the itinerary
  • Additions: Seasonal fresh fruits, cookies, and water purification tablets (with advance notice)

Trek & Expedition Crew

  • Climbing Guide: English-speaking professional, experienced and licensed climbing guides
  • Trek Guide: English-speaking professional, experienced and licensed trek guide
  • Support Staff: Assistance guide for groups above 6, and 1 porter for every two members (one porter carries maximum 25-kilogram baggage)
  • Crew Insurance: Insurance for climbing guide, trek guide, assistant guide/s, and porter/s per Nepal government rule

Expedition Setup and Equipment

  • Camp Equipment: Dome tent with mattress on a twin sharing basis, Kitchen and Dining tent, Kitchen equipments, Toilet tent, Climbing rope: fixed and main rope
  • Climbing Equipment: Harness, Jummer, (Ascender), F-8 (descender), Crampons, Carabineers lock & unlock, Ice-screw, Rock piton, Ice -Axe, Helmet

Communication & Backup

  • Communication: 1 satellite phone
  • PowerElectricity on : Harness, Jummer, (Ascender), F-8 (descender), Crampons, Carabineers lock & unlock, Ice-screw, Rock piton, Ice -Axe, Helmet

Other Services

  • Permits: Sagarmath National Park (SNP) Permit, Khumbu Pasang Lhamu Rural Municipality (Trek Card), Makalu Barun National Park Permit (MBNP) Permit, Mera Peak Climbing Permit, Island Peak Climbing Permit, Lobuche East Climbing Permit
  • Gear: 1 duffel bag - to be returned after the trek
  • First-aid: Comprehensive medical kit equipped with an oximeter, 1 gammow bag for group above 4 (for smaller groups availble on demand at an additional cost)

Excludes

  • International airfare, Nepal visa fees (two passport photographs), travel and medical insurance, emergency evacuation costs.
  • Meals not specified in the itinerary and inclusions.
  • Personal expenses on the trip (snacks, chocolate bars, alcoholic and non-alcoholic beverages, hot showers, telephone and internet services, electricity charges at higher altitudes, laundry, etc.)
  • Costs arising from natural calamities, mishaps, or anything beyond our control.
  • Any costs incurred due to your voluntary departure from the expedition, including early return, are non-refundable.
  • Tips for guides and porters (while not obligatory, it is expected by your staff at the end of their service).
  • Personal items including but not limited to trekking gear (hiking poles, gaiters, sunglasses, etc.), clothing (shorts, shoes, slippers, etc.), and hygiene and toiletries (sunscreen, toilet paper, hand sanitizer).
  • Any service not specifically mentioned in the 'Services Includes' section.

Dates & Availability

Oct 2025
Mar 2026
Apr 2026
Departure Date
Status
Price
Departure Date
Starts: October 15, 2025Ends: November 13, 2025
Status
Available
Autumn
Price
US$3750

Apart from the below fixed departure dates, we can also organize private trips. For more information, please email us at info@himalayanecstasynepal.com

Essential Information

Best Time to Climb:

  • Spring (March to May): Offers stable weather, clear skies, and blooming rhododendrons at lower altitudes.
  • Autumn (September to November): Known for crisp air, excellent visibility, and moderate temperatures. Another highly recommended season.

Difficulty Level:

Acclimatization is Key: Our well-planned itinerary includes ample acclimatization days during the Island Peak Climbing expedition. Proper acclimatization significantly reduces the risk of Acute Mountain Sickness (AMS).

Itinerary Overview:

  • Himalayan Ecstasy's Everest 3 Peak Climbing Challenge itinerary starts at Pangom village (can change to Lukla if weather windows allows), and follows the Mera Peak climbing trail in the Hinku valley.
  • After climbing Mera Peak, you'll trek through the Hongku valley to cross the Amphu Lapcha Pass (a part of the high-altitude Great Himalaya Trail (GHT) that connects the Makalu and Everest regions and arrive at Chukhung.
  • From Chukhung, you'll trek to Island Peak base camp, summit Island Peak and trek to Lobuche via Dingboche.
  • The final leg of the challenge starts with a short trek to Lobuche East Peak high camp. After climbing Lobuche East Peak, you'll descend to Pheriche, and follow the Everest Base Camp trail to Lukla.
  • Our Everest 3 Peak Climbing Challenge lasts 30 days. It can be shortened using private helicopter transfer to the trailhead and trailend, or be extended to include additional acclimatization days.

Training & Preparation:

  • Begin 4-6 months prior to your trip.
  • Focus on cardiovascular endurance: running, cycling, swimming, long-distance hiking (especially with a weighted backpack).
  • Include strength training: targeting legs, core, and upper body.
  • Practice multi-day hiking with a weighted pack to simulate trekking conditions.
  • If possible, gain prior mountaineering experience or take a basic mountaineering course to become familiar with technical gear and rope work. Familiarity with abseiling/rappelling is crucial.

Essential Gear:

  • Technical Climbing Gear: Mountaineering boots (crampon-compatible), crampons, ice axe, climbing harness, ascender (jumar), descender (figure-of-eight or ATC), helmet, locking carabiners.
  • Clothing: Layering system (base, mid-insulation, outer waterproof/windproof shells), warm down jacket, insulated pants, thermal underwear, multiple pairs of warm socks, waterproof gloves/mittens.
  • Trekking Gear: Large duffel bag (provided by Himalayan Ecstasy Nepal), daypack, trekking poles, headlamp with extra batteries, high-quality sleeping bag (-15°C to -20°C comfort rating), sunglasses (glacier glasses), sun hat, warm hat/balaclava.
  • Personal Items: Water bottles/hydration bladder, water purification tablets/filter, toiletries, personal first-aid kit, high-energy snacks.

Guides and Support:

Experienced and certified climbing guides and a trek crew to provide crucial safety, logistical support, and technical expertise.

Permits and Logistics

All necessary permits for the trek and the 3 Peaks (Mera Peak, Island Peak, and Lobuche East Peak) are included in the cost of the trip and will be managed by Himalayan Ecstasy Nepal. For specific details, please check the Includes section under Cost Details

Equipment Lists

Success and comfort on your Everest 3 Climbing Expedition hinge on proper preparation, and your equipment list is central to this. This comprehensive guide outlines every essential item, from high-performance apparel to specialized trekking tools, ensuring your safety and readiness for the diverse Himalayan environment. We urge you to review this list thoroughly; having the right gear is non-negotiable for an enjoyable and secure adventure.

image of mountain climbing gear including gloves, water bottle, helmer, ropes, carbiner, medical kit, and walkie-talkie
Mountain climbing gear provided by Himalayan Ecstasy Nepal's for Everest 3 Peak Expedition

Sun Hat (Wide-Brimmed or Baseball Cap):

hat for trekking

  • Purpose: Essential for protection from the strong Himalayan sun at lower altitudes and even at higher altitudes where UV radiation is intense. A wide-brimmed hat offers more comprehensive face and neck protection.
  • Material: Lightweight, breathable, quick-drying.

Beanie / Warm Fleece Hat:

beanie for trek

  • Purpose: For warmth, especially in the mornings, evenings, and at higher altitudes where temperatures drop significantly.
  • Material: Fleece, wool, or synthetic insulation. Something that covers your ears well.

Buff / Neck Gaiter / Balaclava:

Buff, Neck Gaiter, and Balaclava

  • Purpose: Highly versatile. Can be used as a neck warmer, pulled up over the face for dust/wind protection, worn as a headband, or even as a light hat. A full balaclava is excellent for extreme cold and wind, especially at higher camps or on pass days.
  • Material: Fleece, merino wool, or synthetic stretch fabric.

Headlamp (with extra batteries):

head lamp

  • Purpose: Absolutely crucial for early morning starts (especially for Kala Patthar), navigating around the lodge at night, or if you're delayed on the trail.
  • Features: Brightness levels, red light option (preserves night vision), long battery life.

Headband (Optional but useful):

head band

  • Purpose: For managing hair, wicking sweat, or providing light ear warmth without the bulk of a full hat.

Key Considerations for all Headgear:

  • Layering: Just like clothing, you'll layer your headgear. You might start with a beanie and a buff in the morning, switch to a sun hat during the day, and put the beanie back on in the evening.
  • Protection: The sun's intensity at altitude is often underestimated. Ensure good UV protection. Wind can also be a major factor, causing significant heat loss.
  • Comfort: Choose items that fit well and don't chafe, as you'll be wearing them for long periods.
  • Quick-Drying: Essential, especially for beanies or buffs that might get damp from sweat or light precipitation.

Base Layers (Wicking/Thermal Undershirts):

thermal undershirt

  • Purpose: Wicks sweat away from your body to keep you dry and regulate temperature. This is the foundation of your comfort.
  • Material: Lightweight and mid-weight merino wool or synthetic (polyester, polypropylene). Avoid cotton entirely, as it absorbs moisture and will chill you.
  • Recommended: 2-3 long-sleeved base layers; optionally, 1 short-sleeved for warmer days at lower altitudes.

Mid-Layers (Insulating/Fleece Jackets):

fleece jacket

  • Purpose: To provide warmth by trapping air. You'll add or remove these layers as the temperature fluctuates throughout the day.
  • Material:
    1. Lightweight Fleece (100-200 weight): Ideal for active trekking and mild cold. (1 piece)
    2. Mid-weight Fleece (200-300 weight) or a thin synthetic insulated jacket: For colder conditions and higher altitudes. (1 piece)
  • Recommended: 2 versatile fleece or insulating jackets of varying thickness.

Outer Shell (Waterproof & Windproof Jacket):

outer shell

  • Purpose: Your primary protection against wind, rain, and snow. It doesn't primarily add warmth, but it keeps you dry and protects your insulating layers from the elements.
  • Material: High-quality waterproof and breathable fabric (e.g., Gore-Tex, eVent, or similar). Look for features like sealed seams, an adjustable hood, and pit zips for ventilation.
  • Recommended: 1 durable, waterproof, and windproof hardshell jacket.

Down Jacket (or Heavy Synthetic Puffy Jacket):

down jacket

  • Purpose: Your essential warmth layer for extreme cold, especially in the evenings, mornings, and at high camps (above 4,000 meters), or during breaks.
  • Material: High-fill power down (e.g., 600-800 fill) for excellent warmth-to-weight ratio and packability, or a very warm, high-quality synthetic equivalent.
  • Recommended: 1 very warm, packable down or synthetic insulated jacket.

Key Considerations for Upper Body Protection:

  • Layering is Key: The ability to add or shed layers is paramount for comfort and safety. Never rely on just one or two thick items.
  • "Cotton Kills": Avoid cotton clothing at all costs, as it retains moisture and dramatically increases heat loss.
  • Zippers and Vents: Ensure your layers have full or half zippers, and your shell jacket has pit zips for quick ventilation during strenuous activity.
  • Fit: Layers should fit comfortably over each other without being too bulky or restrictive, allowing for good circulation.

Gloves

Lightweight Liner Gloves (Fleece or Merino Wool):

  • Purpose: These are your base layer. They provide a surprising amount of warmth, wick away sweat, and allow for dexterity for tasks like operating cameras, adjusting zippers, or handling trekking poles without exposing bare skin to cold.
  • Material: Thin fleece, merino wool, or synthetic wicking fabric.

Warm Fleece Gloves / Softshell Gloves:

  • Purpose: Your mid-layer. These provide more insulation than liners and are good for colder days at mid to higher altitudes when you still need some dexterity. They offer decent wind resistance.
  • Material: Mid-weight fleece, softshell fabric, or a blend.

Insulated Mittens (Waterproof/Windproof):

  • Purpose: Your outer, warmest layer, especially for early morning ascents (Kala Patthar), and evenings at higher camps. Mittens are generally warmer than gloves because they allow your fingers to share warmth.
  • Material: Outer shell should be waterproof and windproof (e.g., Gore-Tex, Pertex). Inner insulation should be down or high-loft synthetic. They should be large enough to wear over your liner gloves.

Heavy Duty Gloves (Optional but recommended for very cold sensitive hands or harsher conditions):

  • Purpose: A heavier, more insulated version of the fleece or softshell gloves, offering more warmth than typical mid-layers but still some dexterity compared to full mittens. Can be an alternative to or complement mittens.

Key Considerations for Hand Protection:

  • Layering: The most important concept. You'll layer your gloves just like your clothing. On a cold morning, you might wear liners inside your fleece gloves, or fleece gloves inside your mittens.
  • Waterproof/Windproof Outer Layer: Essential for high altitudes where snow, strong winds, and freezing temperatures are common. Wet hands lose heat rapidly.
  • Dexterity: While warmth is key, ensure you can still perform basic tasks. You'll find yourself taking gloves off less often if you have liners for fine motor skills.
  • Fit: Gloves and mittens should fit well – not too tight (restricts circulation) and not too loose (reduces warmth and dexterity).
  • Backup Pair: It's always a good idea to have a spare pair of liner gloves or a basic warm glove, as gloves can get wet or lost.

Base Layers (Thermal Leggings / Long Underwear):

  • Purpose: To wick sweat away from your skin, keeping you dry and preventing chafing. They provide foundational warmth.
  • Material: Lightweight and mid-weight merino wool or synthetic (polyester). Crucially, avoid cotton, as it retains moisture and chills you.
  • Recommended: 2-3 pairs for rotation.

Trekking Trousers (Durable & Quick-Drying):

  • Purpose: Your primary outer layer for trekking in most conditions.
  • Material: Made from durable, quick-drying nylon or a nylon/spandex blend for comfort and flexibility. Look for features like reinforced knees or articulated (pre-shaped) knees for better movement.
  • Recommended: 1-2 pairs. Convertible trousers (with zip-off legs) can offer versatility for warmer days at lower altitudes.

Softshell Trousers (Optional but Highly Recommended for Higher Altitudes):

  • Purpose: Provides excellent warmth and significant wind resistance, while offering more breathability and flexibility than a hard shell. They often have some water repellency. These are ideal for colder days at higher elevations or when crossing passes.
  • Material: Stretchy, durable softshell fabric.
  • Recommended: 1 pair, to be worn over base layers.

Hardshell / Rain Trousers (Waterproof & Windproof):

  • Purpose: Essential outer layer for complete protection against rain, snow, and severe winds.
  • Material: A high-quality waterproof and breathable membrane (e.g., Gore-Tex, eVent, or similar). Look for full-length side zippers, which are invaluable for putting them on/taking them off easily over boots and for ventilation.
  • Recommended: 1 pair.

Warm Camp Trousers (Optional but adds great comfort):

  • Purpose: A comfortable, warm pair of fleece pants, or lightweight down/synthetic insulated pants specifically for wearing around the teahouse in the evenings. They are excellent for warmth when static or for sleeping in on very cold nights.
  • Recommended: 1 pair (look for packable and compressible options).

Key Considerations for Lower Body Protection:

  • Layering System: The ability to combine or shed layers is paramount for adapting to the wide temperature swings and varying exertion levels.
  • Mobility: Choose pants that offer excellent freedom of movement, especially important on challenging ascents and descents.
  • Quick-Drying: All lower body layers should be quick-drying. Wet pants can lead to chafing and rapid heat loss.
  • Fit: Ensure layers fit comfortably over one another without bunching or being too tight (which can restrict blood flow and reduce warmth).
  • Durability: Trekking pants endure significant wear and tear. Invest in robust materials.
  • Avoid Cotton: Cotton material is unsuitable for trekking as it absorbs moisture, becomes heavy, and loses all insulating properties when wet.

Waterproof Trekking Boots (Mid to High-Cut):

  • Purpose: These are your most crucial piece of gear. They provide essential ankle support, stability on uneven and rocky trails, insulation from cold, and protection from moisture (snow, mud, stream crossings).
  • Features: Look for reputable brands known for their durability and comfort. Choose boots with a mid to high-cut design for optimal ankle support. They must be waterproof (e.g., with a Gore-Tex or similar lining) yet breathable. The sole should be stiff enough for rocky terrain but offer enough flex for comfortable walking.
  • Crucial Tip: Break-in Period: It is absolutely essential to break in your new boots thoroughly before the trek. Wear them on multiple long walks, ideally including some uphill and downhill sections, to mold them to your feet and identify any hot spots. New, unbroken-in boots are the leading cause of blisters.

Climbing Boots

  • Quality Single or Double Boots (insulated)

Camp Shoes / Lodge Shoes / Sandals:

  • Purpose: Provides immense relief for your feet after a long day of trekking. They are perfect for wearing around the teahouse, short strolls, or bathroom breaks at night, allowing your feet to breathe and recover.
  • Features: Lightweight, easy to slip on and off. Crocs, sturdy sandals, or comfortable slip-on shoes are popular choices.

Trekking Socks:

  • Purpose: Crucial for cushioning, wicking moisture away from your skin, regulating temperature, and preventing blisters.
  • Material: Opt for high-quality merino wool or good synthetic blends. Never wear cotton socks for trekking, as they absorb sweat, stay wet, and are a primary cause of blisters and cold feet.
  • Quantity: Bring 3-4 pairs of thick, warm trekking socks (for cushioning and warmth) and 2-3 pairs of thinner liner socks (optional, worn under thick socks, they can help reduce friction and prevent blisters).

Gaiters (Optional but Recommended):

  • Purpose: These are protective covers that attach to your boot and extend up your lower leg. They are excellent for preventing snow, scree, dirt, small rocks, or even leeches (at lower altitudes) from getting into your boots.
  • Features: Look for waterproof and breathable options. Mid-calf height is generally sufficient for most conditions.

Key Considerations for Your Footwear:

  • Fit is King: Ensure all footwear, especially your boots, fits perfectly with your trekking socks. Boots that are too tight restrict circulation (leading to cold feet), while boots that are too loose cause rubbing and blisters.
  • Moisture Management: While waterproof boots keep external water out, moisture-wicking socks are vital to keep your feet dry from sweat. Change socks regularly.
  • Blister Prevention: Be proactive! Address any hot spots immediately with moleskin or blister plasters. Carry a small personal blister kit.
  • Foot Hygiene: Daily foot care, including washing and drying your feet thoroughly, is important for overall foot health on the trek.

Passport:

  • Purpose: Your primary identification for international travel to and from Nepal, and for various trek permits.
  • Details: Must be valid for at least six months beyond your intended stay.

Nepal Visa:

  • Purpose: Required for legal entry into Nepal.
  • Details: Can be obtained upon arrival at Tribhuvan International Airport (TIA) in Kathmandu, or secured in advance from a Nepalese embassy or consulate in your home country. You'll typically need 2-4 passport-sized photographs for this.

Airline Tickets / E-tickets:

  • Purpose: For your international flights to and from Kathmandu, as well as your crucial domestic flights within Nepal (e.g., Kathmandu-Lukla-Kathmandu).
  • Details: Carry printouts and keep digital copies accessible on your phone or in cloud storage.

Travel and Medical Insurance Policy:

  • Purpose: Absolutely critical. This insurance should cover medical emergencies, emergency evacuation (especially helicopter evacuation from high altitudes), trip cancellation/interruption, and lost luggage.
  • Details: Carry a copy of your policy, emergency contact numbers for your insurance provider, and your policy number. Verify that high-altitude trekking up to your maximum elevation is explicitly covered.

Medical Information (Highly Recommended):

  • Purpose: Vital in case of a medical emergency.
  • Details: A small card or note listing any allergies (medications, food), existing medical conditions, current prescription medications (including generic names), and emergency contact information for your doctor.

Emergency Contact Information:

  • Purpose: For quick reference in unforeseen circumstances.
  • Details: List contact details for your next of kin, your tour operator's emergency number, and your country's embassy or consulate in Nepal.

Credit/Debit Cards & Cash (Nepalese Rupees):

  • Purpose: For payments for personal expenses, souvenirs, and tips. ATMs are generally scarce above Namche Bazaar, so cash is essential on the trail.
  • Details: Inform your bank about your travel dates to prevent card suspension. Keep emergency cash in a separate, secure location.

Passport-sized Photographs:

  • Purpose: Bring several extra copies (at least 4-6). They are frequently needed for permits, unexpected forms, or in case of lost documents.

Key Considerations for Your Travel Documents:

  • Originals and Copies: Always carry original documents, but keep high-quality photocopies (both physical and digital) stored separately from the originals. This is your safeguard if originals are lost or stolen.
  • Protection: Store all important documents in a waterproof and durable pouch or bag within your daypack and main luggage.
  • Accessibility: Keep your passport, visa, and trekking permits easily accessible, as they will be required for check-ins and checkpoints.
  • Digital Backups: Scan or photograph all critical documents and save them to a secure cloud service (like Google Drive, Dropbox) or email them to yourself and a trusted contact.
  • Security: Utilize a money belt or secure inner pockets for your passport, large sums of cash, and credit cards, especially in crowded areas.

Sunscreen (High SPF):

  • Minimum SPF 30, preferably 50+. The sun's UV radiation is significantly stronger at altitude. Opt for a broad-spectrum, water-resistant formula. A stick formula can be convenient for face and ears.

Toothbrush & Toothpaste:

  • A lightweight toothbrush and a small, travel-sized tube of toothpaste. Consider a biodegradable option.

Biodegradable Soap / All-in-One Wash:

  • A small bar of biodegradable soap or a travel-sized bottle of biodegradable all-in-one body wash/shampoo. This is crucial for minimizing environmental impact when water might drain into local ecosystems.

Dry Shampoo / Cleansing Wipes:

  • Highly recommended for waterless hair washing when showers are unavailable or too cold. Biodegradable body wipes are excellent for quick "sponge baths."

Moisturizer / Lotion:

  • A small tube is essential. The high altitude and dry, cold air can severely dehydrate and chafe your skin.

Lip Balm (with SPF):

  • Absolutely critical. High UV exposure, wind, and cold can cause severe chapping. Choose a lip balm with high SPF (30+). Bring at least two.

Hand Sanitizer:

  • Indispensable for maintaining hygiene, especially before meals and after using teahouse facilities where water for handwashing may be limited or freezing cold.

Toilet Paper:

  • Essential to carry your own. While some lodges provide it, it's not guaranteed, especially for use on the trail. Pack it in a waterproof bag. Remember to pack out all used paper (do not leave it on the trail).

Small Quick-Drying Towel (Microfiber):

  • A lightweight, compact microfiber towel is great for quick washes or drying after the occasional hot shower (which usually comes with an extra charge).

Personal Medications:

  • Any prescription medications you require, plus a small supply of over-the-counter essentials like pain relievers, blister treatment, antiseptic wipes, and cold/flu remedies.

Feminine Hygiene Products (if applicable):

  • Pack an adequate supply, as availability in remote villages is extremely limited. Be prepared to pack out all used products.

Key Tips for Trekking Toiletries:

  • Go Minimalist: Every gram counts on the trek. Opt for travel sizes or decant into smaller containers.
  • Leak-Proof: Pressure changes at altitude can cause liquids to leak. Ensure all bottles are tightly sealed and ideally double-bagged.
  • Cold Protection: Keep liquids that can freeze (like toothpaste or contact lens solution) inside your sleeping bag at night.
  • Leave No Trace: Always pack out everything you pack in, including all waste from toiletries.

Energy Bars / Granola Bars:

  • Purpose: Provide quick, sustained energy.
  • Recommendation: Look for bars with a good balance of carbohydrates, protein, and healthy fats. Choose options that aren't overly reliant on sugar, to avoid energy crashes.

Nuts & Seeds:

  • Purpose: Excellent source of healthy fats, protein, fiber, and concentrated calories.
  • Recommendation: Almonds, walnuts, cashews, peanuts, pumpkin seeds, and sunflower seeds are all great choices. A mixed bag offers variety.

Dried Fruits:

  • Purpose: Deliver a quick energy boost from natural sugars, along with fiber and vitamins.
  • Recommendation: Raisins, apricots, dates, figs, cranberries, and mango slices are popular options.

Trail Mix (DIY or Pre-packaged):

  • Purpose: A versatile combination, often blending nuts, seeds, dried fruit, and sometimes a few chocolate pieces.
  • Recommendation: Customize your own mix with your favorite components or choose a high-quality pre-made blend.

Hard Candies / Gummy Bears / Jelly Beans:

  • Purpose: Offer an instant sugar rush for quick energy, can help with dry mouth or a sore throat, and provide a welcome morale boost.
  • Recommendation: Small, easy to carry, and non-messy options.

Chocolate (Dark Chocolate Recommended):

  • Purpose: High in calories, provides energy, and is a fantastic psychological pick-me-up. Dark chocolate offers additional antioxidants.
  • Recommendation: Pack robust bars that won't easily crush or melt (though melting is less of an issue at higher, colder altitudes).

Protein Bars / Jerky:

  • Purpose: Essential for muscle recovery and sustained fullness.
  • Recommendation: High-protein bars specifically designed for active individuals, or beef/vegan jerky for a savory protein source.

Nut Butter Packets:

  • Purpose: A super-dense source of calories and healthy fats.
  • Recommendation: Single-serving packets of peanut butter, almond butter, or other nut butters. Can be eaten directly or with crackers.

Crackers / Biscuits:

  • Purpose: Good carbohydrate source and can be a comforting, bland option if your stomach is sensitive at altitude.
  • Recommendation: Plain crackers or digestive biscuits.

Key Considerations for Your Trekking Snacks:

  • Taste at Altitude: Your taste buds can change at high altitudes. Bring a variety, as what you normally love might not appeal to you on the trek. Sometimes salty or blander foods are preferred.
  • Calorie-to-Weight Ratio: Prioritize snacks that pack a lot of energy for their weight, as every gram counts in your pack.
  • Durability & Packaging: Choose snacks that won't easily crush, melt, or make a mess. Ensure all packaging is airtight.
  • Pack Out All Waste: Always carry out all your snack wrappers and any other trash. Leave no trace in the pristine Himalayan environment.

Sleeping bag liner and a Synthetic/Down Sleeping Bag:

  • Purpose: To guarantee you stay warm in freezing mountain temperatures.
  • Recommendation: Aim for a sleeping bag with a "comfort rating" of at least -45°C (-49°F). This rating indicates the temperature at which an average person can sleep comfortably. If you're plaaning for a winter ascent, a bag rated for -73°C (-99°F) might be necessary. Always prioritize the "comfort" or "limit" rating over the "extreme" rating.

Key Considerations for Your Sleeping Bag:

  • Teahouse Nights: Lodges on the Everest 3 Peak Challenge trail provide warm duvets, and are sufficient for summer/spring treks. For winter, especially at higher altitudes, your sleeping bag is your primary source of warmth at night.
  • Protection: Always keep your sleeping bag in a waterproof stuff sack (even inside your duffel bag) to protect it from moisture.
  • Rental Option: If you don't plan to trek frequently in cold conditions, you can also rent a high-quality sleeping bag with Himalayan Ecstasy Nepal. Please contact us to inquire about availability
  • Air Out: Whenever possible, air out your sleeping bag during the day (e.g., at lunch stops if sunny) to remove moisture.

Your Daypack: The Essential Trail Companion

Your daypack is your constant partner on the Everest 3 Peak Challenge expedition, carrying all the immediate essentials you need for comfort, safety, and convenience during your daily hikes. Unlike your main duffel, which is carried by porters, your daypack stays with you, ensuring quick access to vital items. This is where you'll keep everything you might need between teahouse stops. Think of it as your portable base for a day's adventure – from staying hydrated and fueled to adapting to sudden weather changes.

Key Features to Look For:

  • Comfortable Fit: Paramount for multi-day trekking. Seek out adjustable padded shoulder straps, a breathable and padded back panel, and a functional hip belt. A good hip belt is vital for distributing the pack's weight comfortably onto your hips, taking pressure off your shoulders.
  • Hydration Compatible: A dedicated internal sleeve for a hydration reservoir (like a CamelBak) and a port for the drinking tube are highly convenient. This allows you to stay hydrated without constantly stopping to pull out a water bottle.
  • Accessible Pockets: Well-placed pockets are invaluable. Look for side pockets (ideal for water bottles or quick-grab items), a front stash pocket (for maps or a lightweight layer), and a top lid pocket (perfect for small items like a hat, gloves, lip balm, or sunscreen you need often).
  • Integrated Rain Cover: Essential protection for your daypack and its contents. Many quality daypacks come with a built-in, stowable rain cover. If not, purchase one separately.
  • Lightweight Design: Choose a daypack that is inherently light even when empty. Every extra gram adds up over hours and days of trekking.

Climbing Boots (excluded in the package)

  • Quality Single or Double Boots (insulated)

Climbing Gear (included in the package)

  • Harness
  • Crampons
  • Ice-Axe
  • Carabiner: lock/ unlock
  • Ice-screws
  • Snow Anchor
  • Rock Piton
  • Helmet
  • Ascender (Jumar)
  • Figure-8 Descender
  • Poncho or Umbrella
  • Plastics for cover your personal bag
  • Camera /memory stucks
  • Mosquito protect creams (required only summer)

Everest 3 Peak Challenge - 30 Days FAQs

While previous experience helps, the 3 peaks; Mera Peak, Island Peak and Lobuche East Peak - are often considered excellent peaks for beginners in Himalayan climbing. Basic mountaineering skills like using crampons, ice axes, and fixed ropes are taught during the expedition by your guides. However, you should have excellent physical fitness and completed high passes trek like the Everest 3 Passes Trek, Manaslu Circuit Trek or similar treks above 5,000 meters.

You need to be fit with excellent cardiovascular endurance. The 3 Peak climbing challenge involves multiple days of strenuous trekking at high altitudes, demanding summit days that can last 10-14 hours. Regular training (cardio, strength, hiking with weight) for 4-6 months prior is strongly recommended.

Altitude sickness (AMS) is a significant concern. Our well-planned itinerary includes proper acclimatization days which are crucial to mitigate risks.

Additionaly, our guides are trained to recognize symptoms. Staying hydrated, eating well, and ascending gradually are key. We suggest you dicuss any concerns with your physician before the trip.

You'll sleep in local lodges/tea houses on twin sharing where available. During the peak climbing sections (base camp and high camp) and the Amphu Lapcha pass crossing, you will stay in dome tents on twin sharing option.

In teahouses, you'll find a variety of local and international dishes (Dal Bhat, noodles, rice, pasta, etc.). Bottled water is available for purchase (increasingly expensive at higher altitudes) at local lodges/tea houses, or you can use purification tablets/filters.

During camping (either during the pass crossing or peak climbing), your crew will prepare nutritious meals. You'll be provided with boiled water on the camping sections.

Please Note: It's recommended to stick to vegetarian options at higher altitudes to minimize the risk of stomach issues.

Most lodges offer electricity, but at higher altitude you'll have to pay a fee to use charge your phone and devices.

During camping, solar powered lights will be availble to light your tents. Additionally, a solar powered setup will be provided to charge your phone, head lights, etc.But you'll need to inform us if you plan to charge camera batteries or other special equipment. A sufficient power source can be arranged upon request at an additional cost.

You can also bring your own power bank or portable solar charger, as long as the weight is within the porterage or if you plan to carry it yourself. Additional porters can also be arranged upon request at an additional cost.

The Everest 3 Peak Challenge is a fixed departure program with the maximum number of participants won't exceed 8 people.

For private groups, the maximum members will be limited to 14 members.

Our itinerary includes buffer days in case of unfavorable weather or minor health issues. In case of serious illness or injury, emergency evacuation (usually by helicopter) can be arranged, but it's crucial to have comprehensive travel and rescue insurance that covers high-altitude mountaineering.

Yes, the following climbing gears will be provided (to be returned after completion of the trip);

  • Harness,
  • Jumar (Ascender),
  • F-8 (Descender),
  • Crampons,
  • Carabineers (lock & unlock),
  • Ice-screw,
  • Rock piton,
  • Ice -Axe,
  • Helmet

Other essential climbing gears like climbing boots, clothing, head lamps/flash lights, sleeping bag, etc. aren't provided. Some can be rented in Kathmandu and some need to be purchased. For more details, please email us your questions to info@himalayanecstasynepal.com.

The permit cost for the Mera Peak, Island Peak, and Lobuche East Peak is different based on seasons.

Mountain/Peak

Spring

Autumn

Winter

Summer

Mera Peak | 6,461 m USD 350 USD 175 USD 175 USD 175
Lobuche East | 6,189 m USD 350 USD 175 USD 175 USD 175
Imja Tse (Island Peak) | 6,189 m USD 350 USD 175 USD 175 USD 175

The changes in the permits, ultimately affect the cost of the expedition - hence the difference.

Plan Your Trip