Island Peak:
Your accessible yet challenging introduction to Himalayan climbing, offering unparalleled Everest region views.
View Photos
Island Peak Climbing - 18 Days
Trip Overview
Duration18 Days
Trip GradeChallenging
CountryNepal
Maximum Altitude6,189 m
Group Size2 - 14 pax
StartsKathmandu
EndsKathmandu
ActivitiesTrekking, Mountaineering, Peak Climbing
Best TimeMar-May | Sep-Dec
Highlights
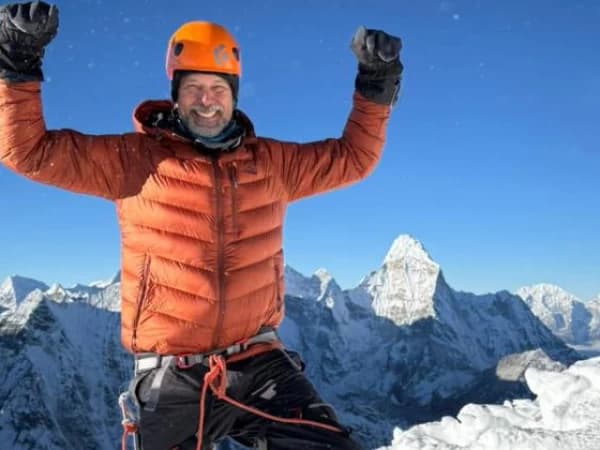
- Summit Island Peak (6,189m): Achieve a significant mountaineering feat by summiting this iconic peak, offering an unparalleled introduction to Himalayan climbing.
- Panoramic Himalayan Views: From the summit, witness a breathtaking 360-degree panorama of giants like Lhotse (8,501m), Makalu (8,475m), and Ama Dablam (6,856m).
- Everest Region Trek: Journey through the legendary Khumbu Valley, experiencing famous Sherpa villages like Namche Bazaar and the spiritual Tengboche Monastery.
- Acclimatization and Training: Benefit from a carefully planned itinerary with essential acclimatization hikes, preparing you for the summit push while offering additional stunning views.
- Learn Core Mountaineering Skills: Gain practical experience with crampons, ice axes, and fixed ropes, taught by experienced guides, building a foundation for future high-altitude climbs.
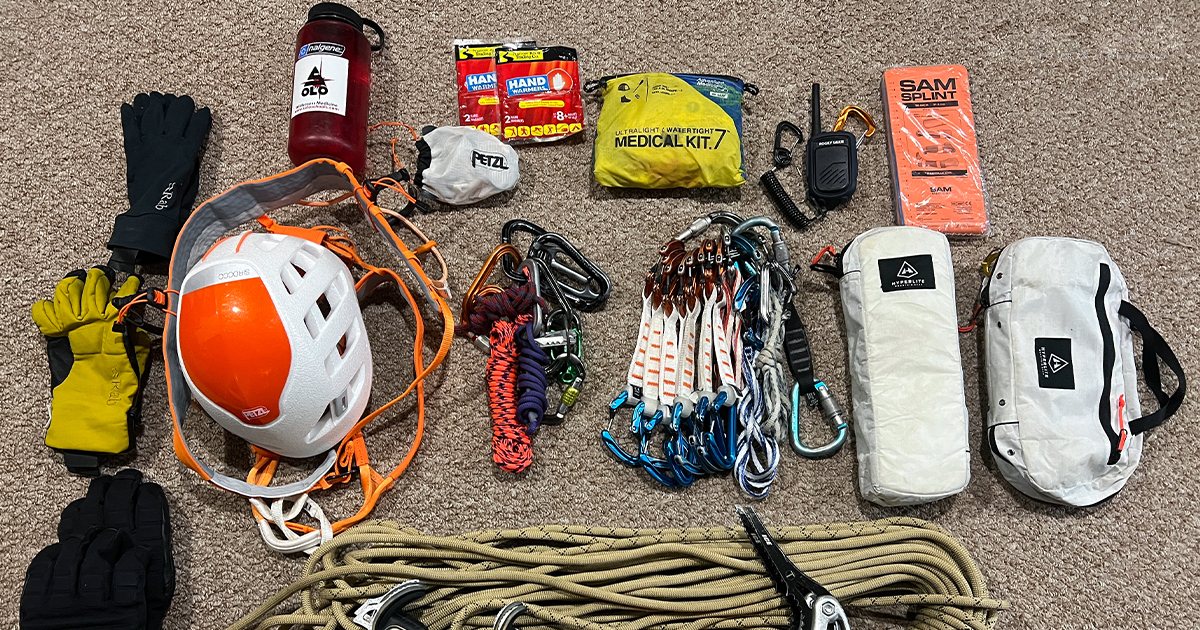
- Climbing gear included: Harness, Jummer, (Ascender), F-8 (descender), Crampons, Carabineers lock & unlock, Ice-screw, Rock piton, Ice -Axe, Helmet
Nestled amidst the colossal peaks of the Khumbu, Island Peak, or Imja Tse, beckons as an ideal objective for adventurous trekkers eager to take their first step into the world of technical mountaineering. Rising majestically from the Imja Khola valley, this expedition seamlessly blends the classic trek through vibrant Sherpa villages and breathtaking landscapes with the thrill of a guided climb. Your journey unfolds through picturesque stops like Dingboche and Chhukung, allowing for crucial acclimatization.
The expedition progresses to Island Peak Base Camp, a high-altitude sanctuary where a dedicated day is spent mastering essential climbing techniques—from crampon use and ice axe handling to critical rope work like jumaring and abseiling. This vital training prepares you for the exhilarating summit push, which begins in the pre-dawn hours. The ascent involves navigating a steep rock gully, traversing the Imja Glacier (often crossing crevasses), and tackling a challenging fixed-rope headwall. The reward from the 6,189m summit is an unparalleled 360-degree panorama of the world's highest mountains, including Everest, Lhotse, Makalu, and Ama Dablam. This meticulously planned expedition offers a challenging yet achievable high-altitude climbing experience, guided by experienced Sherpa teams dedicated to your safety and success.
Your Gateway to Himalayan Summits
From its distinctive island-like appearance amidst a sea of ice, Island Peak captivates and inspires. As you ascend its flanks, you'll navigate a classic alpine route that combines trekking through high-altitude valleys with a thrilling final climb. The route typically involves traversing a glacier, crossing crevasses (often with fixed ladders depending on conditions), and tackling a steep headwall of snow and ice using fixed ropes. The panoramic views from the higher camps and, most significantly, the summit are simply unparalleled, offering a breathtaking tapestry of the surrounding giants, including Everest, Lhotse, Makalu, and Ama Dablam. Each step on Island Peak is a testament to your endurance and the raw, untamed beauty of the Himalayas.
The Challenge and Your Preparation
The Island Peak Climbing Expedition is a serious undertaking that demands excellent physical fitness and a good level of technical comfort. While considered a "trekking peak," it requires proficiency in using essential climbing equipment such as crampons, ice axes, and ascenders (jumars) for the final summit push. You'll need to be comfortable walking on snow and ice, often on steep slopes, and be capable of ascending and descending fixed ropes. Prior experience with basic mountaineering skills or a willingness to learn and practice during the pre-climb training sessions at Base Camp is essential. This expedition is ideal for strong trekkers looking to take their first step into the world of technical mountaineering.
Your Ascent, Our Expertise
Himalayan Ecstasy's Island Peak Climbing Expedition is led by experienced and certified Sherpa climbing guides who possess an intimate knowledge of the mountain and its intricacies. We provide comprehensive logistical support, including high-quality camping equipment, carefully planned acclimatization schedules, and a strong emphasis on safety throughout your journey. Our expert guidance ensures you have the best possible chance of reaching the summit while minimizing risks, allowing you to focus on the incredible experience of high-altitude climbing.
Island Peak Climbing - 18 Days Itinerary
You can merge this trip with the Clockwise Three Passes Trek (Renjo La, Cho La, Kongma La) for an epic adventure across the Himalayas.
If interested, please email us for more information.
Kathmandu to KathmanduExpand all
Depending on how you plan to arrive at Kathmandu, we will arrange for you to rendezvous at your hotel in Thamel. In most cases, you will arrive at Kathmandu via Tribhuvan International Airport where you will meet your guide who will accompany you to your hotel.
In the evening, you will join for a program briefing with your group members. In case you arrive late at night, you will meet your group members the next day at breakfast during which you will also be briefed about your program. Accommodation: 3-star hotel in Kathmandu
Today, you will embark on a walking tour of two UNESCO heritage sites; the Swayambhunath Stupa and the Kathmandu Durbar Square.
The Swayambhunath Stupa lies atop a hill north-west of Thamel. It is the oldest religious site in Nepal and an important pilgrimage site for both Hindus and Buddhists. The main temple complex overlooks the Kathmandu valley and in the olden days offered clear views of the Kathmandu Durbar Square and the old city of Kathmandu.
Bidding farewell to the sights and sounds at Swayamabhunath, you will head towards the Kathmandu Durbar Square (palace courtyard). The courtyard is a complex of structures of the royal palaces, quadrangles, towers, temples, and monuments of the Malla kings of Kathmandu. Plus, you will also get to visit the palace museum which are now open to visitors. The 2015 Nepal earthquake landed significant damages to the palace but renovations are in full swing. Click this link to know more about Kathmandu Durbar Square.
After Kathmandu Durbar Square, you will head back to your hotel in Thamel via the Asan Market, the traditional bustling market area and a hub of Newari culture where for centuries merchants from India and Tibet, alongside farmers and others, have fared their goods. The market offers everything; from foodstuff and traditional spices to electronics. But keep in mind the narrow streets lined with a mix of old traditional houses with ornately carved doors and window frames, important temples, and modern concrete houses, and a bustling crowd of shoppers.
At Thamel, you will attend a last-minute brief on your Everest Three Passes Trek and prepare all required essentials, and in the evening join a group dinner to celebrate your arrival in Nepal
You will start early for the long day ahead with a quick tea and drive to Kathmandu domestic airport for a scenic flight to Lukla, the gateway to Khumbu. In clear weather, you will have ample views of the Himalayas as you fly over rivers, forests, mountain passes and tiny settlements.
At Lukla, you will be welcomed by majestic views of Mt. Karyolung (6465 m), Mt. Khatang (6776 m), Mt. Nupla (5869 m), and the rest of your trek crew. After sorting out your bags, you will begin the day's hike on a gentle undulating trail high above the Dudh Koshi river.
On the trail, you will get to interact with the local Sherpa people who are mostly Buddhists. The major attractions of the day include the suspension bridge crossing over the landslide at Ghat, a huge boulder painted with Tibetan scriptures, and a mane wall just before arriving at Phakding - your destination for the day. Also, the gorgeous Mt. Thamserku (6623m) will reveal itself and welcome you to the Himalayas just before you arrive at Phakding
Another superb day of hiking, you will start the day with a hearty mountain breakfast. The undulating trail can be challenging but equally rewarding. A few minutes our of Phakding, you might see wild honey bee hives high up on mountain cliffs. The trail gets exciting when you reach the landslide crossing at TokTok, and is followed by a small waterfall at Benkar. A river crossing above a suspension bridge after Benkar brings you to the quaint little hamlet of Monjo where you will need to show your National Park permits at a checkpoint. You will then continue to Jorsalle, where you can enjoy local cuisine with views of the famous twin suspension bridge over the Dudh Koshi river.
After lunch, you will cross the suspension bridge and begin a slow grueling climb up a steep trail to Namche. As you climb, during clear weather, you might get a first peek at Everest (8848m), Nuptse (7879m) and Lhotse (8383m) at Top Danda. Once you arrive at the bustling town of Namche, you have the rest of the day at leisure to either explore the town and indulge in luxury - proper coffee and delicious bakery, shop for gears at one of the many stores in town or just call it a day with a book in your lodge
You will begin your acclimatization routine of gradually climbing high today. In the morning, you can explore the beautiful town of Namche, visit the local museum, and explore the nooks and crannies in search of yourself.
After lunch, you will hike to Khumjung and Khunde, where you can visit the Khumjung Hillary School and the Khunde monastery. Also, we suggest climbing down to the Everest view point for a panoramic sunset over the Himalayas
Your day begins with a short, 20-minute descent to Sansa, followed by a further descent to Phunke Tenga, a serene hamlet nestled beside the Dudh Koshi River. After a nourishing lunch, you'll ascend steeply to Tengboche through a captivating forest of pine, juniper, rhododendron, and Himalayan birch. At the summit of the climb lies Tengboche village, home to the renowned Tengboche Monastery. After exploring this spiritual sanctuary, you'll gently descend through the enchanting forest to Deboche.
Please note:
This protected forest, part of Sagarmatha National Park, is a vital habitat for Alpine musk deer, inquisitive pikas, Eurasian lynx, red foxes, and other wildlife. We urge you to respect this delicate ecosystem and keep an eye out for rare wildlife sightings.
Today marks another milestone on your journey as you hike reach 4,000 m.
After breakfast, you will arrive at a river crossing over the Imja Khola that leads to Pangboche village. And just across the river, you will be greeted by the most stunning view of Ama Dablam; the marvelous mountain with its dazzling twin peaks and in full view is truly a sight to behold.
Every Sherpa village has a stone gate engraved with sacred prayers and scriptures, which the locals believe wards off evil spirits. At the Pangboche village stone gate, you will come across two paths; one leading to upper Pangboche where lies the Pangboche monastery, the most famous and oldest monastery of the Khumbu region, and the other trail that leads to the Pangboche village. The Pangboche monastery is also said to house a yeti skull, and is open for viewers.
From the Pangboche village, you will take the well-trodden higher trail to Somare (The lower trail across the village leads to the Imja river en-route to Ama Dablam base camp)
After a short walk, you will arrive at the 4,000m mark at Somare - beyond which vegetation is sparse. After lunch at Somare, you will continue on an even trail until you arrive at the climb up to the rim of the Dingboche valley. The Dingboche valley is shaped like a basin and has a few lodges. Hereon, electricity is a luxury as there are no transmission lines. The only source of electricity is batteries charged by solar panels – hence why you will need to pay to charge your phone and other electronics. Regardless of the hardships, on clear days, you are accompanied by superb scenery throughout the trail
Because you've crossed the 4,000 m mark, you will further the acclimatization routine by climbing high to Nangkartshang Peak and sleeping low at Dingboche.
Nangkartshang Peak lies directly north of the Dingboche valley. Except for some minor scrambling on some dirt and loose stones plus the altitude, it is for the most part an easy ascent to Nangkartshang. You will arrive at a panoramic view of Kangtega, Ama Dablam, Nuptse, Lhotse, Makalu, Cho Oyu, Taboche, along with three highest mountains in the world; Mt. Makalu (8,463m), Lhotse (8,749m), Cho Oyu (8,201m) in the horizon at the Nangkartshang Peak summit. Plus, Imja Glacier on the valley floor is a wonderful sight.
Today's trek from Dingboche to Chhukung is a relatively short and gentle transition further up the Imja Khola Valley, essential for acclimatization. Covering approximately 4-5 kilometers, the walk typically takes 2-3 hours. The trail is well-defined and gradually ascends, following the picturesque Imja Khola (river). Along the way, trekkers are treated to increasingly dramatic views of towering peaks such as Ama Dablam, Lhotse, Nuptse, and Island Peak itself becoming more prominent. Chhukung is a small, remote settlement that serves as the last teahouse stop before Island Peak Base Camp and a popular staging point for various acclimatization hikes, including Chukhung Ri.
For those seeking further acclimatization and spectacular panoramic views, an optional excursion to Chukhung Ri is highly recommended. This challenging side trip, often undertaken in the afternoon after reaching Chhukung or the following morning, involves a steep, sustained climb of approximately 3-4 hours from Chhukung to the summit. The ascent is demanding, primarily on rocky and scree-laden terrain, requiring steady footing but no technical climbing skills. From the top, the reward is an unparalleled 360-degree vista encompassing some of the world's highest mountains, including Makalu, Baruntse, and the entire Nuptse-Lhotse wall, offering a breathtaking perspective of the Everest region.
The journey from Chhukung to Island Peak Base Camp is a crucial, high-altitude segment of the expedition. The trail initially heads south, crossing the Chhukung Khola, before gradually ascending along the moraine of the Imja Glacier, following the Imja Valley eastward. This trek, typically taking 3-4 hours, offers increasingly dramatic views as you gain elevation, passing the turn-off for Amphu Lapcha. Upon arrival at the sprawling base camp, nestled near the Imja Tsho, the focus immediately shifts to active acclimatization.
The afternoon is spent entirely dedicated to rigorous training and final preparations. Your Island Peak mountain guide will lead practical sessions focusing on essential climbing skills. This includes mastering crampon use, effective ice axe techniques, and, critically, rope work. You'll practice jumaring (ascending fixed ropes) and abseiling (descending) on a simulated fixed line, building confidence and proficiency with the gear. The day culminates in a detailed summit briefing, outlining the ascent route, current weather forecasts, safety protocols, and the very early morning wake-up call. This comprehensive preparation is fundamental for a safe and successful attempt on Island Peak's summit.
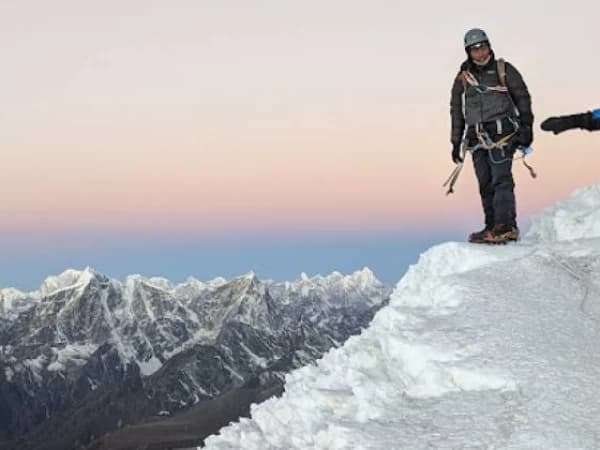
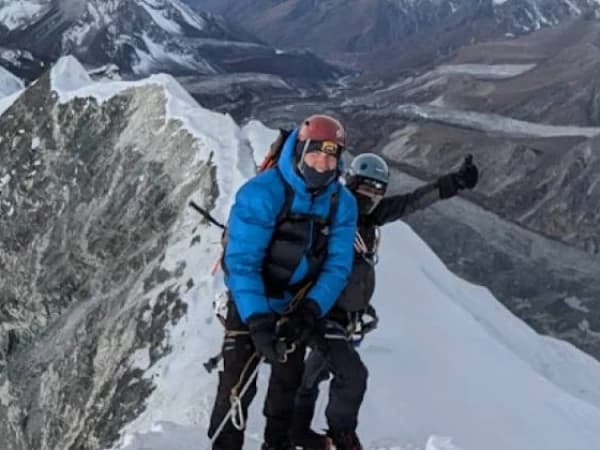
Summit day on Island Peak begins in the pre-dawn darkness, often around midnight or 1 AM, to maximize the chances of reaching the summit before high winds or deteriorating conditions set in. The initial ascent from base camp is a steep, challenging climb up a rock gully. This section, while not highly technical, demands careful footing and endurance in the thin air, typically taking 2-3 hours to navigate. Upon reaching the top of the gully, climbers arrive at Crampon Point, where they don their technical gear: crampons are affixed to boots, and harnesses are connected to safety lines.
From Crampon Point, the route transitions onto the Imja Glacier. This section involves traversing across the glacier, which can be undulating and may require navigating small crevasses or snow bridges, sometimes using ladders depending on conditions. The most demanding part of the climb is the final headwall, a steep snow and ice slope typically ranging from 40 to 50 degrees for approximately 250 to 300 meters. Here, fixed ropes are generally installed by the climbing guides, and climbers ascend using their jumar (ascender) for a secure, strenuous pull to the summit ridge. After a brief, exposed walk along the ridge, the exhilarating summit is reached, offering unparalleled panoramic views of Everest, Lhotse, Makalu, and Ama Dablam. The entire ascent to the summit can take 6-8 hours.
After celebrating the achievement and capturing photographs at the summit, the descent begins immediately, following the same route. The descent requires extreme caution, especially on the fixed ropes of the headwall (using abseil/rappelling techniques) and through the rocky gully, as most accidents occur during the downclimb due to fatigue. The goal is to return to Island Peak Base Camp, pack up, and then continue the long descent back to Chhukung. This entire summit day, including the climb and the full descent to Chhukung, is an exceptionally long and physically draining endeavor, often taking 10-14 hours in total. Reaching Chhukung signifies the successful completion of the Island Peak climbing adventure.
In case of bad weather or other unforseen circumstances, an additional contingency day is provided for your Island Peak Climbing adventure.
You'll retrace your steps back to Monjo following the Everest Base Camp highway via Tengboche.
It's you last night in the mountains blessed by the might Khumbila, the God of Khumbu. You'll follow the "Nepali Flats" to Lukla - the gateway of Khumbu and await your next day's flight to Kathmandu.
In the evening, it is customary to celebrate your journey with your crew with whom you've spend almost 2 weeks in the Himalayas.
You will catch an early morning flight back to Kathmandu and have the rest of the day at leisure. We recomment getting a soothing massage after handing out your laundry for cleaning and getting a scrumptious dinner at one of the eateries in town.
You've the full day at leisure. In the evening, we'll get together to celebrate your journey in Nepal.
Depending upon your exit plans, with the most probable being your return flight back home, your guide or a representative will accompany you to the Tribhuvan International Airport.
Trip Cost Details
Includes
The following are the list of services, also defined in the itinerary, included in the package cost for the Island peak Climbing Expedition:
Room and board in the city, transfers & flights
- Airport Transfers: 4 airport transfers (international arrival & departure, and domestic drop & pickup) in a private air-conditioned vehicle
- Accommodation in Kathmandu: 4 nights in a 3-star hotel at Hotel Thamel Park in Kathmandu
- Meals in Kathmandu: 4 breakfast at your hotel and 1 complimentary farewell dinner
- Scheduled Flights: Kathmandu-Lukla return flights
Room and board on the trek
- Accommodation: Twin sharing room on local lodges as available on the trail
- Meals: 3 meals a day with a cup of either tea or coffee or as defined in the itinerary
- Additions: Seasonal fresh fruits, cookies, and water purification tablets (with advance notice)
Trek & Expedition Crew
- Climbing Guide: An English-speaking professional, experienced and licensed climbing guide
- Support Staff: Assistance guide for groups above 6 and 1 porter for 2 guests (one porter carries maximum 25-kilogram baggage)
- Crew Insurance: Insurance for climbing guide, assistant guide/s, and porter/s per Nepal government rule
Expedition Setup and Equipment
- Camp Equipment: Dome tent with mattress on a twin sharing basis, Kitchen and Dining tent, Kitchen equipments, Toilet tent, Climbing rope: fixed and main rope
- Climbing Equipment: Harness, Jummer, (Ascender), F-8 (descender), Crampons, Carabineers lock & unlock, Ice-screw, Rock piton, Ice -Axe, Helmet
Other Services
- Permits: Sagarmath National Park (SNP) Permit, Khumbu Pasang Lhamu Rural Municipality (Trek Card), & Island Peak Climbing Permit
- Gear: 1 duffel bag - to be returned after the trek
- First-aid: Comprehensive medical kit equipped with an oximeter
Excludes
- International airfare, Nepal visa fees (two passport photographs), travel and medical insurance, emergency evacuation costs.
- Meals not specified in the itinerary and inclusions.
- Personal expenses on the trip (snacks, chocolate bars, alcoholic and non-alcoholic beverages, hot showers, telephone and internet services, electricity charges at higher altitudes, laundry, etc.).
- Costs arising from natural calamities, mishaps, or anything beyond our control.
- Any costs incurred due to your voluntary departure from the expedition, including early return, are non-refundable.
- Tips for guides and porters (while not obligatory, it is expected by your staff at the end of their service).
- Personal items including but not limited to trekking gear (hiking poles, gaiters, sunglasses, etc.), clothing (shorts, shoes, slippers, etc.), and hygiene and toiletries (sunscreen, toilet paper, hand sanitizer).
- Any service not specifically mentioned in the 'Services Includes' section.
Dates & Availability
Sep 2026
Oct 2026
Nov 2026
Mar 2027
Apr 2027
May 2027
Departure Date
Status
Price
Departure Date
Starts: September 27, 2026Ends: October 14, 2026Status
Available
Price
US$2175US$2350
Save US$175Himalayan Ecstast Nepal also organizes private Island Peak Climbing expeditions as per your requirements. Please email us for more information.
Trip Gallery
Add-ons & Options
2 Night 3 days Everest Base camp US$250 only top up with cost Island peak climbing
Essential Information
Best Time to Climb:
- Spring (March to May): Offers stable weather, clear skies, and blooming rhododendrons at lower altitudes. * It's popular, so trails can be busy.
- Autumn (September to November): Known for crisp air, excellent visibility, and moderate temperatures. Another highly recommended season.
- Winter (December to February): It is possible for Island Peak climbing expedition but much colder with increased snow and wind.
Difficulty Level:
Acclimatization is Key: A well-planned itinerary will include ample acclimatization days during the trek to base camp. This often involves spending extra nights at villages like Namche Bazaar and Dingboche, and taking side hikes to higher viewpoints. * Proper acclimatization significantly reduces the risk of Acute Mountain Sickness (AMS).
Itinerary Overview (Typical):
- Himalayan Ecstasy's Island Peak Climbing Expedition itinerary follows the classic Everest Base Camp trekking route up to Dingboche and diverts to Chhukung.
- From Chhukung, you trek to Island Peak Base Camp.
- Summit day is long and challenging, often starting in the early hours (2-3 AM) and lasting 10-14 hours.
- After the summit, you descend back to Chhukung or Island Peak Base Camp and then retrace your steps back to Lukla for your flight to Kathmandu.
- With Himalayan Ecstasy, you can summit Island Peak and return back home in 18 days including buffer days in Kathmandu and in the mountains.
Training & Preparation:
- Begin 4-6 months prior to your trip.
- Focus on cardiovascular endurance: running, cycling, swimming, long-distance hiking (especially with a weighted backpack).
- Include strength training: targeting legs, core, and upper body.
- Practice multi-day hiking with a weighted pack to simulate trekking conditions.
- If possible, gain prior mountaineering experience or take a basic mountaineering course to become familiar with technical gear and rope work. Familiarity with abseiling/rappelling is crucial.
Essential Gear:
- Technical Climbing Gear: Mountaineering boots (crampon-compatible), crampons, ice axe, climbing harness, ascender (jumar), descender (figure-of-eight or ATC), helmet, locking carabiners.
- Clothing: Layering system (base, mid-insulation, outer waterproof/windproof shells), warm down jacket, insulated pants, thermal underwear, multiple pairs of warm socks, waterproof gloves/mittens.
- Trekking Gear: Large duffel bag (provided by Himalayan Ecstasy Nepal), daypack, trekking poles, headlamp with extra batteries, high-quality sleeping bag (-15°C to -20°C comfort rating), sunglasses (glacier glasses), sun hat, warm hat/balaclava.
- Personal Items: Water bottles/hydration bladder, water purification tablets/filter, toiletries, personal first-aid kit, high-energy snacks.
Guides and Support:
Himalayan Ecstasy Nepal's experienced and certified climbing guides and a Sherpa support team provide crucial safety, logistical support, and technical expertise.
Key Details
- Island Peak is graded as 2B (Alpine Grading System), meaning it involves some technical sections but is generally considered "moderately difficult" for a peak climb.
- It requires proficiency in using crampons, ice axes, harness, and fixed ropes. Training on these skills is usually provided by your guides at base camp.
- The final 150-meter headwall is the most challenging part, a steep ascent requiring the use of a jumar (ascender) on fixed ropes. Descending this section using a figure-of-eight device is also critical.
- The climb is physically demanding, requiring excellent endurance and mental resilience.
Equipment Lists
Success and comfort on your Island Peak Climbing Expedition hinge on proper preparation, and your equipment list is central to this. This comprehensive guide outlines every essential item, from high-performance apparel to specialized trekking tools, ensuring your safety and readiness for the diverse Himalayan environment. We urge you to review this list thoroughly; having the right gear is non-negotiable for an enjoyable and secure adventure.
Head
Sun Hat (Wide-Brimmed or Baseball Cap):

- Purpose: Essential for protection from the strong Himalayan sun at lower altitudes and even at higher altitudes where UV radiation is intense. A wide-brimmed hat offers more comprehensive face and neck protection.
- Material: Lightweight, breathable, quick-drying.
Beanie / Warm Fleece Hat:

- Purpose: For warmth, especially in the mornings, evenings, and at higher altitudes where temperatures drop significantly.
- Material: Fleece, wool, or synthetic insulation. Something that covers your ears well.
Buff / Neck Gaiter / Balaclava:

- Purpose: Highly versatile. Can be used as a neck warmer, pulled up over the face for dust/wind protection, worn as a headband, or even as a light hat. A full balaclava is excellent for extreme cold and wind, especially at higher camps or on pass days.
- Material: Fleece, merino wool, or synthetic stretch fabric.
Headlamp (with extra batteries):

- Purpose: Absolutely crucial for early morning starts (especially for Kala Patthar), navigating around the lodge at night, or if you're delayed on the trail.
- Features: Brightness levels, red light option (preserves night vision), long battery life.
Headband (Optional but useful):

- Purpose: For managing hair, wicking sweat, or providing light ear warmth without the bulk of a full hat.
Key Considerations for all Headgear:
- Layering: Just like clothing, you'll layer your headgear. You might start with a beanie and a buff in the morning, switch to a sun hat during the day, and put the beanie back on in the evening.
- Protection: The sun's intensity at altitude is often underestimated. Ensure good UV protection. Wind can also be a major factor, causing significant heat loss.
- Comfort: Choose items that fit well and don't chafe, as you'll be wearing them for long periods.
- Quick-Drying: Essential, especially for beanies or buffs that might get damp from sweat or light precipitation.
Upper Body
Base Layers (Wicking/Thermal Undershirts):

- Purpose: Wicks sweat away from your body to keep you dry and regulate temperature. This is the foundation of your comfort.
- Material: Lightweight and mid-weight merino wool or synthetic (polyester, polypropylene). Avoid cotton entirely, as it absorbs moisture and will chill you.
- Recommended: 2-3 long-sleeved base layers; optionally, 1 short-sleeved for warmer days at lower altitudes.
Mid-Layers (Insulating/Fleece Jackets):

- Purpose: To provide warmth by trapping air. You'll add or remove these layers as the temperature fluctuates throughout the day.
- Material:
- Lightweight Fleece (100-200 weight): Ideal for active trekking and mild cold. (1 piece)
- Mid-weight Fleece (200-300 weight) or a thin synthetic insulated jacket: For colder conditions and higher altitudes. (1 piece)
- Recommended: 2 versatile fleece or insulating jackets of varying thickness.
Outer Shell (Waterproof & Windproof Jacket):

- Purpose: Your primary protection against wind, rain, and snow. It doesn't primarily add warmth, but it keeps you dry and protects your insulating layers from the elements.
- Material: High-quality waterproof and breathable fabric (e.g., Gore-Tex, eVent, or similar). Look for features like sealed seams, an adjustable hood, and pit zips for ventilation.
- Recommended: 1 durable, waterproof, and windproof hardshell jacket.
Down Jacket (or Heavy Synthetic Puffy Jacket):

- Purpose: Your essential warmth layer for extreme cold, especially in the evenings, mornings, and at high camps (above 4,000 meters), or during breaks.
- Material: High-fill power down (e.g., 600-800 fill) for excellent warmth-to-weight ratio and packability, or a very warm, high-quality synthetic equivalent.
- Recommended: 1 very warm, packable down or synthetic insulated jacket.
Key Considerations for Upper Body Protection:
- Layering is Key: The ability to add or shed layers is paramount for comfort and safety. Never rely on just one or two thick items.
- "Cotton Kills": Avoid cotton clothing at all costs, as it retains moisture and dramatically increases heat loss.
- Zippers and Vents: Ensure your layers have full or half zippers, and your shell jacket has pit zips for quick ventilation during strenuous activity.
- Fit: Layers should fit comfortably over each other without being too bulky or restrictive, allowing for good circulation.
Hands

Lightweight Liner Gloves (Fleece or Merino Wool):
- Purpose: These are your base layer. They provide a surprising amount of warmth, wick away sweat, and allow for dexterity for tasks like operating cameras, adjusting zippers, or handling trekking poles without exposing bare skin to cold.
- Material: Thin fleece, merino wool, or synthetic wicking fabric.
Warm Fleece Gloves / Softshell Gloves:
- Purpose: Your mid-layer. These provide more insulation than liners and are good for colder days at mid to higher altitudes when you still need some dexterity. They offer decent wind resistance.
- Material: Mid-weight fleece, softshell fabric, or a blend.
Insulated Mittens (Waterproof/Windproof):
- Purpose: Your outer, warmest layer, especially for early morning ascents (Kala Patthar), and evenings at higher camps. Mittens are generally warmer than gloves because they allow your fingers to share warmth.
- Material: Outer shell should be waterproof and windproof (e.g., Gore-Tex, Pertex). Inner insulation should be down or high-loft synthetic. They should be large enough to wear over your liner gloves.
Heavy Duty Gloves (Optional but recommended for very cold sensitive hands or harsher conditions):
- Purpose: A heavier, more insulated version of the fleece or softshell gloves, offering more warmth than typical mid-layers but still some dexterity compared to full mittens. Can be an alternative to or complement mittens.
Key Considerations for Hand Protection:
- Layering: The most important concept. You'll layer your gloves just like your clothing. On a cold morning, you might wear liners inside your fleece gloves, or fleece gloves inside your mittens.
- Waterproof/Windproof Outer Layer: Essential for high altitudes where snow, strong winds, and freezing temperatures are common. Wet hands lose heat rapidly.
- Dexterity: While warmth is key, ensure you can still perform basic tasks. You'll find yourself taking gloves off less often if you have liners for fine motor skills.
- Fit: Gloves and mittens should fit well – not too tight (restricts circulation) and not too loose (reduces warmth and dexterity).
- Backup Pair: It's always a good idea to have a spare pair of liner gloves or a basic warm glove, as gloves can get wet or lost.
Lower Body
Base Layers (Thermal Leggings / Long Underwear):
- Purpose: To wick sweat away from your skin, keeping you dry and preventing chafing. They provide foundational warmth.
- Material: Lightweight and mid-weight merino wool or synthetic (polyester). Crucially, avoid cotton, as it retains moisture and chills you.
- Recommended: 2-3 pairs for rotation.
Trekking Trousers (Durable & Quick-Drying):
- Purpose: Your primary outer layer for trekking in most conditions.
- Material: Made from durable, quick-drying nylon or a nylon/spandex blend for comfort and flexibility. Look for features like reinforced knees or articulated (pre-shaped) knees for better movement.
- Recommended: 1-2 pairs. Convertible trousers (with zip-off legs) can offer versatility for warmer days at lower altitudes.
Softshell Trousers (Optional but Highly Recommended for Higher Altitudes):
- Purpose: Provides excellent warmth and significant wind resistance, while offering more breathability and flexibility than a hard shell. They often have some water repellency. These are ideal for colder days at higher elevations or when crossing passes.
- Material: Stretchy, durable softshell fabric.
- Recommended: 1 pair, to be worn over base layers.
Hardshell / Rain Trousers (Waterproof & Windproof):
- Purpose: Essential outer layer for complete protection against rain, snow, and severe winds.
- Material: A high-quality waterproof and breathable membrane (e.g., Gore-Tex, eVent, or similar). Look for full-length side zippers, which are invaluable for putting them on/taking them off easily over boots and for ventilation.
- Recommended: 1 pair.
Warm Camp Trousers (Optional but adds great comfort):
- Purpose: A comfortable, warm pair of fleece pants, or lightweight down/synthetic insulated pants specifically for wearing around the teahouse in the evenings. They are excellent for warmth when static or for sleeping in on very cold nights.
- Recommended: 1 pair (look for packable and compressible options).
Key Considerations for Lower Body Protection:
- Layering System: The ability to combine or shed layers is paramount for adapting to the wide temperature swings and varying exertion levels.
- Mobility: Choose pants that offer excellent freedom of movement, especially important on challenging ascents and descents.
- Quick-Drying: All lower body layers should be quick-drying. Wet pants can lead to chafing and rapid heat loss.
- Fit: Ensure layers fit comfortably over one another without bunching or being too tight (which can restrict blood flow and reduce warmth).
- Durability: Trekking pants endure significant wear and tear. Invest in robust materials.
- Avoid Cotton: Cotton material is unsuitable for trekking as it absorbs moisture, becomes heavy, and loses all insulating properties when wet.
Foot Wear
Waterproof Trekking Boots (Mid to High-Cut):
- Purpose: These are your most crucial piece of gear. They provide essential ankle support, stability on uneven and rocky trails, insulation from cold, and protection from moisture (snow, mud, stream crossings).
- Features: Look for reputable brands known for their durability and comfort. Choose boots with a mid to high-cut design for optimal ankle support. They must be waterproof (e.g., with a Gore-Tex or similar lining) yet breathable. The sole should be stiff enough for rocky terrain but offer enough flex for comfortable walking.
- Crucial Tip: Break-in Period: It is absolutely essential to break in your new boots thoroughly before the trek. Wear them on multiple long walks, ideally including some uphill and downhill sections, to mold them to your feet and identify any hot spots. New, unbroken-in boots are the leading cause of blisters.
Climbing Boots
- Quality Single or Double Boots (insulated)
Camp Shoes / Lodge Shoes / Sandals:
- Purpose: Provides immense relief for your feet after a long day of trekking. They are perfect for wearing around the teahouse, short strolls, or bathroom breaks at night, allowing your feet to breathe and recover.
- Features: Lightweight, easy to slip on and off. Crocs, sturdy sandals, or comfortable slip-on shoes are popular choices.
Trekking Socks:
- Purpose: Crucial for cushioning, wicking moisture away from your skin, regulating temperature, and preventing blisters.
- Material: Opt for high-quality merino wool or good synthetic blends. Never wear cotton socks for trekking, as they absorb sweat, stay wet, and are a primary cause of blisters and cold feet.
- Quantity: Bring 3-4 pairs of thick, warm trekking socks (for cushioning and warmth) and 2-3 pairs of thinner liner socks (optional, worn under thick socks, they can help reduce friction and prevent blisters).
Gaiters (Optional but Recommended):
- Purpose: These are protective covers that attach to your boot and extend up your lower leg. They are excellent for preventing snow, scree, dirt, small rocks, or even leeches (at lower altitudes) from getting into your boots.
- Features: Look for waterproof and breathable options. Mid-calf height is generally sufficient for most conditions.
Key Considerations for Your Footwear:
- Fit is King: Ensure all footwear, especially your boots, fits perfectly with your trekking socks. Boots that are too tight restrict circulation (leading to cold feet), while boots that are too loose cause rubbing and blisters.
- Moisture Management: While waterproof boots keep external water out, moisture-wicking socks are vital to keep your feet dry from sweat. Change socks regularly.
- Blister Prevention: Be proactive! Address any hot spots immediately with moleskin or blister plasters. Carry a small personal blister kit.
- Foot Hygiene: Daily foot care, including washing and drying your feet thoroughly, is important for overall foot health on the trek.
Travel Documents
Passport:
- Purpose: Your primary identification for international travel to and from Nepal, and for various trek permits.
- Details: Must be valid for at least six months beyond your intended stay.
Nepal Visa:
- Purpose: Required for legal entry into Nepal.
- Details: Can be obtained upon arrival at Tribhuvan International Airport (TIA) in Kathmandu, or secured in advance from a Nepalese embassy or consulate in your home country. You'll typically need 2-4 passport-sized photographs for this.
Airline Tickets / E-tickets:
- Purpose: For your international flights to and from Kathmandu, as well as your crucial domestic flights within Nepal (e.g., Kathmandu-Lukla-Kathmandu).
- Details: Carry printouts and keep digital copies accessible on your phone or in cloud storage.
Travel and Medical Insurance Policy:
- Purpose: Absolutely critical. This insurance should cover medical emergencies, emergency evacuation (especially helicopter evacuation from high altitudes), trip cancellation/interruption, and lost luggage.
- Details: Carry a copy of your policy, emergency contact numbers for your insurance provider, and your policy number. Verify that high-altitude trekking up to your maximum elevation is explicitly covered.
Medical Information (Highly Recommended):
- Purpose: Vital in case of a medical emergency.
- Details: A small card or note listing any allergies (medications, food), existing medical conditions, current prescription medications (including generic names), and emergency contact information for your doctor.
Emergency Contact Information:
- Purpose: For quick reference in unforeseen circumstances.
- Details: List contact details for your next of kin, your tour operator's emergency number, and your country's embassy or consulate in Nepal.
Credit/Debit Cards & Cash (Nepalese Rupees):
- Purpose: For payments for personal expenses, souvenirs, and tips. ATMs are generally scarce above Namche Bazaar, so cash is essential on the trail.
- Details: Inform your bank about your travel dates to prevent card suspension. Keep emergency cash in a separate, secure location.
Passport-sized Photographs:
- Purpose: Bring several extra copies (at least 4-6). They are frequently needed for permits, unexpected forms, or in case of lost documents.
Key Considerations for Your Travel Documents:
- Originals and Copies: Always carry original documents, but keep high-quality photocopies (both physical and digital) stored separately from the originals. This is your safeguard if originals are lost or stolen.
- Protection: Store all important documents in a waterproof and durable pouch or bag within your daypack and main luggage.
- Accessibility: Keep your passport, visa, and trekking permits easily accessible, as they will be required for check-ins and checkpoints.
- Digital Backups: Scan or photograph all critical documents and save them to a secure cloud service (like Google Drive, Dropbox) or email them to yourself and a trusted contact.
- Security: Utilize a money belt or secure inner pockets for your passport, large sums of cash, and credit cards, especially in crowded areas.
Toiletries
Toothbrush & Toothpaste:
- A lightweight toothbrush and a small, travel-sized tube of toothpaste. Consider a biodegradable option.
Biodegradable Soap / All-in-One Wash:
- A small bar of biodegradable soap or a travel-sized bottle of biodegradable all-in-one body wash/shampoo. This is crucial for minimizing environmental impact when water might drain into local ecosystems.
Dry Shampoo / Cleansing Wipes:
- Highly recommended for waterless hair washing when showers are unavailable or too cold. Biodegradable body wipes are excellent for quick "sponge baths."
Moisturizer / Lotion:
- A small tube is essential. The high altitude and dry, cold air can severely dehydrate and chafe your skin.
Lip Balm (with SPF):
- Absolutely critical. High UV exposure, wind, and cold can cause severe chapping. Choose a lip balm with high SPF (30+). Bring at least two.
Sunscreen (High SPF):
- Minimum SPF 30, preferably 50+. The sun's UV radiation is significantly stronger at altitude. Opt for a broad-spectrum, water-resistant formula. A stick formula can be convenient for face and ears.
Hand Sanitizer:
- Indispensable for maintaining hygiene, especially before meals and after using teahouse facilities where water for handwashing may be limited or freezing cold.
Toilet Paper:
- Essential to carry your own. While some lodges provide it, it's not guaranteed, especially for use on the trail. Pack it in a waterproof bag. Remember to pack out all used paper (do not leave it on the trail).
Small Quick-Drying Towel (Microfiber):
- A lightweight, compact microfiber towel is great for quick washes or drying after the occasional hot shower (which usually comes with an extra charge).
Personal Medications:
- Any prescription medications you require, plus a small supply of over-the-counter essentials like pain relievers, blister treatment, antiseptic wipes, and cold/flu remedies.
Feminine Hygiene Products (if applicable):
- Pack an adequate supply, as availability in remote villages is extremely limited. Be prepared to pack out all used products.
Key Tips for Trekking Toiletries:
- Go Minimalist: Every gram counts on the trek. Opt for travel sizes or decant into smaller containers.
- Leak-Proof: Pressure changes at altitude can cause liquids to leak. Ensure all bottles are tightly sealed and ideally double-bagged.
- Cold Protection: Keep liquids that can freeze (like toothpaste or contact lens solution) inside your sleeping bag at night.
- Leave No Trace: Always pack out everything you pack in, including all waste from toiletries.
Eating & Drinking
Energy Bars / Granola Bars:
- Purpose: Provide quick, sustained energy.
- Recommendation: Look for bars with a good balance of carbohydrates, protein, and healthy fats. Choose options that aren't overly reliant on sugar, to avoid energy crashes.
Nuts & Seeds:
- Purpose: Excellent source of healthy fats, protein, fiber, and concentrated calories.
- Recommendation: Almonds, walnuts, cashews, peanuts, pumpkin seeds, and sunflower seeds are all great choices. A mixed bag offers variety.
Dried Fruits:
- Purpose: Deliver a quick energy boost from natural sugars, along with fiber and vitamins.
- Recommendation: Raisins, apricots, dates, figs, cranberries, and mango slices are popular options.
Trail Mix (DIY or Pre-packaged):
- Purpose: A versatile combination, often blending nuts, seeds, dried fruit, and sometimes a few chocolate pieces.
- Recommendation: Customize your own mix with your favorite components or choose a high-quality pre-made blend.
Hard Candies / Gummy Bears / Jelly Beans:
- Purpose: Offer an instant sugar rush for quick energy, can help with dry mouth or a sore throat, and provide a welcome morale boost.
- Recommendation: Small, easy to carry, and non-messy options.
Chocolate (Dark Chocolate Recommended):
- Purpose: High in calories, provides energy, and is a fantastic psychological pick-me-up. Dark chocolate offers additional antioxidants.
- Recommendation: Pack robust bars that won't easily crush or melt (though melting is less of an issue at higher, colder altitudes).
Protein Bars / Jerky:
- Purpose: Essential for muscle recovery and sustained fullness.
- Recommendation: High-protein bars specifically designed for active individuals, or beef/vegan jerky for a savory protein source.
Nut Butter Packets:
- Purpose: A super-dense source of calories and healthy fats.
- Recommendation: Single-serving packets of peanut butter, almond butter, or other nut butters. Can be eaten directly or with crackers.
Crackers / Biscuits:
- Purpose: Good carbohydrate source and can be a comforting, bland option if your stomach is sensitive at altitude.
- Recommendation: Plain crackers or digestive biscuits.
Key Considerations for Your Trekking Snacks:
- Taste at Altitude: Your taste buds can change at high altitudes. Bring a variety, as what you normally love might not appeal to you on the trek. Sometimes salty or blander foods are preferred.
- Calorie-to-Weight Ratio: Prioritize snacks that pack a lot of energy for their weight, as every gram counts in your pack.
- Durability & Packaging: Choose snacks that won't easily crush, melt, or make a mess. Ensure all packaging is airtight.
- Pack Out All Waste: Always carry out all your snack wrappers and any other trash. Leave no trace in the pristine Himalayan environment.
Sleeping Bags
Sleeping bag liner and a Synthetic/Down Sleeping Bag:
- Purpose: To guarantee you stay warm in freezing mountain temperatures.
- Recommendation: Aim for a sleeping bag with a "comfort rating" of at least -45°C (-49°F). This rating indicates the temperature at which an average person can sleep comfortably. If you're plaaning for a winter ascent, a bag rated for -73°C (-99°F) might be necessary. Always prioritize the "comfort" or "limit" rating over the "extreme" rating.
Key Considerations for Your Sleeping Bag:
- Teahouse Nights: Lodges on the Island Peak trail provide warm duvets, and are sufficient for summer/spring treks. For winter, especially at higher altitudes, your sleeping bag is your primary source of warmth at night.
- Protection: Always keep your sleeping bag in a waterproof stuff sack (even inside your duffel bag) to protect it from moisture.
- Rental Option: If you don't plan to trek frequently in cold conditions, you can also rent a high-quality sleeping bag with Himalayan Ecstasy Nepal. Please contact us to inquire about availability
- Air Out: Whenever possible, air out your sleeping bag during the day (e.g., at lunch stops if sunny) to remove moisture.
Bag Packs
Your Daypack: The Essential Trail Companion
Your daypack is your constant partner on the Island Peak Climbing expedition, carrying all the immediate essentials you need for comfort, safety, and convenience during your daily hikes. Unlike your main duffel, which is carried by porters, your daypack stays with you, ensuring quick access to vital items. This is where you'll keep everything you might need between teahouse stops. Think of it as your portable base for a day's adventure – from staying hydrated and fueled to adapting to sudden weather changes.
Key Features to Look For:
- Comfortable Fit: Paramount for multi-day trekking. Seek out adjustable padded shoulder straps, a breathable and padded back panel, and a functional hip belt. A good hip belt is vital for distributing the pack's weight comfortably onto your hips, taking pressure off your shoulders.
- Hydration Compatible: A dedicated internal sleeve for a hydration reservoir (like a CamelBak) and a port for the drinking tube are highly convenient. This allows you to stay hydrated without constantly stopping to pull out a water bottle.
- Accessible Pockets: Well-placed pockets are invaluable. Look for side pockets (ideal for water bottles or quick-grab items), a front stash pocket (for maps or a lightweight layer), and a top lid pocket (perfect for small items like a hat, gloves, lip balm, or sunscreen you need often).
- Integrated Rain Cover: Essential protection for your daypack and its contents. Many quality daypacks come with a built-in, stowable rain cover. If not, purchase one separately.
- Lightweight Design: Choose a daypack that is inherently light even when empty. Every extra gram adds up over hours and days of trekking.
Climbing Equipments
- Harness
- Crampons
- Ice-Axe
- Carabiner: lock/ unlock
- Ice-screws
- Snow Anchor
- Rock Piton
- Helmet
- Ascender (Jumar)
- Figure-8 Descender
- Sling/Tape
- Climbing Boot
Miscellaneous
- Poncho or Umbrella
- Plastics for cover your personal bag
- Camera /memory stucks
- Mosquito protect creams (required only summer)
Island Peak Climbing - 18 Days FAQs
While previous experience helps, Island Peak is often considered an excellent peak for beginners in Himalayan climbing. Basic mountaineering skills like using crampons, ice axes, and fixed ropes are taught during the expedition by your guides. However, you should have strong trekking experience and excellent physical fitness.
You need to be highly fit with excellent cardiovascular endurance. The expedition involves multiple days of strenuous trekking at high altitudes, followed by a demanding summit day that can last 10-14 hours. Regular training (cardio, strength, hiking with weight) for 4-6 months prior is strongly recommended.
Altitude sickness (AMS) is a significant concern. A well-planned itinerary with sufficient acclimatization days is crucial to mitigate risks. Guides are trained to recognize symptoms. Staying hydrated, eating well, and ascending gradually are key. Discuss any concerns with your doctor before the trip.
During the trek to Island Peak Base Camp, you will stay in teahouses, which offer basic lodge accommodation with shared rooms. At Island Peak Base Camp and potentially High Camp, you will stay in tented accommodation set up by your climbing crew.
In teahouses, you'll find a variety of local and international dishes (Dal Bhat, noodles, rice, pasta, etc.). At climbing camps, your Sherpa crew will prepare meals. It's recommended to stick to vegetarian options at higher altitudes to minimize the risk of stomach issues. For water, bottled water is available for purchase (increasingly expensive at higher altitudes), or you can use purification tablets/filters with boiled water from teahouses.
Yes, most teahouses offer charging facilities for a fee. It's advisable to bring a power bank or portable solar charger, especially for the climbing camps where electricity might be limited.
You will typically need a Sagarmatha National Park Permit, a Khumbu Pasang Lhamu Rural Municipality Permit (local permit), and an Island Peak Climbing Permit issued by the Nepal Mountaineering Association (NMA). Himalayan Ecstasy Nepal will usually arrange these for you.
Our group sized for the Island Peak Climbing Expedition starts from 2 members up to to 14 members.
Our itinerary includes buffer days in case of unfavorable weather or minor health issues. In case of serious illness or injury, emergency evacuation (usually by helicopter) can be arranged, but it's crucial to have comprehensive travel and rescue insurance that covers high-altitude mountaineering.
Yes, many trekking shops in Kathmandu and even in Namche Bazaar or Chhukung offer rental services for mountaineering gear like boots, crampons, ice axes, harnesses, and down jackets. However, for critical personal items like boots, we recommended to use your own well broken-in gear.