Manaslu offers a remote and authentic Himalayan climbing experience, far less crowded than Everest or Lhotse. This expedition is ideal for climbers seeking solitude combined with a technical mixed climb on rock, ice, and snow. Located in Nepal’s Gorkha and Manaslu region (Latitude: 28.5497° N, Longitude: 84.5597° E), we provide full-board services and experienced guide support with options to choose Company Service or Permit and Join Service too. With a focus on teamwork, climbers benefit from private teams that allow a more focused, personal ascent. Manaslu is perfect for those wanting adventure, remote landscapes, and a rewarding summit challenge.
Mt. Manaslu Expedition 8163m in 37 Days
EXPEDITION REQUIREMENTS
- Previous High-Altitude Experience (mandatory): Climbers must have successfully ascended at least one 7,000m peak (recently) as per the latest regulations.
- Valid Climbing Permit: Issued by the Department of Tourism, Nepal.
- Registered Expedition Agency: The climb must be organized through a government-registered trekking/climbing agency like Himalayan Ecstasy Nepal (HEN).
- Experienced Guide Requirement: A licensed climbing guide (Sirdar/Guide) must be assigned to the expedition.
- Travel & Rescue Insurance: Comprehensive insurance covering high-altitude evacuation (helicopter rescue) is mandatory.
- Medical Fitness: A recent medical certificate confirming you are fit for extreme high-altitude climbing.
- Logistics & Documentation: Valid passport, visa, and all required expedition paperwork.
EXPEDITION HIGHLIGHTS
- Summit Mount Manaslu (8,163 m), the eighth-highest mountain in the world.
- Difficulty or Grade Level: Moderate to challenging expedition, suitable for experienced climbers with prior 7,000m peak experience.
- Follow the classic expedition route through the remote Budhi Gandaki Valley.
- Trek through traditional Himalayan villages including Deng, Namrung, Shyala, and Samagaun.
- Fully equipped Manaslu Base Camp (4,900 m) with professional expedition infrastructure.
- Participate in the traditional Puja ceremony before the climb begins.
- Strategic acclimatization rotations across Camp I, II, and III.
- Climb glaciers, crevasses, and steep snow slopes using fixed ropes and technical gear.
- Execute the final summit push via Camp IV (7,600 m) in the extreme high-altitude zone.
- Enjoy spectacular summit views of Annapurna, Dhaulagiri, Himal Chuli, and Ngadi Chuli.
- Full-board expedition with experienced Sherpa guides and professional logistics.
- Responsible expedition with base camp cleanup and Leave No Trace principles.
EXPEDITION CHALLENGES
- Technical Difficulty (C1 to C2): The Icefall section between Camp 1 and Camp 2 is the most technically challenging part of the standard route. Rated PD+ (Peu Difficile Plus) to AD (Assez Difficile), it involves navigating steep ice headwalls and deep crevasses, often via aluminum ladders, requiring continuous fixed-rope work.
- Altitude and Endurance: The slopes from Camp 2 upwards are highly exposed to extreme winds and cold. Operating at altitudes above 7,000 meters, especially in the final push to the summit, is physically brutal and demands maximum endurance.
- Avalanche Risks: While avalanches are common on the mountain due to its massive snow load, our experienced Sherpa route-fixing team is trained to set the route away from potential avalanche sites.
- Objective Hazards: Like any major Himalayan peak, objective dangers such as serac fall, crevasses on the glacial approach, and the potential for sudden weather changes are prevalent.
The Ascent Plan
- Base Camp to Camp 1: Navigating the Manaslu Glacier - Ascend over moraines and the lower reaches of the glacier to arrive at Camp 1. This section is generally non-technical but you'll need to climb used fixed ropes on steep sections, and may need to cross crevasses on ladders.
- Camp 1 to Camp 2: Traversing the Icefall and Headwall - The most technical section of the expedition, climbing the dynamic Manaslu Icefall and tackling the steep ice headwall. Deep crevasses poise a significant challenge.
- Camp 2 to Camp 3: High Altitude Terrain - The climb is comparatively less complex in technicality than the section between C1 and C2, but the mountain's exposed upper flanks, the steep slopes, the thin air (53.5% air with 41.7% effective oxygen available) and prolong exposure to extreme cold (-15°C to -20°C at night) and strong winds a.k.a. the Manaslu Roar makes everything challenging.
- Summit Push: After a fews days rest followed by the rotations till C3, you will depart basecamp aiming for the summit. You'll sleep 1 night at each camp and and setup a final camp at Camp 4 (7,600 m) before the summit push. The route is generally straightforward until the highly exposed knife-edge summit ridge, which requires Herculean effort and focus.
IMPORTANT: Essential High-Altitude Gear & Safety Notice
For a successful Manaslu Expedition, having the right high-altitude equipment is not optional. These are critical for both safety and performance in extreme conditions.
- Supplemental Oxygen: It is strongly recommended to plan for an extra oxygen bottle in advance. This acts as a safety backup during summit push or emergencies.
- Mask and Regulator: Among the most important pieces of equipment. They must be in proper working condition. Any malfunction at high altitude can directly impact your ability to breathe and continue safely.
- Down Suit: A high-quality down suit is essential to withstand extreme cold conditions during higher camps and summit attempts.
- High-Altitude Mountaineering Boots: Reliable brands such as Scarpa or La Sportiva are recommended for proper insulation and support.
- Sleeping Bag (-50°C): A high-performance sleeping bag is necessary to ensure proper rest and protection against extreme temperatures.
- Gloves: Insulated, high-quality gloves are required to prevent frostbite and maintain dexterity.
- Helmet: A good-quality helmet is essential for protection in rocky and exposed sections.
Proper planning and ensuring the quality of these essential items play a vital role in the overall success and safety of the expedition.
Ever dreamt of standing on top of one of the world’s highest peaks? Summiting Everest is most adventurers’ dream, but it can be difficult for first-timers. So, choosing to do the Manaslu Expedition is going to be the best preparatory trek considering its realistic altitude training.
Standing on top of the 8,163-meter-tall Mt. Manaslu is a majestic Himalayan experience for sure! The eighth-highest mountain in the world offers not just breathtaking views, but also remote trails and a secluded experience.
Moreover, it’s a comparatively budget-friendly expedition from the other summits too. The start of the journey itself is simple, with comfortable accommodations and passing through traditional villages. You’ll cross numerous suspension bridges above the Budhi Gandaki River and even get the chance to immerse yourself in Tibetan-Buddhist culture.
Passing via the villages of Machhakhola, Jagat, Philim, Deng, Bihi, Gap, Namrung, Lhi, Lho, Shyala, and Samagaun, you’ll reach Manaslu Base Camp, the same route that trekkers follow when doing the Manaslu Circuit Trek.
After proper rest, acclimatization, and participation in a traditional Puja ceremony, the 37-day full-board Manaslu Expedition organized by Himalayan Ecstasy Nepal unfolds!
The upcoming days are when you start your expedition, with the first phase involving rotations between higher camps (Base Camp > C1 > C2 > C3 > back to BC). This prepares your body, and you attain the right mountaineering skills for the final summit attempt.
Your summit push shall be on the 21 to 26-day period, with a few days added as contingency for safety. You’ll be accompanied by professional guides throughout your Manaslu Expedition, so worry less on logistics part and focus on your physical as well as mental preparation.
Once you summit the eighth-highest mountain in the world, you’ll descend safely and reach Base Camp. On the final day, you’ll clean the base camp, ensuring that you follow the ‘no trace’ principle and wave goodbye to Mount Manaslu and the Mansiri Himal range.
The journey ends with the same return via the Nubri Valley and then to Jagat (you have the option to go for Larke Pass and reach Annapurna CA too) as you enjoy the final moments in the mountains. And upon returning to Kathmandu, we’ll have farewell celebrations for your Manaslu Expedition attempt.
Ready to explore more of this 37-day Manaslu Expedition package brought to you by Himalayan Ecstasy Nepal? Let’s dive in.
Flexible Expedition Packages: Choose What Works for You
At Himalayan Ecstasy Nepal, we understand that every climber comes with a different level of experience, a different budget, and a different idea of how much support they need on the mountain. That is why we have structured the Manaslu Expedition into three flexible options.
And here is something important to know upfront: you do not need a group to book. Individual climbers are welcome. If you are coming solo, we handle the official formalities by coordinating your documentation and permits with other registered expedition groups on the same mountain. You climb your own journey. We take care of the paperwork.
Option A: Full Board Expedition
The complete, fully managed experience from Kathmandu to the summit and back.
Everything is handled by our team including airport pickup, hotel stays, official briefings at the Ministry of Tourism, all trekking and expedition permits, licensed Sherpa guides and their insurance, porter support, liaison officer facilitation, full base camp infrastructure (dining tent, kitchen tent, sleeping tents, communication equipment), high-altitude cooks, route fixing, camp establishment, weather monitoring, and summit support.
You focus entirely on climbing. We handle everything else!
Option B: Company Service (Budget Expedition)
A more minimal arrangement for experienced climbers who prefer to manage certain aspects independently. HEN takes care of all the essential official requirements, including your expedition permit, Sherpa and his insurance, porter support, trekking permit, and liaison officer facilitation. Transportation from Kathmandu to Base Camp is also arranged.
Beyond that, climbers take on greater personal responsibility for their own logistics and gear. A cost-effective option without compromising on the non-negotiables.
Option C: Permit and Join Service
The most flexible and budget-friendly option. HEN arranges your climbing permit and all required official documentation, then coordinates your placement within an existing expedition group heading to Manaslu in the same season. Base camp to summit support and base camp services are included.
This one's ideal for self-sufficient climbers who have their own team and gear but need the official framework and mountain logistics handled professionally!
Why Manaslu Is Now the First Choice for 8,000m Climbers?
There is a reason Manaslu has become one of the most sought-after 8,000m expeditions in recent years, and it goes beyond just the mountain itself.
For a long time, Cho Oyu in Tibet was the preferred first 8,000m objective for many mountaineers. It was considered more accessible and slightly less technical than other giants. But the situation changed dramatically when the Chinese and Tibetan authorities began cancelling permits at the last minute due to internal political issues.
Climbers were arriving with months of preparation behind them only to have their expeditions cancelled with almost no notice. On top of that, peak permits, climbing guide costs, and kitchen crew expenses in Tibet began rising rapidly, making Cho Oyu increasingly unviable. Manaslu stepped in as the natural alternative, and it has earned that position on its own merits.
It sits in Nepal, where the permit system is transparent and reliable. It is the eighth-highest mountain in the world, which means the altitude training you get here is genuine preparation for Everest or any other 8,000m peak.
The route is challenging but not the most technically extreme among the giants, which makes it the most appropriate first 8,000m objective for serious mountaineers. And the approach through the remote Budhi Gandaki Valley adds a cultural and scenic richness that you simply do not get on many other expeditions at this level.
If summiting an 8,000m peak is your dream, Manaslu is thus where that journey realistically and wisely begins!
Your Climbing Guide: More Than Just a Leader
The guides at Himalayan Ecstasy Nepal are not just experienced mountaineers. They are the people who make your dream of standing on an 8,000m summit actually possible.
Every single day on the mountain, your guide/sherpa is working to keep you safe, keep you moving, and keep your confidence steady when the altitude and exhaustion start weighing on you. They know the route, they read the weather, and they make the calls that protect you when conditions shift.
Think of them like a mother's hand, always there to care for you and keep you safe throughout the expedition. Every single day on the mountain, your guide gives everything to make your ascent successful and your dream of conquering Manaslu real. A tip after the summit is appreciated, but what truly matters is your review and your story. That is what helps more climbers find HEN, and what makes future expeditions possible for others chasing the same dream.
Journey to Manaslu: Explore Remote Valleys and Nubri Culture

Your Manaslu expedition begins long before you reach the mountain itself. After arriving in Kathmandu and completing the official mountaineering briefing at the Ministry of Tourism, your journey continues with a scenic drive toward the remote Budhi Gandaki Valley in the Gorkha district.
From the village of Jagat, the expedition transitions into a multi-day trek through one of Nepal’s most preserved Himalayan regions. The trail gradually climbs through dense forests of bamboo, rhododendron, and pine while following the powerful Budhi Gandaki River upstream.
As you move deeper into the valley, the landscape slowly transforms. Subtropical hills give way to alpine terrain while traditional Tibetan-influenced villages such as Deng, Namrung, Shyala, and Samagaun appear along the route.
Prayer flags flutter above stone houses, mani walls line the trails, and ancient monasteries remind you that the Manaslu region is as culturally rich as it is geographically dramatic.
This approach trek is not just a physical journey but also a gradual acclimatization phase. Each village stop allows your body to adjust to the rising altitude while offering a rare opportunity to experience authentic Himalayan village life. Friendly locals, warm teahouse hospitality, and traditional meals provide a comforting contrast to the rugged wilderness that surrounds you.
As you approach Samagaun, the views become increasingly spectacular. Massive peaks such as Himal Chuli, Ngadi Chuli, and of course, Mount Manaslu itself begin to dominate the skyline. From here, the expedition route diverges from the traditional Manaslu Circuit trail and heads directly toward the eighth-highest mountain’s base!
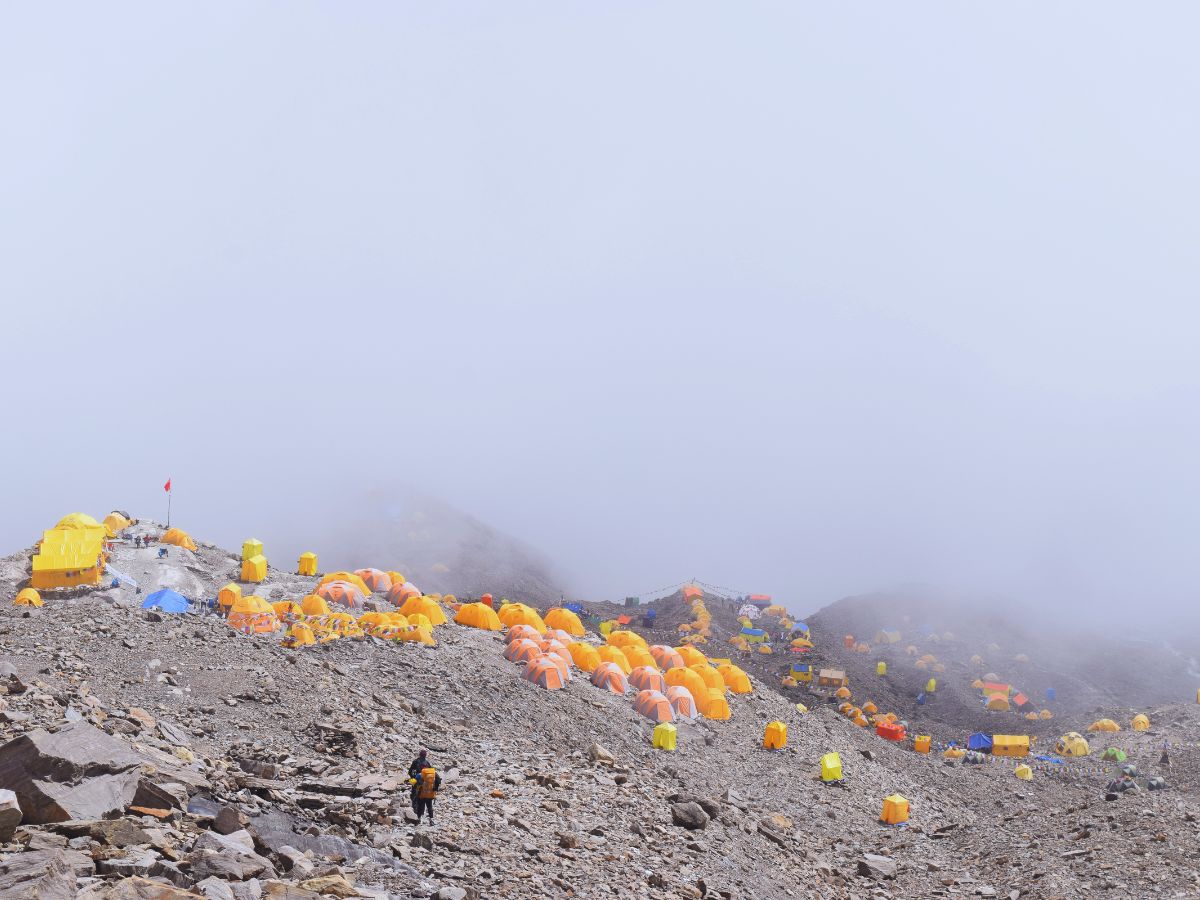
Life at Manaslu Base Camp

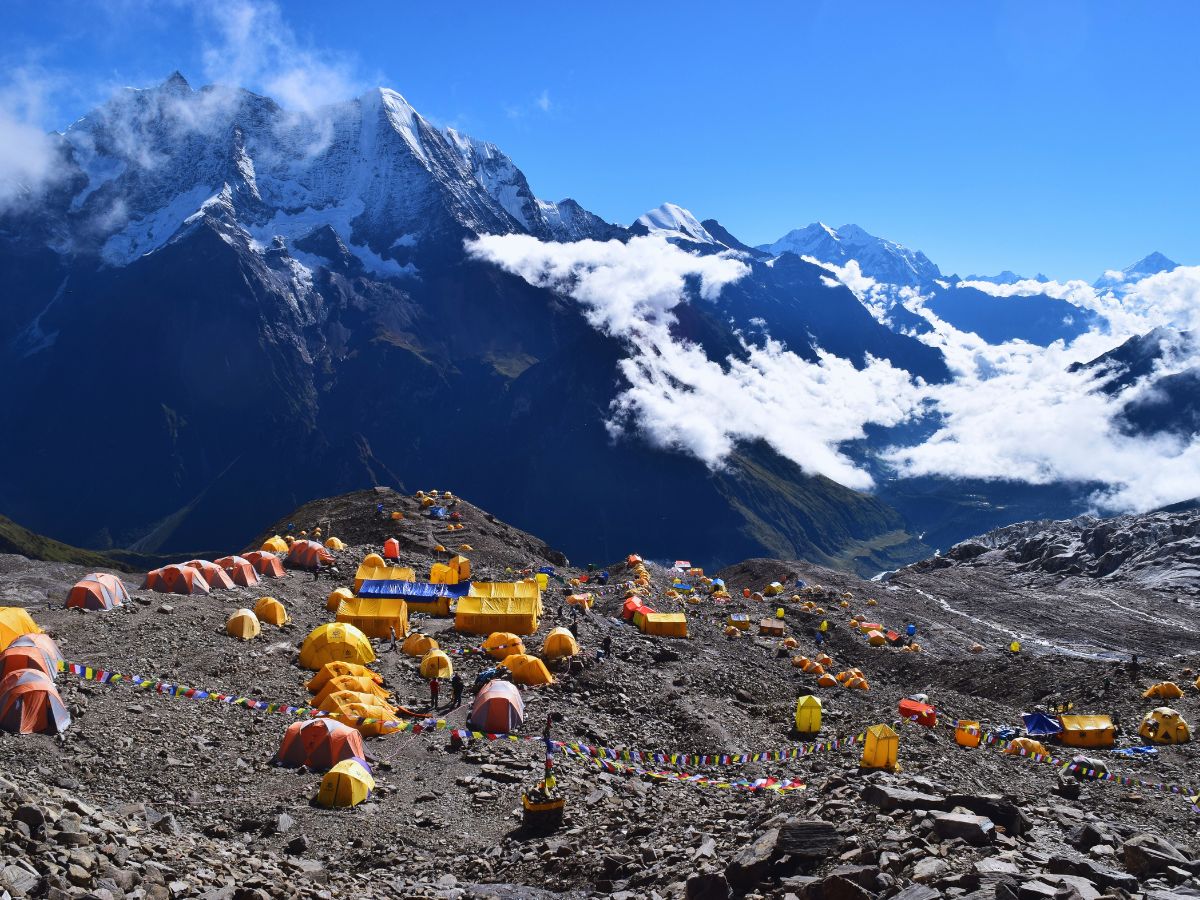
Reaching Manaslu Base Camp marks the beginning of the true mountaineering phase of the expedition. Located at approximately 4,800 meters, the base camp sits on glacial terrain surrounded by towering ice walls and massive Himalayan peaks.
Unlike the teahouse lodges used during the approach trek, accommodation here consists of fully equipped expedition tents organized into a structured base camp environment. This high-altitude camp becomes your home for several weeks.
Life at base camp revolves around preparation, recovery, and acclimatization. You organize your technical equipment, review climbing plans with guides, and participate in short training sessions designed to familiarize everyone with glacier travel techniques, rope systems, and safety procedures.
One of the most meaningful traditions at Manaslu Base Camp is the Puja Ceremony. Led by a local Lama, this sacred Buddhist ritual blesses the climbers, the equipment, and the mountain itself before any summit attempts begin.
Prayer flags are raised, offerings are made, and you receive blessings for a safe journey. Note that for many mountaineers, this ceremony represents a powerful spiritual moment that connects Himalayan climbing culture with the mountain’s deep cultural significance.
Outside of scheduled activities, climbers spend their time resting, hydrating, and enjoying the breathtaking environment. Surrounded by glaciers and snowfields, base camp offers extraordinary views of the Manaslu massif (called the Mansiri Himal range) and neighboring Himalayan giants.
These quieter days are essential for conserving energy and allowing the body to adapt to the thin air before moving higher onto the mountain.
Acclimatization Rotations and Technical Climbing

The success of any 8,000-meter expedition depends on proper acclimatization. Similar is the case with Manaslu, which is achieved through a series of carefully planned rotations between Base Camp and the higher camps.
Over the following days, climbers gradually ascend and descend between Camp 1, Camp 2, and Camp 3 (which we call ‘rotation’), allowing their bodies to adjust to the extreme altitude.
The climb from Base Camp to Camp 1 introduces the first technical terrain. Here, climbers step onto the Manaslu Glacier and navigate complex ice formations, crevasses, and snow bridges. Fixed ropes installed by HEN's Sherpa team provide security across steep sections of the glacier and icefall.
From Camp 1, the route continues toward Camp 2 through the heart of the icefall. This section includes ladder crossings over crevasses, steep ice slopes, and sustained climbing using ascenders along fixed lines. You need to rely on techniques such as front-pointing with crampons and efficient rope management to move safely across the dynamic glacier terrain.
Camp 2 sits on a broad snow plateau high above the glacier, offering incredible views of the surrounding Himalayan peaks. Beyond this point, the mountain begins to feel more remote and exposed.
The ascent to Camp 3 pushes you into the extreme high-altitude environment above 6,800 meters. Here, the challenge is less about technical complexity and more about endurance. Thin air, powerful winds, and sustained snow slopes demand both physical strength and mental resilience.
These rotations between camps allow you to build strength, adapt to altitude, and become familiar with the route before the final summit push!
The Summit Push: Climbing the Eighth-Highest Mountain on Earth
After weeks of preparation, acclimatization, and monitoring weather conditions, you, along with the entire expedition team waits for a suitable summit window. When conditions align, you shall begin the final ascent from Base Camp toward the summit of Mount Manaslu (8,163 meters).
The summit push follows a staged progression through the high camps. Climbers spend one night at each camp as they ascend: Camp 1, Camp 2, Camp 3, and finally Camp 4 at approximately 7,600 meters.
Camp 4 lies within the extreme high-altitude environment commonly referred to as the “Death Zone.” Oxygen levels here are drastically reduced, and you have to rely on supplementary oxygen only while preparing for the summit attempt.
The summit bid typically begins late at night, often between midnight and 2 AM. Under headlamp light, you, along with other climbers, ascend steep snow slopes and exposed ridges using fixed ropes for safety. The climb requires steady pacing, careful footwork, and mental discipline to continue despite severe cold, wind, and exhaustion. The very final approach follows a narrow ridge leading to the summit itself!
Standing on top of Mt. Manaslu offers one of the most extraordinary panoramas in the Himalayas. From the summit, climbers can see vast stretches of the Himalayan range, including Annapurna, Dhaulagiri, and numerous Tibetan peaks on the northern horizon.
However, time on the summit is brief. You will likely spend only a few minutes celebrating, taking photographs, and absorbing the moment before beginning the long and demanding descent back toward the lower camps.
Reaching the summit of Manaslu is not just a physical achievement, it is also the culmination of weeks of preparation, teamwork, and perseverance in one of the most challenging environments on Earth.
Why Choose Himalayan Ecstasy for the Manaslu Expedition?
You all agree by the fact that choosing the right expedition operator can make a significant difference in both safety and overall experience on an 8,000-meter mountain, right?
Well, Himalayan Ecstasy brings extensive experience in organizing Himalayan treks and high-altitude expeditions. Our team understands the unique challenges of the Manaslu region, from the remote access routes of the Budhi Gandaki Valley to the demanding technical sections of the climbing route.
Our expedition leaders, Sherpa guides, and support staff are professionally trained in high-altitude mountaineering and emergency response, ensuring climbers receive experienced guidance throughout every stage of the expedition.
We also strongly emphasize responsible mountaineering practices. Environmental protection, proper waste management, and respect for local culture remain central to our expedition philosophy. Every climb includes base camp cleanup procedures and adherence to the “Leave No Trace” principles promoted across Nepal’s mountaineering industry.
So, overall speaking, for climbers seeking a well-organized, safe, and authentic mountain expedition, Himalayan Ecstasy Nepal combines professional logistics, experienced mountain staff, and deep local knowledge to deliver a reliable and memorable Manaslu climbing experience.
Mt. Manaslu Expedition 8163m in 37 Days Itinerary
You’ll arrive at Tribhuvan International Airport in Kathmandu, complete immigration, and collect your baggage before stepping out of the terminal. Here, one of our Himalayan Ecstasy representatives will be waiting to welcome you in a Nepali style.
Our team shall also help you with your transfer to your hotel in Thamel, which is often known as the heart of Kathmandu’s expedition hub.
After checking in at your assigned hotel, take some time to rest and recover from your international flight. In the late afternoon or evening, we will do a short meet and greet, and also provide a brief introduction to your Manaslu expedition.
We’ll also help you learn more about Nepali culture. You can head to a vendor to exchange currency and purchase a Nepali SIM card (NTC or Ncell).
Since Thamel is full of trekking gear shops, if you need to buy any personal equipment, this is the perfect opportunity! After settling in and exploring a little of Kathmandu, return to your hotel for a comfortable overnight stay.
After breakfast at the hotel, you will dedicate this day to your Mt. Manaslu expedition preparation. In Nepal, all mountaineering expeditions require a proper briefing (including Manaslu), so this is done at the Ministry of Tourism from early morning.
During the briefing, officials will go over important rules and regulations for climbing Manaslu with you, along with other climbers. You’ll also learn about environmental protection policies, waste management, safety procedures, and all permits/documents for this expedition.
Once the briefing is complete, you’ll have lunch, and after that, you will meet your expedition leader and climbing guides. This is when your team fully inspects your climbing equipment, ensuring everything is in good condition. If any items are missing, you can purchase them from Thamel’s trekking shops or rent from us!
In the evening, we will have another short meeting with all climbers and support staff to review the expedition route, safety plans, and climbing schedule. We want to make sure you won’t have any confusion left!
At night, we have organized a welcome dinner for the entire crew. So, be ready to enjoy this before tomorrow’s drive to the Gorkha district.
Your day starts with an early breakfast, as always, in the hotel itself before beginning the drive from Kathmandu to Gorkha. After a journey of approximately 125 kilometers in about 7 to 8 hours, you’ll reach Machhakhola (timing varies depending on road conditions). You will travel by local bus or shared jeep, depending on availability.
After leaving Kathmandu, the route takes you past rural hills and river valleys, passing through Nagdhunga, Galchi, Malekhu, and Dhading Besi. From here onward, the road becomes narrow and more rugged as it passes through hills, forests, and small settlements.
After crossing Aankhu Khola River, you’ll arrive at Arughat Bazaar (570 m), which is a traditional trading town connecting Dhading and Gorkha districts. From here, the final section follows the Budhi Gandaki River valley, passing small hamlets, waterfalls, and terraced farmland before arriving in Soti Khola (730 m).
If the road condition is good enough, you will head to Machhakhola on the same vehicle, otherwise transfer to a 4WD. The jeep will take you to Jagat village (1,370m) above sea level.
In Jagat, all your permits and documents are checked and registered. Once that’s done, you’ll check in at a local teahouse or lodge, enjoy dinner, and rest well for the start of your trek tomorrow. It’s going to be the same route that we use for the Manaslu Circuit Trek.
After an early breakfast at your teahouse in Jagat, your trek towards Deng (or Dyang at 1,860 m) begins, following the same Budhi Gandaki River. The walk is going to be on well-used stone and dirt paths, and you’ll cross several suspension bridges over small rivers and streams along the way.
The trail passes through dense forests of bamboo, rhododendron, and pine. You’ll pass the villages of Philim (1,560 m), Ekle Bhatti (1,580 m), Nyak (1,625 m), Pewa (1,750 m), and then reach Deng in an overall 20 km which takes about 8 to 10 hours.
This quiet village serves as a perfect resting point for both trekkers and climbers. Your stay is going to be in a basic lodge that’s comfortable enough for the night.
After your dal bhat meal, don’t head to sleep right away. Instead, go unwind by the river or sit outside, enjoying the fresh subtropical atmosphere with the night view of Shringi Himal right in front of you.
Your trek continues further north toward Namrung (2,630 m) today. The trail is yet again a gradual climb as you wind through peaceful forests of oak, pine, and rhododendron. Today’s hike will be about 17 km that takes 8 to 10 hours.
As you enter the Nubri Valley region, you’re welcomed with stone houses and mani walls, and colorful Buddhist prayer flags flutter in every major locations of Bihi (2,010 m), Bhijam (2,005 m), Gap (2,105 m), and Gapshya (2,150 m).
Upon arriving in Namrung, you’ll have to show your permits yet again. It’s actually one of the first larger villages in the Nubri Valley with comfortable accommodation, views of high mountains, and the highlight here is the apple orchards.
From today, the landscape begins to change noticeably as the air becomes cooler and alpine plants (like juniper and shrubs) start replacing the larger forest trees. The trail climbs steadily yet again with only afew major steeps, which still allows you to enjoy the scenery at a comfortable pace.
You’ll pass small hamlets of Bhijam (2,650 m), Lhi (2,920 m), Shyo (2,960 m), and Lho (2,920 m) before reaching Shyala (3,500 m). The mani walls and chortens (small Buddhist shrines) line the whole trail, giving you a clear glimpse of the Tibetan Buddhist lifestyle.
As you climb higher towards Lho, the surrounding mountains start to look much larger. In fact, that’s the place that gives you the first strong views of the Mt. Manaslu and the Mansiri Himal range, which features Himal Chuli and Ngadi Chuli too.
Upon checking in at today’s lodge after covering approximately 13 kmin about 7-8 hours, be sure to drink warm water and keep yourself hydrated. A short walk around the village for fresh air is indeed quite helpful to adjust to the altitude.
Today’s trek shall be towards Samagaun, which is the largest village in the Nubri Valley. Passing through beautiful alpine shrubs, junipers, and mountain grasses, we first head to the must-visit site in Manaslu Conservation Area: Pungyen Gompa, aka Pungen Gumba (4,040 m).
This monastery isn’t just famous for Tibetan Buddhism, but more for the incredible views of Mount Manaslu and the surrounding range. It’s indeed a fantastic spot for photos and perfect for acclimatizing in the mountain atmosphere before continuing towards Samagaun (3,530 m).
If you started early, you should cover the 13 km overall hike today much more quickly. And this gives you enough time for exploring the village and visiting old monasteries instead of just resting in the teahouse.
This is the day you head away from the circuit trail and take on the expedition route towards Manaslu Base Camp (MBC) at 4,800 m. The trail starts with alpine pastures and grassy slopes before gradually becoming rocky and more rugged.
While even trekkers choose to reach up to the base camp of the eighth-highest mountain in the world, the climb is quite challenging (especially for those who have to make the return the same day).
Don’t forget to stop by the serene Birendra Lake (3,690 m), which is a stunning turquoise glacial lake formed by the Manaslu glacier itself. It’s a picturesque spot, too, and in fact, you’ll get a wonderful glimpse once you're heading on to the base camp trail.
After crossing the lateral moraines of the Manaslu Glacier, loose stones and scree fields, you’ll reach the Base Camp that sits at the foot of Manaslu, the mountain of spirits, aka the killer mountain. And from here on, your tent stays begin, which are basic but functional enough.
Once settled, you may take time to organize your personal gear. Be sure to walk around the camp for acclimatization at such a high-altitude. And if time allows, you can even go for short practice sessions with your equipment, under your guide’s supervision.
From here onwards, hydration and frequent light meals become important in order to avoid altitude sickness. We know you’re exhausted already, so rest well tonight after dinner that’s served by a high-altitude cook in your tent itself.
The next two days in the Manaslu Base Camp are all about rest and recovery. In fact, these days give prefect opportunity for your body to adjust to such a high altitude while giving you a chance to enjoy the stunning Himalayan environment.
Be sure to keep up with your exercises, with our HEN guides will help you out on, which include gentle stretching and short hikes. But remember not to overexert yourself as your body needs fuel to cope with the upcoming rotations.
During this time, there’s one special highlight that you can enjoy. It is the Puja Ceremony on the second day, where a spiritual ritual is led by a Lama (monk). Basically, it’s a centuries-old tradition done for the Himalayan climbers to ensure their successful summit and return safely.
We highly suggest that you participate in this puja, which is a great way to show respect towards the sacredness of Manaslu. More than that, it gives you a chance to connect with the local Tibetan Buddhist culture, a memorable experience beyond just the mountain adventure you came for.
Apart from the ceremony, on these two days, you shall be finalizing your personal gear and clothing. When doing so, be sure to double-check your climbing harness, crampons, ice axes, helmet, ropes, sleeping bag, and down jacket.
Our HEN guides will help you review the route maps and technical plans. Learn and practise everything you learn from them, and be mentally prepared for the emergency procedures too. Your job is to ensure that you are fully ready for the higher camps and the summit push.
While at it, don’t forget to enjoy the environment that’s surrounded by glaciers, snowfields, and spectacular views of the nearby peaks. You can also spend your time communicating with other fellow climbers.
Over the next eight days, our focus shall only be on acclimatizing and preparing for the Mt. Manaslu summit. For that, you shall be accompanied by your sherpa for rotating between Base Camp and the higher camps (namely Camp 1, Camp 2, and Camp 3).
The idea is to allow your body to adjust gradually to the extreme altitude as you learn your way on technical glacier terrain. Let’s guide you on how they are done effectively:
Ascent to Camp 1: Navigating the Manaslu Glacier
The climb from Base Camp (MBC) to Camp 1 (C1) marks your first true technical challenge, demanding focus as you transition from solid ground onto the dynamic glacier environment.
- Technical Grading: PD+ (Peu Difficile Plus) / AD- (Assez Difficile Moins)
- Ice/Glacier Grade: AI 2-3 (Alpine Ice)
Terrain and Technical Challenge:
You will begin by stepping onto the lower reaches of the Manaslu Glacier, immediately requiring the use of full climbing gear (harness, crampons, and ice axe). The route is defined by the complex and changing features of the Icefall. The terrain is technical, demanding navigation around massive seracs and over snow bridges spanning deep crevasses.
The fixed lines provide the primary means of ascent on the steepest sections, requiring rigorous climbing effort intensified by the altitude. You will use your ascender (jumar) frequently as you clip into and climb the extensive fixed ropes established by the Sherpa team.
Despite the rigor, the visual rewards are immediate and stunning. Looking back, you gain a massive perspective on the entire Samagaun valley. As you gain height, the surrounding giants—Ngadi Chuli and Himal Chuli—dominate the panorama.
Camp 1 is a small and exposed site, located on a relatively flat section of the glacier. Its position offers a brief respite and an up-close, commanding view of the mountains dominating the skyline.
- Elevation Gain: Approximately 800 meters (from 4,900 m to 5,700m).
- Time Required: 4 to 7 hours, depending on fitness and conditions.
Ascent to Camp 2: Traversing the Icefall and Headwall
The climb from Camp 1 (C1) to Camp 2 (C2) is the most technical section below the summit push.
- Technical Grading: PD+ (Peu Difficile Plus) / AD- (Assez Difficile Moins)
- Ice/Glacier Grade: AI 2-3 (Alpine Ice)
Terrain and Technical Challenge:
The first portion involves steady climbing on fixed ropes, navigating wide and sometimes hidden crevasses that require careful crossing using snow bridges or fixed aluminum ladders.
The crux of the route is the ascent through the heart of the Icefall, culminating in the ice headwall. This section features several steep, vertical or near-vertical ice bulges, often around 100 meters in length with a slope of up to 65 degrees. The terrain is dynamic, demanding alertness against moving ice and serac danger.
Required Technique
The fixed ropes are mandatory here. Your movement must be controlled and rhythmic:
- Jumaring: You will rely heavily on your jumar (ascender), employing strong upper-body endurance and a solid stance to ascend the steep fixed lines.
- Front-Pointing: On the steepest ice, you must use front-pointing with your crampons, keeping your heels low and using the fixed rope for weight transfer.
- Ladder Crossing: Where required, you must maintain excellent balance while crossing the crevasse ladders, strictly keeping your safety tethers clipped into the fixed ropes at all times.
Once you overcome the ice headwall, the terrain softens, leading you onto a vast, open snowfield that is less chaotic. The spectacular views from this altitude include Ngadi Chuli and the surrounding peaks, which now seem very close.
Camp 2 is a strategic, established site on this open plateau, serving as the launching pad for your next rotation.
- Elevation Gain: Approximately 800 meters (from 4,900 m to 5,700m).
- Time Required: 4 to 7 hours, depending on fitness and conditions.
Ascent to Camp 3: High Altitude Commitment
The ascent from Camp 2 (C2) to Camp 3 (C3) marks the move into the extreme high-altitude environment, demanding steady, persistent effort on sustained slopes. While less complex technically than the Icefall below C2, the challenge is amplified by the sheer altitude and exposure.
- Technical Grading: AD- (Assez Difficile Moins)
- Ice/Glacier Grade: AI 2 (Alpine Ice, often wind-hardened snow)
Terrain and Technical Challenge:
Departing C2, you begin a long, diagonal climb up the featureless snow slopes of the mountain's upper flank. The path is almost entirely on fixed ropes, which provide the primary means of security and ascent across the exposed gradient.
The terrain is generally composed of hard, wind-slab snow or blue ice, requiring efficient front-pointing with your crampons. There are few major crevasses at this altitude, but the primary hazards are the steep pitch and the unrelenting exposure to high winds and cold. The technical requirement is sustained jumaring on the fixed lines, demanding exceptional aerobic fitness and mental focus to maintain a steady pace at over 7,000 meters.
Camp 3 is a small, precarious site, often chipped into the steep snow slope itself. Due to its exposed nature, C3 is primarily used for short, strategic overnight stays during acclimatization rotations or as a critical intermediate stop before the final push to Camp 4. At C3, you are now truly above the surrounding peaks, with views extending across the vast Himalayan range, emphasizing the dramatic scale of the mountain.
- Elevation Gain: Approximately 500 meters (from 6,400 m to 6,900m).
- Time Required: 5 to 7 hours, depending on fitness and conditions.
After doing back and forth in higher camps, you now properly know the route, and more than that, you’re perhaps exhausted. So, to ensure your body isn’t exhausted for the final summit, we take two days' rest at Base Camp, where you can recover well.
Remember to drink plenty of water and take enough nutrition (high-carb diet recommended). The idea is to maintain strength and stamina for the upcoming summit attempt, which is indeed going to be demanding.
Also, be sure to organize and recheck all personal and climbing gear. Everything should be in top condition and easily accessible to you. In case you find any issues, let your sherpa guides know about them, and together, you’ll resolve the problem and find alternatives on what to do.
And since weather plays a crucial role in the final summit push, your team will monitor forecasts closely to identify the best summit window. Briefings and discussions will happen most of the time, so your guides help you understand the conditions.
Remember: you’re doing the summit yourself, and the sherpas are there just to guide you. They keep other things in check, like your safety, food preparations, and coordination with other team members.
Keep your hikes light during this timeframe to ensure your muscles are kept loose and you’re acclimatizing well. Soak in the views from time to time, track your progress, and get plenty of sleep. If you’re not feeling well, this is the right time to inform the team.
These are the days that you have been waiting for! We’re going to attempt the final ascent of Mount Manaslu (8,163 m). In fact, these days are the ones that are the most demanding and require full focus, teamwork, and careful attention to safety.
The climb is not just physically challenging but also mentally tough. But those breathtaking Himalayan views from the top of the eighth-highest mountain in the world are surely a once-in-a-lifetime achievement.
You’ll stay overnight at Camp 1 the first night, followed by Camp 2 on the second, Camp 3 on the third, and Camp 4 (C4) on the fourth night of the summit push.
The ascent from Camp 3 to Camp 4 moves you into the "Death Zone" and is a necessary staging point for the summit bid, demanding efficiency and managing extreme cold and low oxygen.
- Technical Grading: PD+ (Peu Difficile Plus)
- Snow/Ice Grade: AI 2 (Alpine Ice/Hard Snow)
The route follows fixed ropes, traversing diagonally up the mountain's exposed upper flank. The terrain is characterized by a mix of hard, wind-scoured snow and ice. While the technical difficulties are moderate, primarily involving efficient jumaring and moving with precise crampon placement. The physical effort is immense due to the severe lack of oxygen. Plus, the climb is highly exposed to strong, cold winds, making speed and thermal regulation critical.
Camp 4 is strategically located on a small, protected saddle or shelf that offers stunning, immediate views of the surrounding Himalayan giants below your altitude. Due to the extreme altitude and severe cold, C4 is used for the briefest possible duration. You'll typically spend only one night here during the summit push, arriving in the afternoon, resting briefly on supplementary oxygen, and departing for the summit attempt that same night.
Manaslu Summit Bid
The summit push is the most demanding and critical day of the entire expedition. Departing C4 in the dark, usually between midnight and 2:00 AM, you will embark on a continuous ascent into the extreme cold of the "Death Zone."
- Technical Grading: AD (Assez Difficile) / D- (Difficile Moins)
- Snow/Ice Grade: AI 2–3 (Sustained climbing on hard snow/ice)
The initial hours are spent climbing long, steep slopes of hard snow and ice. You will be entirely dependent on fixed ropes for security and ascent, employing continuous jumaring and efficient front-pointing in your crampons. The challenge is primarily physical, maintaining a slow, steady rhythm despite the severe cold, darkness, and critically low oxygen levels (even while utilizing supplementary oxygen).
The route traverses below the central peak, moving towards the exposed ridge. The final section is the most committing: a sharp, narrow ridge leading directly to the summit. This segment demands absolute focus and steady placement of feet, with fixed lines being your essential lifeline against the sheer drops on both sides.
The Summit and The Descent
Reaching the summit (8,163 m) offers a truly unforgettable, 360-degree panorama of the entire Himalayan range. The views are unparalleled, with peaks like Annapurna, Dhaulagiri, and Cho Oyu visible in the distance. Time at the summit is brief (usually just minutes). This is to allow for photographs before the inevitable cold forces the descent.
The return journey to C4 is the most dangerous part of the day, demanding mental fortitude to rappel and down-climb safely while severely fatigued. Upon reaching C4, you will typically pack up and continue the descent to either C2 or C1.
Listen, fellow climbers: mountaineering is all about patience, flexibility, and respect for nature. And the weather at extreme altitudes is so unpredictable that anything can happen. Bad weather means summiting can be extremely difficult and risky.
So, our team at HEN has added four contingency days to this itinerary to ensure your safe summit attempt. These 4 days are usually enough to see how the weather turns out to be. Your sherpa guide shall wait for the perfect weather window or manage any unforeseen circumstances without letting you rush the climb.
During these four contingency days, we ensure that you’re at the safest spot. This is usually the Base Camp, but sometimes, if you’re too high, it can be at any other high-altitude camp.
Honestly, contingency days are actually good. Because if you or other team members fall ill or get injured during the planned days, you get extra rest. So, you see, this slows down your climb further, and better for acclimatization too.
In case you incur any extra expenses during these days, we will settle them after your summit is successful back in Kathmandu. So, no worries!
Remember that contingency days are not just about waiting. You get enough time to plan what to do ahead of time, of course, with the team leader and expedition guides to help you throughout the difficult time.
We’re sure you had an incredible journey and a successful Manaslu summit attempt. Now, whether you reached the top or not, Day 31 marks the final day at the base camp.
Before making the return, we will spend this day together to clean up the mess we made at the base camp. This is to ensure that the environment remains pristine for future climbers, and it’s this ‘Responsible Tourism’ policy of ours that many climbers choose Himalayan Ecstasy Nepal time and again.
In fact, the “Leave No Trace” principles have become an essential part of responsible mountaineering in the Himalayas, not just in Manaslu but all the other destinations too. And every mountaineering agency in Nepal follows it today!
So, get ready to dismantle the tents, expedition equipment, and all non-biodegradable waste (like wrappers, empty fuel canisters, broken gear, etc.). In your expedition team, we also send a staff member who ensures all the Manaslu Conservation Area regulations are followed. So, he/she shall ensure all the waste is collected and transported safely out of the region.
After cleanup, enjoy your last tent meal, mountain views, and wave one final goodnight to Mt. Manaslu.
You’ve summited Mt. Manaslu, cleaned the base camp, and now, it’s time to wave goodbye to this part of the Gorkha district.
You will be using the same route to descend back. Share your stories with the locals as you pass through the villages of Samagaun, Shyala, Namrung, Deng, Philim, and finally Jagat.
Back in low altitude, you start feeling much better with the subalpine weather of Budhi Gandaki Valley, perfect for resting. The backtrack to Jagat will take about three days.
But you could even opt for a similar time and head on to do the Larke Pass. It takes one extra day, but it is totally worth it. While you summited Manaslu, this time you’ll circumnavigate the eighth-highest mountain, entering the Annapurna region. Just let us know which one you’d like to do before the trip starts.
After trekking out of the mountains, the final leg of this 37-day Manaslu Expedition is going to be finalized on a scenic drive back to Kathmandu in a 4WD and then on a shared bus/jeep. It’s the same way you reached the starting point.
Once you’re in Kathmandu, we’ll help you check into a tourist-friendly hotel in Thamel (usually 3-star, but you have the option to increase your budget and choose our 4-star Hotel Thamel Park). This is the day you rest well, take a good shower that you probably missed in the mountains, and be back in the chaotic city life.
We’ll even meet you in the evening and go for dinner together. You can share your entire experience here, as we love to hear that from our guests!
Today is a complete leisure day for you so that you can recover well from the expedition and wrap up the formalities after your Manaslu expedition. In your free time, you can head on to Thamel or Ason for some souvenir shopping (Nepal has a lot to offer, really).
For those interested, our team at HEN has also organized a short optional visit to the Ministry of Tourism. This is where you get a chance to share your experience and even meet government officials. You’d be congratulated on your summit and possibly receive some gifts.
In the evening, we will be hosting a farewell dinner for the entire expedition team at a traditional Nepali restaurant. A Thakali Khana Set with cuisine, Nepali cultural dance, and the final night together!
Your expedition journey concludes with a transfer from your hotel to Tribhuvan International Airport as per the timing of your flight. We generally drop you at least three hours prior so you don’t have to be late.
The farewell will be in a typical Nepali-style, and you’ll also way your final bye to the guides, support staff, fellow climbers, and our HEN staff, with whom we believe you had a wonderful time together. You can tip them at the end too!
Safe travels to you and your team. And if you’re visiting Nepal again, don’t forget that we are at your service always.
In fact, if you’d like to extend your stay in Nepal, we have more short tour packages that you can explore. Or simply do some sightseeing in Kathmandu, visiting all the UNESCO World Heritage Sites. Just let us know, and we’ll handle everything for you!
Trip Cost Details
Includes
[Full-Board Services]
Arrival & Kathmandu Services
- Airport transfers: pick-up and drop-off in a private vehicle.
- 4 nights hotel accommodation in Kathmandu (3-star/4-star standard) on bed & breakfast plan.
- Welcome & farewell dinner at a typical Nepali restaurant.
- Trekking and climbing map (optional but included).
Government & Permits
- Government Liaison Officer with full equipment, salary, and accommodation.
- Manaslu Restricted Area Permit (MRAP), Manaslu Conservation Area Permit (MCAP), and expedition royalty permit fees.
- Garbage deposit and waste management fees as required by Nepal Government.
Trekking and Base Camp Logistics
- Private transfers: Kathmandu > Dharapani/Machha Khola > Kathmandu (depending on trailhead)
- Accommodation on trek: twin-sharing lodges / tea-houses.
- 3 meals per day (breakfast, lunch, dinner) with tea/coffee.
- Fresh seasonal fruits and hygienic food at all camps and Base Camp.
- Personal baggage allowance: 40–50 kg per member, carried by porters or mules.
- Base Camp setup: individual dome/box tent per member, with foam mattress and pillow, dining tent, kitchen tent, toilet & shower tent, staff tent, store tent, tables & chairs, and all cooking equipment.
- Gas heater in dining tent at Base Camp.
- Solar panels and/or a generator for lighting and personal device charging.
Expedition Staff and Insurance
- 1:1 Climbing Sherpa per member for the entire climb and rotations.
- Climbing Sherpa assistance for carrying gear to high camps.
- Experienced Base Camp cook and kitchen helpers as required.
- All wages, insurance, equipment, and food for Nepalese staff and Sherpas.
- Comprehensive insurance coverage for all Nepali staff (climbing Sherpas, assistant guides, and kitchen crew)
- High-altitude insurance for staff, including emergency helicopter evacuation coverage (up to USD 10,000 liability)
High Camp Setup & Climbing Logistics
- High altitude shared dome tents (2 members per tent).
- High altitude food at Camps I, II, III, IV.
- Gas stove, cooking equipment, and necessary kitchen facilities at high camps.
- Route fixing team for ropes and climbing lines (included; no extra charge).
- Summit oxygen: 4 bottles per climber with mask & regulator, plus 1 bottle per high-altitude Sherpa.
- Emergency oxygen mask & regulator for medical use at Base Camp.
Communication
- Walkie-talkie between Base Camp and higher camps.
- Satellite phone for emergency communication (members can use at additional charge).
Safety & Medical
- Comprehensive medical kit for members and staff.
- Daily weather forecast service from professional meteorological sources.
Other Services
- T-shirt and duffle bag provided to each member.
- Official summit certificate issued by Nepal Government after successful climb.
Excludes
- International airfare to/from Kathmandu.
- Nepal entry visa fee ($125 USD for 90 days).
- Meals not specified in the itinerary (e.g., lunch/dinner in Kathmandu beyond welcome/farewell).
- Extra nights in Kathmandu (early arrival, late departure, or early trek return).
- Personal insurance (medical, high-altitude evacuation, helicopter rescue, trip cancellation). Mandatory for climbers.
- Personal expenses: phone calls, internet, toiletries, hot showers, laundry, soft drinks, alcohol, snacks, etc.
- Personal climbing/trekking gear: clothing, packing items, bags, trekking poles, boots, gaiters, sunglasses, personal medical kit, etc.
- Filming/camera/drone permits (if applicable).
- Summit bonus for climbing guide: $1,800 to $2,000 USD (mandatory, not optional). This is a standard and non-negotiable part of Himalayan expedition culture. Your guide gives everything to get you to the summit safely, and this is the minimum expected acknowledgment of that effort.
- Tips for Base Camp staff (suggested minimum $200 to 400 USD per member).
- Additional supplementary oxygen cylinders if required beyond the included allocation: $500 per cylinder at Base Camp, $800 to $1,000 per cylinder at Camp 4. It is always better to plan for extra bottles in advance rather than face a shortage at extreme altitude.
- Any service not specifically mentioned in the “Cost Includes” section.
- Any additional staff beyond what is included in the package.
- Costs arising from natural calamities, mishaps, or anything beyond control.
Additional Costs & Notes:
- Summit bonus for climbing guide: USD 1,800 to 2,000 per climber (mandatory as per expedition practice)
- Tips for Base Camp staff: Suggested USD 200 to 400 per member
- Extra oxygen cylinders (if required):
- USD 500 per bottle at Base Camp
- USD 800 to 1,000 per bottle at Camp 4
- Additional staff or services beyond the package
- Any costs arising due to weather, natural calamities, or circumstances beyond control
Essential Information
Now that you’ve seen the full itinerary and highlights of the Manaslu Expedition, let’s walk through the practical stuff that will help you prepare and feel confident before and during your journey.
This guide covers the best time to visit, permits, accommodation, food, packing tips, altitude advice, and more all in a clear, down‑to‑earth way so you know exactly what to expect.
Best Time to Climb Manaslu
Choosing the right climbing season should be the first thing on your mind before attempting Mt. Manaslu expedition for safety reasons. The eighth-highest mountain in the world, is typically climbed during two main Himalayan climbing seasons:
Spring (April to May)
This is one of the most popular seasons for climbing Manaslu. During this time, temperatures gradually rise after the winter freeze and the snow conditions on the mountain are generally stable. The route is usually well established by multiple expeditions, which helps with logistics and route fixing.
Advantages of spring climbing include:
- Relatively stable weather patterns
- Warmer temperatures compared to autumn
- Favorable snow and ice conditions for climbing
- Active expedition support from multiple teams
Autumn (September to October)
Autumn is the second season for Manaslu expedition after Spring. Once the monsoon season end, the skies become extremely clear and the visibility across the Himalayas become spectacular, giving you not just safety but mountain views that fill your heart!
Advantages of autumn climbing include:
- Clear skies and excellent visibility
- Stable weather windows for summit attempts
- Dry trekking trails during the approach
However, nights at higher camps can be significantly colder compared to spring.
Seasons to Avoid
The monsoon season (June to August) because it brings heavy snowfall, unstable slopes, and high avalanche risk.
Likewise, winter (December to February) should also be avoided as it brings extreme cold and powerful winds that make climbing extremely dangerous.
Permits Required For Mt. Manaslu Expedition
Climbing Manaslu requires several permits issued by the Government of Nepal because the region lies within a protected and restricted Himalayan area. Here they are:
- Manaslu Expedition Permit: Issued by Nepal’s Department of Tourism is the primary one. This permit officially authorizes climbers to attempt the summit of Mount Manaslu.
- Manaslu Conservation Area Permit (MCAP): This permit is required for entering the Manaslu Conservation Area, which protects the fragile ecosystem and wildlife of the region. It’s issued by the National Trust for Nature Conservation (NTNC).
- Restricted Area Permit (RAP): The entire region of Manaslu (inside Chumnubri Rural Municipality) is categorized as a ‘restricted area’ due to its proximity to the Tibet border. This permit regulates and monitors travel in the region and is issued by the Department of Immigration (only given to a registered travel agency).
- Cumnubri Rural Municipality Permit: Issued by the rural municipality office itself, this is a new permit to enter past Jagat. Your guide will help you get it when heading for the Manaslu Expedition.
- TIMS Card: This has become an optional thing at the moment. But we include this within the package, so nothing is left out. In this full-board Manaslu Expedition by HEN, these permits are included within our package. So, you do not have to worry about their pricing, but rather make sure that you submit the documents to us prior.
Altitude Sickness and Prevention Tips
Climbing Manaslu involves entering the extreme altitude zone above 8,000 meters, often called the “death zone.” At these elevations, the human body cannot survivefor extended periods without proper acclimatization.
Hence, you may encounter the following altitude-related illnesses:
- Acute Mountain Sickness (AMS): Common symptoms are headachess, nausea, dizziness, fatigue, and sleep disturbances.
- High Altitude Pulmonary Edema (HAPE): A life-threatening condition caused by fluid buildup in the lungs, leading to severe breathing difficulties.
- High Altitude Cerebral Edema (HACE): A dangerous swelling of the brain that can lead to confusion, loss of coordination, and unconsciousness.
So, how do you prevent it during the Manaslu expedition? Here are some strategies, coming directly from our HEN experts (some that you have to apply yourself, others will be done by our skilled sherpas):
- Gradual ascent and staged camp rotations
- Adopt “Climb high, sleep low” acclimatization strategy
- Proper hydration and high-energy nutrition
- Adequate rest between climbing rotations
- Continuous monitoring of climbers’ health
- Use supplemental oxygen during summit attempts, especially above Camp III or Camp IV.
Note: Our expedition team carries medical kits, communication equipment, and evacuation protocols in case of emergencies.
Fitness and Mental Preparation Required
Climbing an 8,000-meter mountain like Mt. Manaslu requires a very high level of physical fitness and mental resilience. So, proper preparation is a must!
Climbers should ideally train for several months before the expedition. Recommended training includes:
- Long endurance training (running, hiking, cycling)
- Strength training focused on legs and core
- High-altitude trekking or mountaineering experience
- Ice climbing and crampon techniques
- Carrying heavy backpacks during training hikes
- Have a prior experience on 6000 m or 7000 m peaks
Beyond physical strength, climbers must also be mentally prepared for:
- Extreme cold and unpredictable weather
- Long expedition durations (often 40–50 days)
- Isolation and limited comfort
- High-risk environments requiring constant focus
- Strong determination, patience, and teamwork are essential qualities for a successful Manaslu expedition
Accommodation and Food During the Entire Journey
During your Manaslu expedition, accommodation and food can vary depending on the stage of the journey.
While trekking through the Manaslu region, your stay shall be in local teahouses and mountain lodges. These places provide basic but comfortable accommodation with shared rooms and dining areas.
Meals typically include traditional Nepali and international dishes such as Dal Bhat (rice, lentils, vegetables), Noodles and soups, Fried rice or pasta, Eggs, bread, and pancakes, etc.
Once the expedition reaches Manaslu Base Camp, the climbing square shall help you set up a full expedition camp. These includes personal sleeping tents, large dining tents, kitchen tents, communication tents, plus medical and storage areas.
Also, you’ll be accompanied by our professional expedition cooks who prepare high-calorie meals designed for high-altitude climbing. And at higher camps (Camp I to IV), climbers stay in high-altitude mountaineering tents shared between climbers.
Note that meals at these camps are simpler and typically consist of freeze-dried food, soups, noodles, and energy snacks to maintain strength during the climb.
Transportation to Reach Manaslu Region
Your Manaslu expedition begins in Kathmandu, the capital city of Nepal, where we have arranged a private transport to drop you at your hotel (the same we do when we drop you at the Tribhuvan International Airport).
From Kathmandu, the journey to the Manaslu region (and back) typically involves a long overland drive to the trailhead, usually to Soti Khola or Machha Khola, depending on road conditions. The transportation here may include private expedition vehicles (4WD jeeps for rough mountain roads) or local buses.
During the expedition, equipment and supplies are transported using a combination of porters, mules, and other pack animals, ensuring that all climbing gear, food, and expedition infrastructure reach the base camp safely.
Equipment Lists
Success and comfort on your Manaslu Expedition hinge on proper preparation, and your equipment list plays a critical role in that. This comprehensive guide covers every essential item (from high-performance apparel to specialized trekking gear), ensuring you’re fully prepared for the diverse and demanding Himalayan environment. We strongly encourage you to review this list carefully; having the right equipment is not just important, it’s essential for a safe, smooth, and rewarding expedition.
Sun Hat (Wide-Brimmed or Baseball Cap):
- Purpose: Essential for protection from the strong Himalayan sun at lower altitudes and even at higher altitudes where UV radiation is intense. A wide-brimmed hat offers more comprehensive face and neck protection.
- Material: Lightweight, breathable, quick-drying.
Beanie / Warm Fleece Hat:
- Purpose: For warmth, especially in the mornings, evenings, and at higher altitudes where temperatures drop significantly.
- Material: Fleece, wool, or synthetic insulation. Something that covers your ears well.
Buff / Neck Gaiter / Balaclava:
- Purpose: Highly versatile. Can be used as a neck warmer, pulled up over the face for dust/wind protection, worn as a headband, or even as a light hat. A full balaclava is excellent for extreme cold and wind, especially at higher camps or on pass days.
- Material: Fleece, merino wool, or synthetic stretch fabric.
Headlamp (with extra batteries):
- Purpose: Absolutely crucial for early morning starts (especially for Kala Patthar), navigating around the lodge at night, or if you're delayed on the trail.
- Features: Brightness levels, red light option (preserves night vision), long battery life.
Headband (Optional but useful):
- Purpose: For managing hair, wicking sweat, or providing light ear warmth without the bulk of a full hat.
Key Considerations for all Headgear:
- Layering: Just like clothing, you'll layer your headgear. You might start with a beanie and a buff in the morning, switch to a sun hat during the day, and put the beanie back on in the evening.
- Protection: The sun's intensity at altitude is often underestimated. Ensure good UV protection. Wind can also be a major factor, causing significant heat loss.
- Comfort: Choose items that fit well and don't chafe, as you'll be wearing them for long periods.
- Quick-Drying: Essential, especially for beanies or buffs that might get damp from sweat or light precipitation.
Base Layers (Wicking/Thermal Undershirts):
- Purpose: Wicks sweat away from your body to keep you dry and regulate temperature. This is the foundation of your comfort.
- Material: Lightweight and mid-weight merino wool or synthetic (polyester, polypropylene). Avoid cotton entirely, as it absorbs moisture and will chill you.
- Recommended: 2-3 long-sleeved base layers; optionally, 1 short-sleeved for warmer days at lower altitudes.
Mid-Layers (Insulating/Fleece Jackets):
- Purpose: To provide warmth by trapping air. You'll add or remove these layers as the temperature fluctuates throughout the day.
- Material:
- Lightweight Fleece (100-200 weight): Ideal for active trekking and mild cold. (1 piece)
- Mid-weight Fleece (200-300 weight) or a thin synthetic insulated jacket: For colder conditions and higher altitudes. (1 piece)
- Recommended: 2 versatile fleece or insulating jackets of varying thickness.
Outer Shell (Waterproof & Windproof Jacket):
- Purpose: Your primary protection against wind, rain, and snow. It doesn't primarily add warmth, but it keeps you dry and protects your insulating layers from the elements.
- Material: High-quality waterproof and breathable fabric (e.g., Gore-Tex, eVent, or similar). Look for features like sealed seams, an adjustable hood, and pit zips for ventilation.
- Recommended: 1 durable, waterproof, and windproof hardshell jacket.
Down Jacket (or Heavy Synthetic Puffy Jacket):
- Purpose: Your essential warmth layer for extreme cold, especially in the evenings, mornings, and at high camps (above 4,000 meters), or during breaks.
- Material: High-fill power down (e.g., 600-800 fill) for excellent warmth-to-weight ratio and packability, or a very warm, high-quality synthetic equivalent.
- Recommended: 1 very warm, packable down or synthetic insulated jacket.
Key Considerations for Upper Body Protection:
- Layering is Key: The ability to add or shed layers is paramount for comfort and safety. Never rely on just one or two thick items.
- "Cotton Kills": Avoid cotton clothing at all costs, as it retains moisture and dramatically increases heat loss.
- Zippers and Vents: Ensure your layers have full or half zippers, and your shell jacket has pit zips for quick ventilation during strenuous activity.
- Fit: Layers should fit comfortably over each other without being too bulky or restrictive, allowing for good circulation.
Lightweight Liner Gloves (Fleece or Merino Wool):
- Purpose: These are your base layer. They provide a surprising amount of warmth, wick away sweat, and allow for dexterity for tasks like operating cameras, adjusting zippers, or handling trekking poles without exposing bare skin to cold.
- Material: Thin fleece, merino wool, or synthetic wicking fabric.
Warm Fleece Gloves / Softshell Gloves:
- Purpose: Your mid-layer. These provide more insulation than liners and are good for colder days at mid to higher altitudes when you still need some dexterity. They offer decent wind resistance.
- Material: Mid-weight fleece, softshell fabric, or a blend.
Insulated Mittens (Waterproof/Windproof):
- Purpose: Your outer, warmest layer, especially for early morning ascents, and evenings at higher camps. Mittens are generally warmer than gloves because they allow your fingers to share warmth.
- Material: Outer shell should be waterproof and windproof (e.g., Gore-Tex, Pertex). Inner insulation should be down or high-loft synthetic. They should be large enough to wear over your liner gloves.
Heavy Duty Gloves (Optional but recommended for very cold sensitive hands or harsher conditions):
- Purpose: A heavier, more insulated version of the fleece or softshell gloves, offering more warmth than typical mid-layers but still some dexterity compared to full mittens. Can be an alternative to or complement mittens.
Key Considerations for Hand Protection:
- Layering: The most important concept. You'll layer your gloves just like your clothing. On a cold morning, you might wear liners inside your fleece gloves, or fleece gloves inside your mittens.
- Waterproof/Windproof Outer Layer: Essential for high altitudes where snow, strong winds, and freezing temperatures are common. Wet hands lose heat rapidly.
- Dexterity: While warmth is key, ensure you can still perform basic tasks. You'll find yourself taking gloves off less often if you have liners for fine motor skills.
- Fit: Gloves and mittens should fit well – not too tight (restricts circulation) and not too loose (reduces warmth and dexterity).
- Backup Pair: It's always a good idea to have a spare pair of liner gloves or a basic warm glove, as gloves can get wet or lost.
Base Layers (Thermal Leggings / Long Underwear):
- Purpose: To wick sweat away from your skin, keeping you dry and preventing chafing. They provide foundational warmth.
- Material: Lightweight and mid-weight merino wool or synthetic (polyester). Crucially, avoid cotton, as it retains moisture and chills you.
- Recommended: 2-3 pairs for rotation.
Trekking Trousers (Durable & Quick-Drying):
- Purpose: Your primary outer layer for trekking in most conditions.
- Material: Made from durable, quick-drying nylon or a nylon/spandex blend for comfort and flexibility. Look for features like reinforced knees or articulated (pre-shaped) knees for better movement.
- Recommended: 1-2 pairs. Convertible trousers (with zip-off legs) can offer versatility for warmer days at lower altitudes.
Softshell Trousers (Optional but Highly Recommended for Higher Altitudes):
- Purpose: Provides excellent warmth and significant wind resistance, while offering more breathability and flexibility than a hard shell. They often have some water repellency. These are ideal for colder days at higher elevations or when crossing passes.
- Material: Stretchy, durable softshell fabric.
- Recommended: 1 pair, to be worn over base layers.
Hardshell / Rain Trousers (Waterproof & Windproof):
- Purpose: Essential outer layer for complete protection against rain, snow, and severe winds.
- Material: A high-quality waterproof and breathable membrane (e.g., Gore-Tex, eVent, or similar). Look for full-length side zippers, which are invaluable for putting them on/taking them off easily over boots and for ventilation.
- Recommended: 1 pair.
Warm Camp Trousers (Optional but adds great comfort):
- Purpose: A comfortable, warm pair of fleece pants, or lightweight down/synthetic insulated pants specifically for wearing around the teahouse in the evenings. They are excellent for warmth when static or for sleeping in on very cold nights.
- Recommended: 1 pair (look for packable and compressible options).
Key Considerations for Lower Body Protection:
- Layering System: The ability to combine or shed layers is paramount for adapting to the wide temperature swings and varying exertion levels.
- Mobility: Choose pants that offer excellent freedom of movement, especially important on challenging ascents and descents.
- Quick-Drying: All lower body layers should be quick-drying. Wet pants can lead to chafing and rapid heat loss.
- Fit: Ensure layers fit comfortably over one another without bunching or being too tight (which can restrict blood flow and reduce warmth).
- Durability: Trekking pants endure significant wear and tear. Invest in robust materials.
- Avoid Cotton: Cotton material is unsuitable for trekking as it absorbs moisture, becomes heavy, and loses all insulating properties when wet.
Waterproof Trekking Boots (Mid to High-Cut):
- Purpose: These are your most crucial piece of gear. They provide essential ankle support, stability on uneven and rocky trails, insulation from cold, and protection from moisture (snow, mud, stream crossings).
- Features: Look for reputable brands known for their durability and comfort. Choose boots with a mid to high-cut design for optimal ankle support. They must be waterproof (e.g., with a Gore-Tex or similar lining) yet breathable. The sole should be stiff enough for rocky terrain but offer enough flex for comfortable walking.
- Crucial Tip: Break-in Period: It is absolutely essential to break in your new boots thoroughly before the trek. Wear them on multiple long walks, ideally including some uphill and downhill sections, to mold them to your feet and identify any hot spots. New, unbroken-in boots are the leading cause of blisters.
Climbing Boots
- Quality Single or Double Boots (insulated)
Camp Shoes / Lodge Shoes / Sandals:
- Purpose: Provides immense relief for your feet after a long day of trekking. They are perfect for wearing around the teahouse, short strolls, or bathroom breaks at night, allowing your feet to breathe and recover.
- Features: Lightweight, easy to slip on and off. Crocs, sturdy sandals, or comfortable slip-on shoes are popular choices.
Trekking Socks:
- Purpose: Crucial for cushioning, wicking moisture away from your skin, regulating temperature, and preventing blisters.
- Material: Opt for high-quality merino wool or good synthetic blends. Never wear cotton socks for trekking, as they absorb sweat, stay wet, and are a primary cause of blisters and cold feet.
- Quantity: Bring 3-4 pairs of thick, warm trekking socks (for cushioning and warmth) and 2-3 pairs of thinner liner socks (optional, worn under thick socks, they can help reduce friction and prevent blisters).
Gaiters (Optional but Recommended):
- Purpose: These are protective covers that attach to your boot and extend up your lower leg. They are excellent for preventing snow, scree, dirt, small rocks, or even leeches (at lower altitudes) from getting into your boots.
- Features: Look for waterproof and breathable options. Mid-calf height is generally sufficient for most conditions.
Key Considerations for Your Footwear:
- Fit is King: Ensure all footwear, especially your boots, fits perfectly with your trekking socks. Boots that are too tight restrict circulation (leading to cold feet), while boots that are too loose cause rubbing and blisters.
- Moisture Management: While waterproof boots keep external water out, moisture-wicking socks are vital to keep your feet dry from sweat. Change socks regularly.
- Blister Prevention: Be proactive! Address any hot spots immediately with moleskin or blister plasters. Carry a small personal blister kit.
- Foot Hygiene: Daily foot care, including washing and drying your feet thoroughly, is important for overall foot health on the trek.
Passport:
- Purpose: Your primary identification for international travel to and from Nepal, and for various trek permits.
- Details: Must be valid for at least six months beyond your intended stay.
Nepal Visa:
- Purpose: Required for legal entry into Nepal.
- Details: Can be obtained upon arrival at Tribhuvan International Airport (TIA) in Kathmandu, or secured in advance from a Nepalese embassy or consulate in your home country. You'll typically need 2-4 passport-sized photographs for this.
Airline Tickets / E-tickets:
- Purpose: For your international flights to and from Kathmandu, as well as your crucial domestic flights within Nepal (e.g., Kathmandu-Lukla-Kathmandu).
- Details: Carry printouts and keep digital copies accessible on your phone or in cloud storage.
Travel and Medical Insurance Policy:
- Purpose: Absolutely critical. This insurance should cover medical emergencies, emergency evacuation (especially helicopter evacuation from high altitudes), trip cancellation/interruption, and lost luggage.
- Details: Carry a copy of your policy, emergency contact numbers for your insurance provider, and your policy number. Verify that high-altitude trekking up to your maximum elevation is explicitly covered.
Medical Information (Highly Recommended):
- Purpose: Vital in case of a medical emergency.
- Details: A small card or note listing any allergies (medications, food), existing medical conditions, current prescription medications (including generic names), and emergency contact information for your doctor.
Emergency Contact Information:
- Purpose: For quick reference in unforeseen circumstances.
- Details: List contact details for your next of kin, your tour operator's emergency number, and your country's embassy or consulate in Nepal.
Credit/Debit Cards & Cash (Nepalese Rupees):
- Purpose: For payments for personal expenses, souvenirs, and tips. ATMs are generally scarce above Namche Bazaar, so cash is essential on the trail.
- Details: Inform your bank about your travel dates to prevent card suspension. Keep emergency cash in a separate, secure location.
Passport-sized Photographs:
- Purpose: Bring several extra copies (at least 4-6). They are frequently needed for permits, unexpected forms, or in case of lost documents.
Key Considerations for Your Travel Documents:
- Originals and Copies: Always carry original documents, but keep high-quality photocopies (both physical and digital) stored separately from the originals. This is your safeguard if originals are lost or stolen.
- Protection: Store all important documents in a waterproof and durable pouch or bag within your daypack and main luggage.
- Accessibility: Keep your passport, visa, and trekking permits easily accessible, as they will be required for check-ins and checkpoints.
- Digital Backups: Scan or photograph all critical documents and save them to a secure cloud service (like Google Drive, Dropbox) or email them to yourself and a trusted contact.
- Security: Utilize a money belt or secure inner pockets for your passport, large sums of cash, and credit cards, especially in crowded areas.
Sunscreen (High SPF):
- Minimum SPF 30, preferably 50+. The sun's UV radiation is significantly stronger at altitude. Opt for a broad-spectrum, water-resistant formula. A stick formula can be convenient for face and ears.
Toothbrush & Toothpaste:
- A lightweight toothbrush and a small, travel-sized tube of toothpaste. Consider a biodegradable option.
Biodegradable Soap / All-in-One Wash:
- A small bar of biodegradable soap or a travel-sized bottle of biodegradable all-in-one body wash/shampoo. This is crucial for minimizing environmental impact when water might drain into local ecosystems.
Dry Shampoo / Cleansing Wipes:
- Highly recommended for waterless hair washing when showers are unavailable or too cold. Biodegradable body wipes are excellent for quick "sponge baths."
Moisturizer / Lotion:
- A small tube is essential. The high altitude and dry, cold air can severely dehydrate and chafe your skin.
Lip Balm (with SPF):
- Absolutely critical. High UV exposure, wind, and cold can cause severe chapping. Choose a lip balm with high SPF (30+). Bring at least two.
Hand Sanitizer:
- Indispensable for maintaining hygiene, especially before meals and after using teahouse facilities where water for handwashing may be limited or freezing cold.
Toilet Paper:
- Essential to carry your own. While some lodges provide it, it's not guaranteed, especially for use on the trail. Pack it in a waterproof bag. Remember to pack out all used paper (do not leave it on the trail).
Small Quick-Drying Towel (Microfiber):
- A lightweight, compact microfiber towel is great for quick washes or drying after the occasional hot shower (which usually comes with an extra charge).
Personal Medications:
- Any prescription medications you require, plus a small supply of over-the-counter essentials like pain relievers, blister treatment, antiseptic wipes, and cold/flu remedies.
Feminine Hygiene Products (if applicable):
- Pack an adequate supply, as availability in remote villages is extremely limited. Be prepared to pack out all used products.
Key Tips for Toiletries:
- Go Minimalist: Every gram counts on the trek. Opt for travel sizes or decant into smaller containers.
- Leak-Proof: Pressure changes at altitude can cause liquids to leak. Ensure all bottles are tightly sealed and ideally double-bagged.
- Cold Protection: Keep liquids that can freeze (like toothpaste or contact lens solution) inside your sleeping bag at night.
- Leave No Trace: Always pack out everything you pack in, including all waste from toiletries.
Energy Bars / Granola Bars:
- Purpose: Provide quick, sustained energy.
- Recommendation: Look for bars with a good balance of carbohydrates, protein, and healthy fats. Choose options that aren't overly reliant on sugar, to avoid energy crashes.
Nuts & Seeds:
- Purpose: Excellent source of healthy fats, protein, fiber, and concentrated calories.
- Recommendation: Almonds, walnuts, cashews, peanuts, pumpkin seeds, and sunflower seeds are all great choices. A mixed bag offers variety.
Dried Fruits:
- Purpose: Deliver a quick energy boost from natural sugars, along with fiber and vitamins.
- Recommendation: Raisins, apricots, dates, figs, cranberries, and mango slices are popular options.
Trail Mix (DIY or Pre-packaged):
- Purpose: A versatile combination, often blending nuts, seeds, dried fruit, and sometimes a few chocolate pieces.
- Recommendation: Customize your own mix with your favorite components or choose a high-quality pre-made blend.
Hard Candies / Gummy Bears / Jelly Beans:
- Purpose: Offer an instant sugar rush for quick energy, can help with dry mouth or a sore throat, and provide a welcome morale boost.
- Recommendation: Small, easy to carry, and non-messy options.
Chocolate (Dark Chocolate Recommended):
- Purpose: High in calories, provides energy, and is a fantastic psychological pick-me-up. Dark chocolate offers additional antioxidants.
- Recommendation: Pack robust bars that won't easily crush or melt (though melting is less of an issue at higher, colder altitudes).
Protein Bars / Jerky:
- Purpose: Essential for muscle recovery and sustained fullness.
- Recommendation: High-protein bars specifically designed for active individuals, or beef/vegan jerky for a savory protein source.
Nut Butter Packets:
- Purpose: A super-dense source of calories and healthy fats.
- Recommendation: Single-serving packets of peanut butter, almond butter, or other nut butters. Can be eaten directly or with crackers.
Crackers / Biscuits:
- Purpose: Good carbohydrate source and can be a comforting, bland option if your stomach is sensitive at altitude.
- Recommendation: Plain crackers or digestive biscuits.
Key Considerations for Your Trekking Snacks:
- Taste at Altitude: Your taste buds can change at high altitudes. Bring a variety, as what you normally love might not appeal to you on the trek. Sometimes salty or blander foods are preferred.
- Calorie-to-Weight Ratio: Prioritize snacks that pack a lot of energy for their weight, as every gram counts in your pack.
- Durability & Packaging: Choose snacks that won't easily crush, melt, or make a mess. Ensure all packaging is airtight.
- Pack Out All Waste: Always carry out all your snack wrappers and any other trash. Leave no trace in the pristine Himalayan environment.
Sleeping bag liner and a Synthetic/Down Sleeping Bag:
- Purpose: To guarantee you stay warm in freezing mountain temperatures.
- Recommendation: Aim for a sleeping bag with a "comfort rating" of at least -45°C (-49°F). This rating indicates the temperature at which an average person can sleep comfortably. If you're plaaning for a winter ascent, a bag rated for -73°C (-99°F) might be necessary. Always prioritize the "comfort" or "limit" rating over the "extreme" rating.
Key Considerations for Your Sleeping Bag:
- Teahouse Nights: Lodges on the Manaslu Circuit trail provide warm duvets, and are sufficient for summer/spring treks. For winter, especially at higher altitudes, your sleeping bag is your primary source of warmth at night.
- Protection: Always keep your sleeping bag in a waterproof stuff sack (even inside your duffel bag) to protect it from moisture.
- Rental Option: If you don't plan to trek frequently in cold conditions, you can also rent a high-quality sleeping bag with Himalayan Ecstasy Nepal. Please contact us to inquire about availability
- Air Out: Whenever possible, air out your sleeping bag during the day (e.g., at lunch stops if sunny) to remove moisture.
Your Daypack: The Essential Trail Companion
Your daypack is your constant partner on the Everest 3 Peak Challenge expedition, carrying all the immediate essentials you need for comfort, safety, and convenience during your daily hikes. Unlike your main duffel, which is carried by porters, your daypack stays with you, ensuring quick access to vital items. This is where you'll keep everything you might need between teahouse stops. Think of it as your portable base for a day's adventure – from staying hydrated and fueled to adapting to sudden weather changes.
Key Features to Look For:
- Comfortable Fit: Paramount for multi-day trekking. Seek out adjustable padded shoulder straps, a breathable and padded back panel, and a functional hip belt. A good hip belt is vital for distributing the pack's weight comfortably onto your hips, taking pressure off your shoulders.
- Hydration Compatible: A dedicated internal sleeve for a hydration reservoir (like a CamelBak) and a port for the drinking tube are highly convenient. This allows you to stay hydrated without constantly stopping to pull out a water bottle.
- Accessible Pockets: Well-placed pockets are invaluable. Look for side pockets (ideal for water bottles or quick-grab items), a front stash pocket (for maps or a lightweight layer), and a top lid pocket (perfect for small items like a hat, gloves, lip balm, or sunscreen you need often).
- Integrated Rain Cover: Essential protection for your daypack and its contents. Many quality daypacks come with a built-in, stowable rain cover. If not, purchase one separately.
- Lightweight Design: Choose a daypack that is inherently light even when empty. Every extra gram adds up over hours and days of trekking.
- Harness: A lightweight but fully adjustable climbing harness, suitable for mountaineering (padded legs are a bonus for comfort). Ensure it is rated for high-altitude use.
- Crampons:Technical mountaineering crampons (automatic/step-in are preferred for climbing boots). Ensure they fit your climbing boots perfectly and practice putting them on before the trip.
- Ice-Axe: A robust technical ice-axe (length appropriate for your height) for self-arrest and assistance on the glacier and steep slopes. A leash is highly recommended to prevent losing your axe.
- Carabiners (Locking / Non-Locking): Bring 8-10 Locking Carabiners (pear-shaped/HMS types for belaying/safety) and 4-6 Non-Locking Carabiners for general purpose clipping. Keep them simple, lightweight, and rated for climbing.
- Ice-Screws: Essential for setting anchors in ice. Bring 3-4 quality screws (16cm - 21cm), typically provided as part of the team's group gear but often good to have extras for personal use or safety.
- Snow Anchor: A reliable snow picket or specialized deadman anchor. This is primarily a group gear item, but personal use on the summit push can be required.
- Rock Piton: Usually considered group gear for emergency or establishing fixed anchors on rock sections. Not typically carried by every individual climber.
- Helmet: A UIAA-approved, lightweight, and adjustable climbing helmet. Essential for protection from falling ice and rock. Ensure it fits comfortably over your balaclava/hat.
- Ascender (Jumar): A mechanical rope grab device (Jumar or Petzl Ascender) for ascending fixed ropes. Bring one left-hand or right-hand model as per your preference.
- Figure-8 Descender / Belay Device: A versatile rappel/belay device (e.g., ATC Guide, Reversos, or Figure-8) for safe descending and managing ropes.
- Sling / Tape: 4-6 Slings/Runners (60cm, 120cm) and 1-2 Long Prusik Cords (6mm or 7mm x 5-6m) for setting up anchors, clipping into fixed lines, and emergency self-rescue.
- Climbing Boot: High-altitude, insulated double or triple plastic/leather boots (e.g., La Sportiva Olympus Mons, Scarpa Phantom 8000). Absolutely non-negotiable for frostbite prevention at extreme altitudes.
- Down Suit: A high-quality, full-body down suit (800+ fill power) rated for extreme cold ($8000\text{m}$ level). Essential for the summit push above Camp 3.
- Poncho or Umbrella
- Plastics for cover your personal bag
- Camera /memory stucks
- Mosquito protect creams (required only summer)