Our site is in soft launch as we enhance features and update content.

Mt.Makalu Expedition 8,463 m in 50 Days

15 Reviews in TripAdvisor
36 Reviews in Google

Join HEN’s professionally organized Makalu Expedition at 8,463 m with full board service from Kathmandu to Kathmandu. Our experienced climbing guides, Sherpa team, and complete expedition logistics ensure a safe and well-supported journey to the summit of the world’s fifth-highest mountain!

Trip Overview
Trip GradeStrenuous
CountryNepal
Maximum Altitude8,463 m
Group Size1-12 pax
StartsKathmandu
EndsKathmandu
ActivitiesMountaineering
Best TimeMarch - May, September - November

EXPEDITION REQUIREMENTS

  • Previous High-Altitude Experience (mandatory): Climbers must have successfully ascended at least one 7,000m peak (recently) as per the latest regulations.
  • Valid Climbing Permit: Issued by the Department of Tourism, Nepal.
  • Registered Expedition Agency: The climb must be organized through a government-registered trekking/climbing agency like Himalayan Ecstasy Nepal (HEN).
  • Experienced Guide Requirement: A licensed climbing guide (Sirdar/Guide) must be assigned to the expedition.
  • Travel & Rescue Insurance: Comprehensive insurance covering high-altitude evacuation (helicopter rescue) is mandatory.
  • Medical Fitness: A recent medical certificate confirming you are fit for extreme high-altitude climbing.
  • Logistics & Documentation: Valid passport, visa, and all required expedition paperwork.

EXPEDITION HIGHLIGHTS

Key Highlights

  • Summit Mount Makalu (8,463 m): Climb the 5th-highest mountain in the world. A true challenge for serious climbers.
  • Difficulty / Grade Level: 5E / Very Difficult, Rock/Ice summit pyramid (Grade III-IV)
  • Remote and Wild Approach: Trek through the beautiful and less crowded Barun Valley. This is one of the most untouched regions in Nepal.
  • Traditional Villages & Culture: Walk through local villages like Seduwa, Tashi Gaon, and Khongma. You will see real mountain life here.
  • Makalu Base Camp (4,780 m): Stay at a fully equipped base camp with tents, food, and full expedition support.
  • Advanced Base Camp (5,870 m): Move higher to ABC of Makalu, where the real climbing phase begins under Makalu’s massive south face.
  • Puja Ceremony: Before climbing, take part in a traditional Sherpa Puja ceremony for safety and blessings.
  • Camp Rotations (C1, C2, C3): Follow a proper acclimatization plan. Climb up and down between camps to prepare your body.
  • Technical Climbing Experience: Use ropes, crampons, and ice axes. You will cross glaciers, steep snow slopes, and icy sections.
  • Summit Push via High Camp: Push for the summit from high camp with your guide and Sherpa team. This is the toughest and most rewarding part.
  • Incredible Himalayan Views: From the summit, enjoy views of Everest, Lhotse, Baruntse, and Kanchenjunga.
  • Full Expedition Support: Experienced Sherpa team, oxygen support, meals, and logistics are managed by HEN.
  • Responsible Climbing: We follow Leave No Trace and clean up the base camp after the expedition.

Key Challenges

Technical Difficulty (C2 to C3 - French Couloir & Summit Ridge): The most technical part of Makalu is above Camp 2, especially near the French Couloir and the final summit ridge. You will climb steep ice and hard snow slopes at high altitude using fixed ropes. The terrain is exposed, narrow, and requires strong climbing skills and confidence.

Altitude and Endurance: Makalu is one of the hardest 8000m peaks physically. From Camp 2 upwards, the climb is long, steep, and very tiring. Above 7,000 meters, oxygen levels are extremely low, and your body struggles to recover. The summit push is long and demanding, requiring top endurance.

Avalanche Risks: Some sections, especially below the upper slopes, can have avalanche risk depending on snow conditions. Our Sherpa team carefully fixes the route and chooses safer lines, but conditions can change quickly.

Objective Hazards: Makalu is a serious mountain with real risks. These include:

  • Crevasses on glacier sections
  • Falling ice and rock in steep areas
  • Sudden weather changes and strong winds

You must stay focused and follow your guide at all times.

The Ascent Plan

Base Camp to Camp 1 (Approx. 5,400 m): You start from Base Camp and move over moraine, rocks, and glacier terrain. This section is not very technical, but can be tiring due to loose ground and altitude. You may use fixed ropes in some parts.

Camp 1 to Camp 2 (Approx. 6,000 m): The climb becomes steeper with snow and ice sections. You will use crampons and fixed ropes. The terrain is more exposed, and careful footwork is important.

Camp 2 to Camp 3 (Approx. 6,700 m): Now the climb becomes more serious. You gain height on steeper slopes with thinner air. The route leads toward the upper face of Makalu. This section is physically demanding and requires good pacing.

Summit Push (8,463 m): After rotations and rest, you begin your summit push.

You move up through Camp 2 and Camp 3, then climb toward the French Couloir, a steep and technical section that leads to the summit ridge.

From there, you follow a narrow, exposed ridge to the summit. This is the most challenging part of the climb. Strong winds, extreme cold, and exposure make it very demanding.

Reaching the summit of Mount Makalu (8,463 m) is not just about strength; it’s about skill, patience, and determination.

IMPORTANT: Essential High-Altitude Gear & Safety Notice

For a successful Makalu Expedition, having the right high-altitude equipment is not optional. These items are critical for both safety and performance in extreme conditions.

  • Supplemental Oxygen: Plan for 4 oxygen bottles per climber and bottles per Sherpa. Carrying an additional backup is strongly advised for safety during the summit push and in case of emergencies.
  • Mask and Regulator: One of the most critical components. It must be in proper working condition, as any malfunction at high altitude can directly affect your ability to breathe and continue safely.
  • Down Suit: A high-quality down suit is essential to withstand extreme cold at higher camps and during the summit push.
  • High-Altitude Mountaineering Boots: Reliable options such as Scarpa or La Sportiva are recommended for proper insulation and support.
  • Sleeping Bag (-50°C): A high-performance sleeping bag is necessary for protection against extreme temperatures and proper rest.
  • Gloves: Insulated, high-quality gloves are required to prevent frostbite and maintain hand function.
  • Helmet: A good-quality helmet is essential for protection in rocky and exposed sections.

Proper planning and ensuring the quality of these essential items play a vital role in the overall success and safety of the expedition.

EXPEDITION OVERVIEW

Expedition in Nepal is truly special, a combination of adventure and beauty. You’ll trek through the Barun Valley, a hidden paradise with lush forests, yak pastures, and sparkling rivers.

Along the way, you’ll see dramatic views of Makalu, Chamlang, Baruntse, and other Himalayan giants, and witness glaciers, moraines, and alpine landscapes that few travelers ever see.

This trek also immerses you in local culture, passing through Sherpa and Rai villages, visiting monasteries, and observing traditional Himalayan life. Unlike crowded trails like Everest or Annapurna, the Makalu route gives you a sense of solitude and discovery, making every step feel like your own adventure.

With Himalayan Ecstasy, you’re not just booking a trip, you’re joining a team that knows the mountains inside out. Our guides have years of experience in the region and understand both the terrain and local culture.

We handle all the logistics, from permits and cargo transport to camp setup and safety monitoring, so you can focus on your climb and your experience. We are always there to advise, encourage, and guide you, whether it’s helping you cross a tricky ice section, adjusting your gear, or sharing stories about the villages you pass.

When you trek with us, you get reliability, local knowledge, and care in every step of your journey!

The journey starts in Kathmandu, where you prepare and meet your team before flying to Tumlingtar. From there, you trek through Num, Seduwa, Tashi Gaon, Khongma Danda, Dobate, and the Barun Valley, gradually gaining altitude and entering the Makalu-Barun National Park.

Along the trail, you pass forests, alpine meadows, yak pastures, and glaciers until you reach Base Camp. Over the next few weeks, you rotate through Camps I, II, and III, acclimatizing and preparing for the summit push.

After attempting the summit, you carefully descend, retracing your steps through the same stunning landscapes, before returning to Kathmandu to rest, celebrate, and reflect on your adventure.

Ready to explore more of this 50-day Makalu Expedition package brought to you by Himalayan Ecstasy Nepal? Let’s dive in.

Flexible Makalu Expedition Packages: Choose What Works for You

At Himalayan Ecstasy Nepal, we understand that every climber comes with a different level of experience, budget, and expectation of support on the mountain. That is why we have structured the Makalu Expedition into three flexible options.

And here is something important to know. You do not need a group to book. Solo climbers are welcome. If you are joining alone, we handle all official formalities by coordinating your permits and documentation with other registered expedition teams on Makalu. You focus on your climb. We take care of the process!

Option A: Full Board Makalu Expedition

The complete, fully managed experience from Kathmandu to the summit and back.

Everything is handled by our team, including airport transfers, hotel stays, Ministry briefings, all permits, experienced Sherpa guides and their insurance, porter support, and liaison officer coordination.

At Makalu Base Camp, you will have a fully equipped expedition setup with dining tents, kitchen, communication systems, and high-altitude support staff. Higher up, we manage route coordination, camp setup, oxygen support, weather updates, and summit planning.

You focus entirely on climbing. We handle everything else.

Option B: Company Service (Budget Makalu Expedition)

A more flexible setup for experienced climbers who prefer partial independence.

HEN takes care of all essential and official requirements including your Makalu climbing permit, Sherpa support with insurance, porter services, trekking permits, and liaison officer coordination. Transportation from Kathmandu to Base Camp is also arranged.

Beyond that, climbers manage their own gear, high altitude logistics, and personal setup.

A cost effective option without compromising the essentials.

Option C: Permit and Join Expedition Service

The most flexible and budget-friendly option for independent climbers.

HEN arranges your Makalu climbing permit and all required documentation, then coordinates your placement within an existing expedition team on the mountain.

You get access to base camp services and shared expedition support while maintaining flexibility with your own gear and climbing style.

Ideal for climbers who are self sufficient but need the official framework handled professionally.

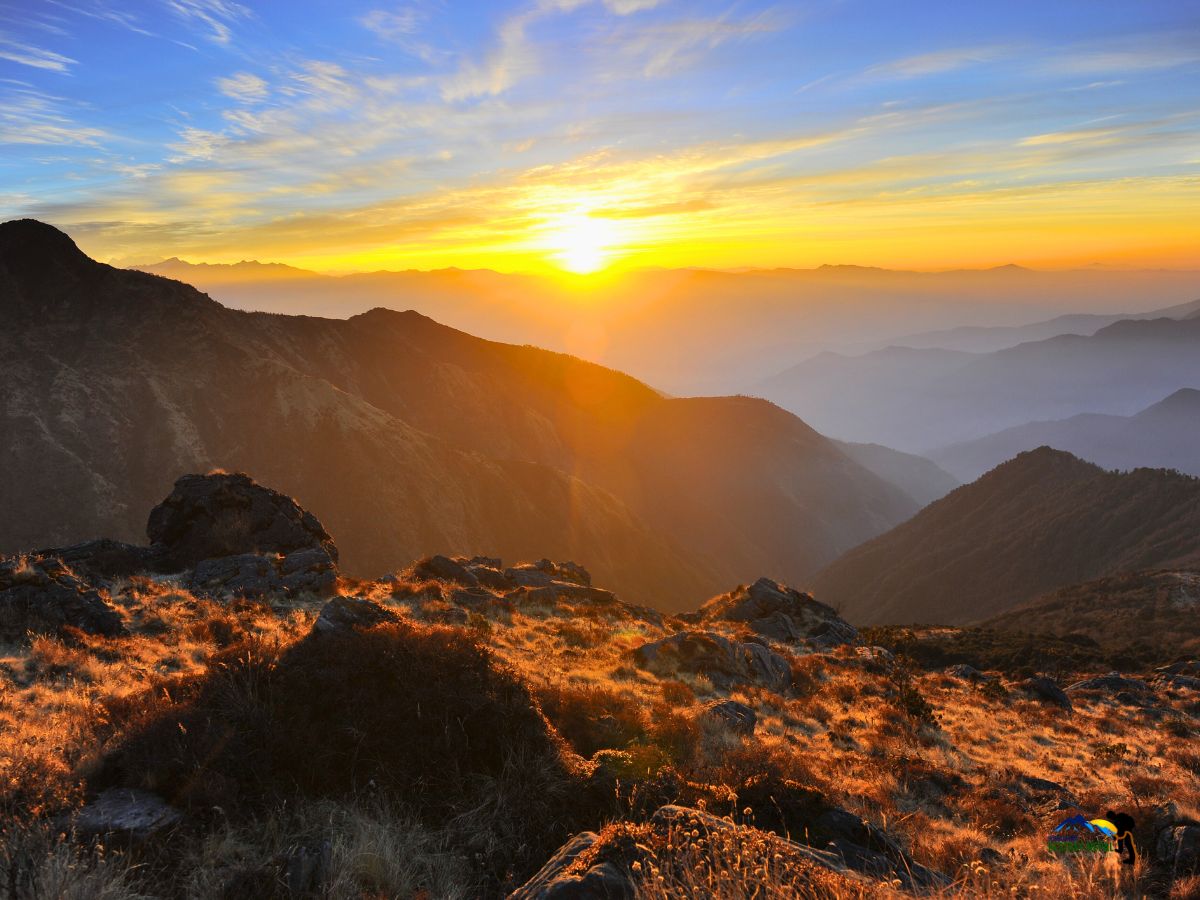
Witness the Majesty of Makalu and the Eastern Himalayas

mountain view in makalu expedition

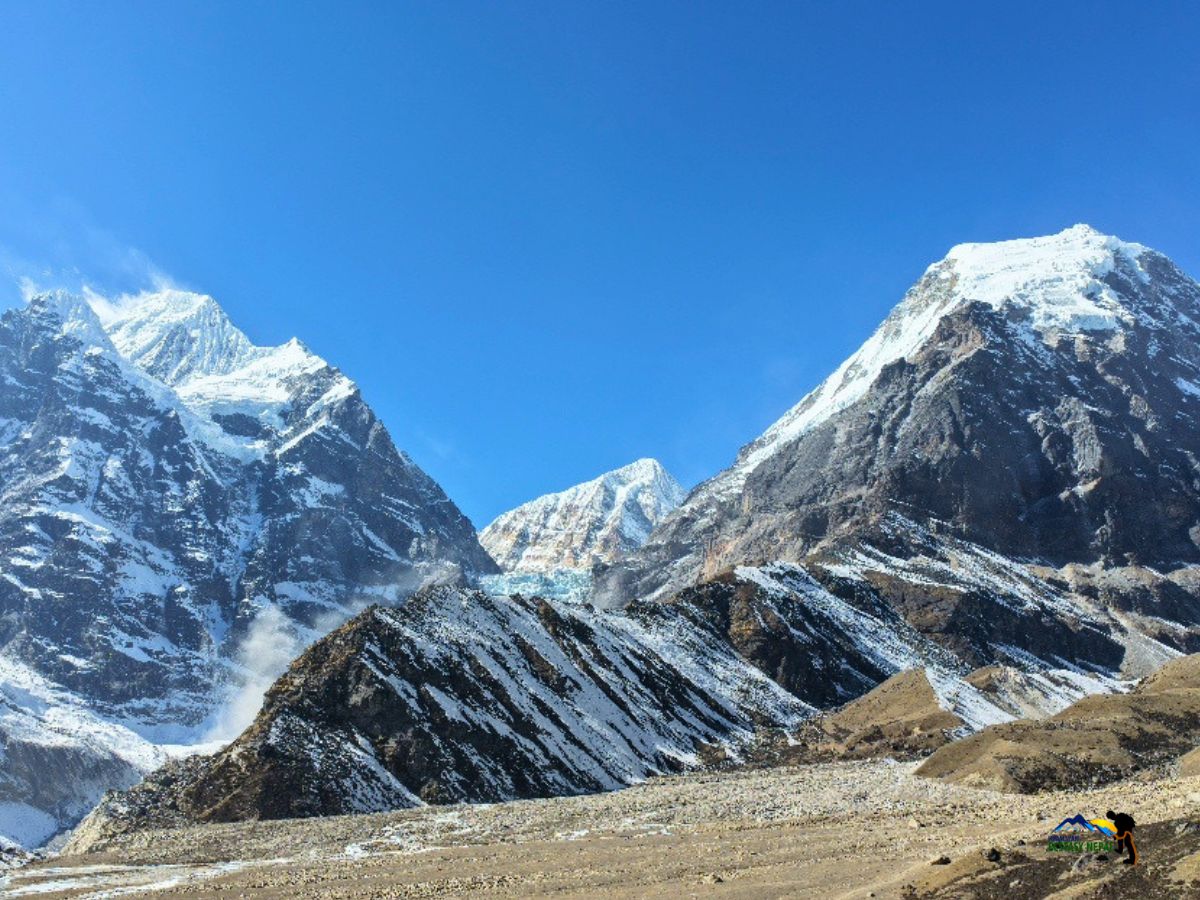
From the moment you step into the Barun Valley, the views of Makalu, Baruntse, and Chamlang dominate the skyline.

You’ll see glaciers, snowfields, and towering ridges up close, giving you a sense of just how powerful these mountains are. Every day offers new perspectives from lush river valleys at lower altitudes to stark alpine landscapes above.

Gateway via Tumlingtar

tumlingtar airport in makalu region

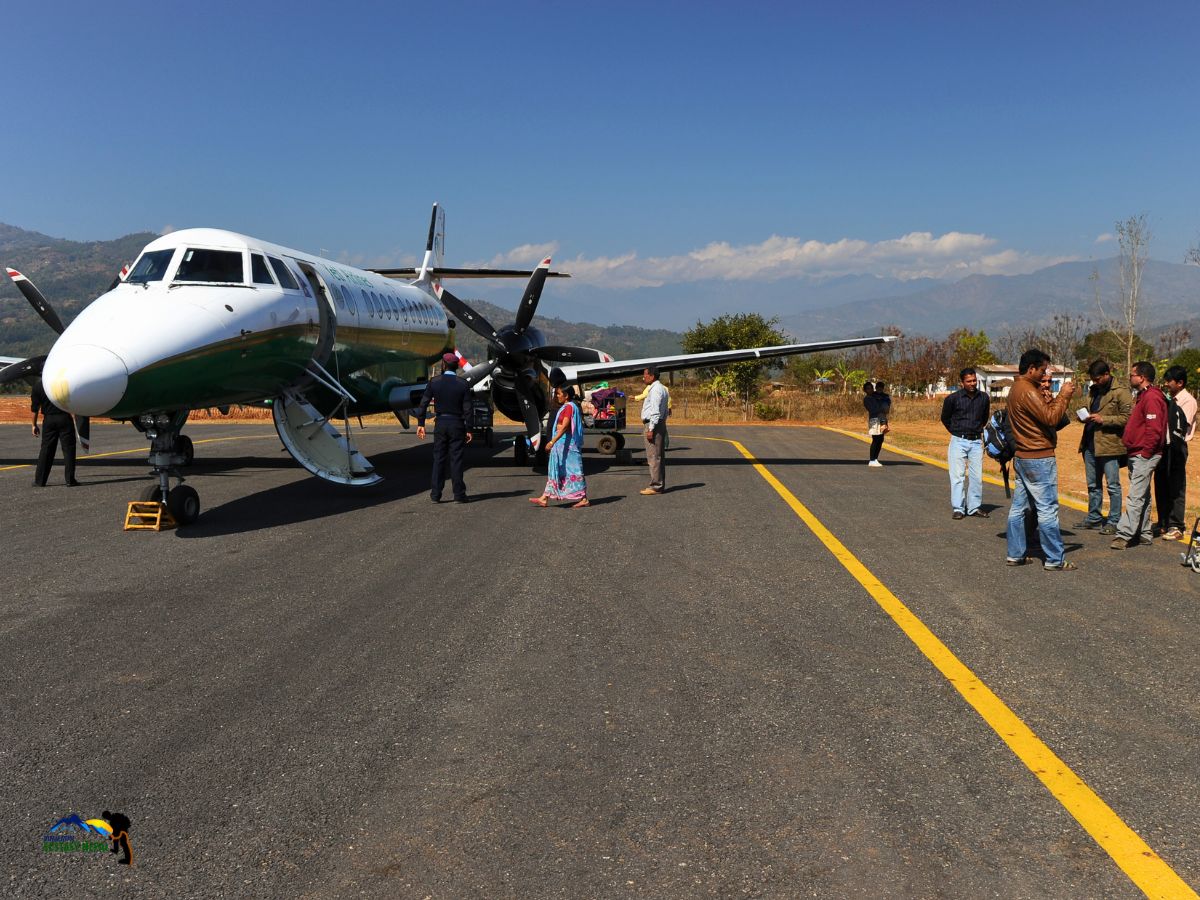
Tumlingtar is the main access point for the Makalu region. The short flight from Kathmandu brings you to eastern Nepal, where the road ends and the real journey begins.

From here, you start the trek toward Num and gradually enter the remote Makalu-Barun National Park. It is also the last place with basic urban facilities, so final gear checks and logistics are usually completed here before heading into the mountains.

Trek Through Remote Villages and Local Culture

makalu region local culture

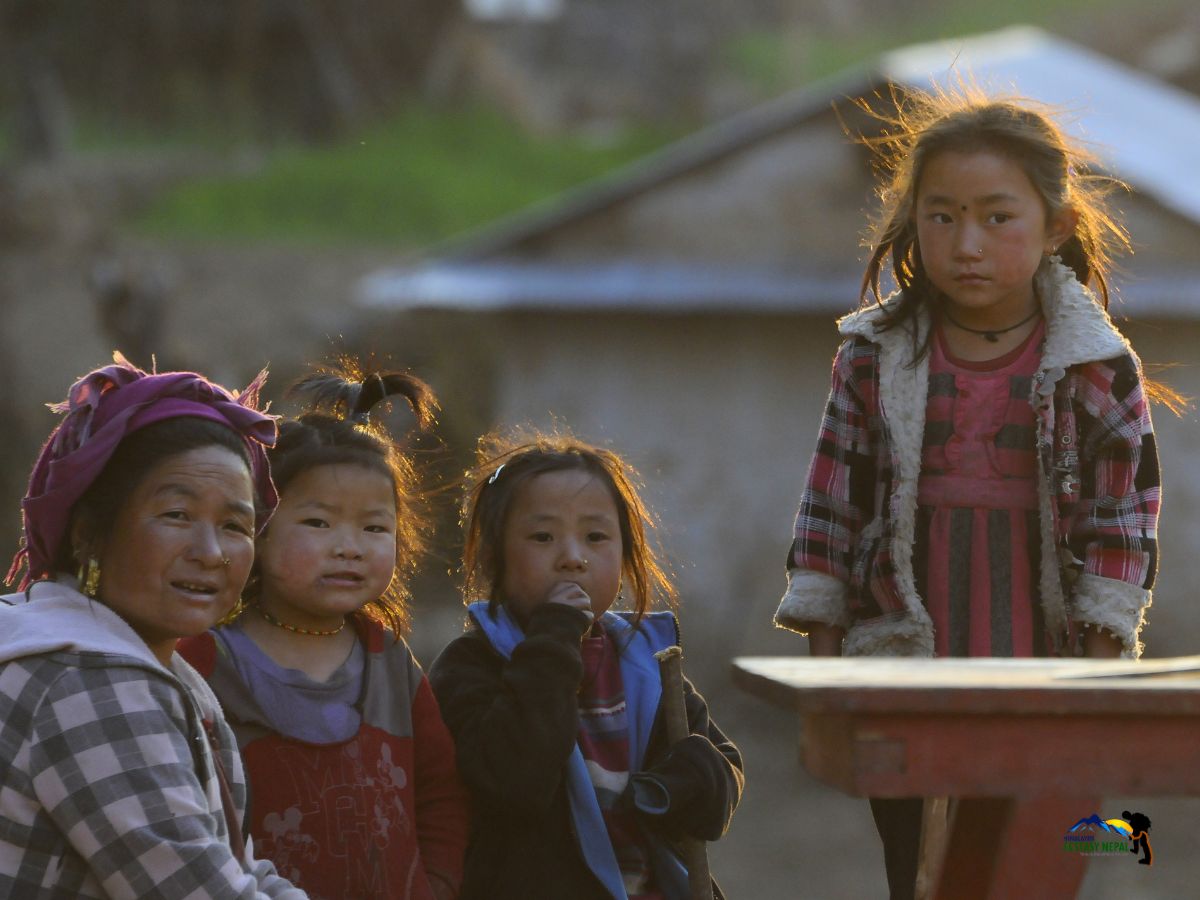
Along the trail, you’ll pass Sherpa and Rai villages, each with its own traditions and lifestyles. You can see mani walls, small monasteries, prayer flags, and terraced fields.

The locals are welcoming, and our HEN team will help you understand their culture, language, and customs. It’s not just a trek, it’s a cultural journey through a region few travelers ever see.

Explore the Pristine Barun Valley

barun valley

The Barun Valley is a hidden Himalayan treasure. You’ll walk through dense rhododendron and pine forests, cross wooden bridges, and see waterfalls and moss-covered rocks along clear rivers.

As you climb higher, the valley opens into alpine meadows and yak pastures, giving you a feeling of being completely immersed in nature. The valley is quiet, wild, and breathtakingly beautiful.

Adventure at Every Step

This expedition is designed for those seeking true adventure. You’ll navigate steep trails, rocky moraines, glaciers, and ice sections, and use ropes and crampons under the guidance of our HEN experts.

Each day challenges your strength, stamina, and focus, while rewarding you with views and experiences that feel almost unreal. The summit push, in particular, is a once-in-a-lifetime achievement.

Respecting the Mountains of Makalu Region

mountain views in makalu region

For many of our Sherpas, mountains are more than just tall peaks; they are sacred places where deities reside. Most Sherpas follow Hinduism or Tibetan Buddhism, and they see mountains as holy.

Before any climb, a special ritual is performed at Base Camp. The ceremony apologizes to the mountain for stepping on it and asks for blessings from the deities to keep the weather steady and ensure safety during the climb.

Skipping this ritual is considered disrespectful, so all climbers are encouraged to observe and learn. Joining in these traditions gives you a deeper connection to the Himalayas and a unique insight into local culture before your ascent.

Unique Himalayan Experiences

From the Puja ceremonies at Base Camp to seeing yaks grazing in high meadows and listening to the sound of melting glaciers, the Makalu Expedition offers experiences you won’t find anywhere else.

You’ll witness the quiet power of the mountains, the rhythm of local life, and the camaraderie of fellow climbers, all while feeling connected to this remote and beautiful region.

Mt.Makalu Expedition 8,463 m in 50 Days Itinerary

Kathmandu to KathmanduExpand all
Max Altitude: 1,400 m Meals: DinnerAccommodation: 3-star HotelTransportation: On a private basis
Max Altitude: 1,400 m Meals: B, L, DAccommodation: 3-Star Hotel
Max Altitude: 1,560 m Meals: B, L, DAccommodation: Local LodgeTransportation: Flight + Jeep
Max Altitude: 1,510 m Meals: B, L, DAccommodation: Local Lodge
Max Altitude: 2,070 m Meals: B, L, DAccommodation: Local Lodge
Max Altitude: 3,760 m Meals: B, L, DAccommodation: Local Lodge
Max Altitude: 3,550 m Meals: B, L, DAccommodation: Local Lodge
Max Altitude: 3,650 m Meals: B, L, DAccommodation: Local Lodge
Max Altitude: 4,310 m Meals: B, L, DAccommodation: Tent
Max Altitude: 4,780 m Meals: B, L, DAccommodation: Tent
Max Altitude: 5,870 m Meals: B, L, DAccommodation: Tent
Max Altitude: 8,463  m Meals: B, L, DAccommodation: Tent
Max Altitude: 5,870 m Meals: B, L, DAccommodation: Tent
Max Altitude: 3,600 m Meals: B, L, DAccommodation: Local Lodge
Max Altitude: 3,760 m Meals: B, L, DAccommodation: Local Lodge
Max Altitude: 1,510 m Meals: B, L, DAccommodation: Local Lodge
Max Altitude: 920 m Meals: B, L, DAccommodation: Local LodgeTransportation: Jeep
Max Altitude: 1,400 m Meals: B, L, DAccommodation: 3-star HotelTransportation: Flight
Max Altitude: 1,400 m Meals: B, L, DAccommodation: 3-star Hotel

Trip Cost Details

Includes

[Full-Board Services]

Arrival & Kathmandu Services

  • Airport transfers: pick-up and drop-off in a private vehicle
  • 4 nights hotel accommodation in Kathmandu (3-star/4-star) on bed & breakfast plan
  • Welcome & farewell dinner at a typical Nepali restaurant
  • Trekking and climbing map (included)

Government & Permits

  • Government Liaison Officer with full equipment, salary, and accommodation
  • Makalu-Barun National Park Permit and Mount Makalu Expedition Royalty Permit
  • Garbage deposit and waste management fees as per Nepal Government rules

Trekking and Base Camp Logistics

  • Domestic flights: Kathmandu to Tumlingtar to Kathmandu
  • Private jeep transfer: Tumlingtar to Num to Tumlingtar
  • Accommodation on trek: twin-sharing lodges/tea houses (basic in remote areas)
  • 3 meals per day (breakfast, lunch, dinner) with tea/coffee
  • Fresh and hygienic meals during the trek and at Base Camp
  • Personal baggage allowance: 40–50 kg per member, carried by porters
  • Makalu Base Camp setup includes:
    • Individual tent for each member
    • Foam mattress and pillow
    • Dining tent, kitchen tent
    • Toilet and shower tent
    • Staff and storage tents
    • Tables, chairs, and full kitchen equipment
  • Gas heater in dining tent at Base Camp
  • Solar panels and/or generator for lighting and charging devices

Expedition Staff

  • 1:1 Climbing Sherpa per member for the entire expedition
  • Sherpa support for carrying gear to higher camps
  • Experienced Base Camp cook and kitchen staff
  • All wages, insurance, equipment, and food for Sherpas and staff included
  • Comprehensive insurance coverage for all Nepali staff (climbing Sherpas, assistant guides, and kitchen crew)
  • High-altitude insurance for staff, including emergency helicopter evacuation coverage (up to USD 10,000 liability)

High Camp Setup & Climbing Logistics

  • High-altitude tents (shared: 2 climbers per tent)
  • High-altitude meals at Camp I, II, and III (Makalu typically does not use a fixed Camp IV; summit push is often from C3 depending on conditions)
  • Gas stoves, cooking gear, and basic kitchen setup at high camps
  • Fixed ropes and route fixing by professional Sherpa team (included in cost)
  • Summit oxygen support:
    • 4 bottles per climber with mask and regulator
    • 3 bottles per high-altitude Sherpa
  • Emergency oxygen system available at Base Camp

Communication

  • Walkie-talkie communication between Base Camp and higher camps
  • Satellite phone available for emergency use (personal use at extra cost)

Safety & Medical

  • Comprehensive medical kit for members and staff
  • Regular weather forecast updates from professional sources

Other Services

  • Expedition T-shirt and duffle bag for each member
  • Official summit certificate issued by the Nepal Government after a successful climb

Excludes

  • International airfare to/from Kathmandu.
  • Nepal entry visa fee ($125 USD for 90 days).
  • Meals not specified in the itinerary (e.g., lunch/dinner in Kathmandu beyond welcome/farewell).
  • Extra nights in Kathmandu (early arrival, late departure, or early trek return).
  • Personal insurance (medical, high-altitude evacuation, helicopter rescue, trip cancellation). Mandatory for climbers.
  • Personal expenses: phone calls, internet, toiletries, hot showers, laundry, soft drinks, alcohol, snacks, etc.
  • Personal climbing/trekking gear: clothing, packing items, bags, trekking poles, boots, gaiters, sunglasses, personal medical kit, etc.
  • Filming/camera/drone permits (if applicable).
  • Summit bonus for climbing guide: $1,800 to $2,000 USD (mandatory, not optional). This is a standard and non-negotiable part of Himalayan expedition culture. Your guide gives everything to get you to the summit safely, and this is the minimum expected acknowledgement of that effort.
  • Tips for Base Camp staff (suggested minimum $200 to 400 USD per member).
  • Additional supplementary oxygen cylinders if required beyond the included allocation: $500 per cylinder at Base Camp, $800 to $1,000 per cylinder at Camp 4. It is always better to plan for extra bottles in advance rather than face a shortage at extreme altitude.
  • Any service not specifically mentioned in the “Cost Includes” section.
  • Any additional staff beyond what is included in the package.
  • Costs arising from natural calamities, mishaps, or anything beyond control.

Additional Costs & Notes:

  • Summit bonus for climbing guide: USD 1,800 to 2,000 per climber (mandatory as per expedition practice)
  • Tips for Base Camp staff: Suggested USD 200 to 400 per member
  • Extra oxygen cylinders (if required):
    • USD 500 per bottle at Base Camp
    • USD 800 to 1,000 per bottle at Camp 3
  • Additional staff or services beyond the package
  • Any costs arising due to weather, natural calamities, or circumstances beyond control

Essential Information

Now that you’ve seen the full itinerary and highlights of the Makalu Expedition, let’s walk through the practical stuff that will help you prepare and feel confident before and during your journey. 

This guide covers the best time to visit, permits, accommodation, food, packing tips, altitude advice, and more, all in a clear, down‑to‑earth way so you know exactly what to expect.

Best Time for Makalu Expedition

The best time for the Makalu Expedition is during spring (April to May) and autumn (late September to November). In spring, the rhododendron forests are in bloom, the weather is generally clear, and snow conditions on the higher slopes are stable.

Autumn offers crisp skies, excellent visibility, and a chance to enjoy the mountains without the monsoon clouds. During both seasons, temperatures are milder, and trekking conditions are safer.

Our HEN team will help you monitor the weather closely to pick the perfect window for your summit attempt, ensuring both safety and a rewarding experience.

Seasons to Avoid

Monsoon Season (June to August):
This is not a good time for Makalu. Heavy rain makes the trails slippery and difficult. There are also risks of landslides, and flights to Tumlingtar can get delayed or canceled. Clouds block mountain views, and conditions at higher camps become unsafe.

Winter Season (December to February):
Winter is very harsh on Makalu. Temperatures drop extremely low, and strong winds are common. Heavy snowfall can block the route and increase avalanche risk. Climbing becomes much more difficult and dangerous during this time.

For a safe and successful climb, it is best to avoid these seasons and plan your expedition in spring or autumn.

Permits Required for Makalu Expedition

To do the Makalu Expedition, you need a few important permits. First, you need a Makalu-Barun National Park permit. This permit allows you to enter and trek through the protected park area surrounding the mountain.

Second, for climbing, you need a mountaineering permit from the Nepal government, which gives you legal permission to climb Mount Makalu. The permit fees support conservation efforts and local communities.

Our Himalayan Ecstasy Nepal team handles all the paperwork for these permits. We arrange everything in Kathmandu and make sure all documents are ready before you start your journey. This means you don’t have to worry about the complicated permit process we take care of it so you can focus on the adventure.

Altitude Sickness and Prevention Tips

Climbing Makalu (8,463 m) means entering the extreme altitude zone above 8,000 meters, often called the “death zone.” At this height, your body cannot survive for long without proper acclimatization.

So, you may face these altitude-related problems:

  • Acute Mountain Sickness (AMS): Common symptoms include headache, nausea, dizziness, fatigue, and trouble sleeping.
  • High Altitude Pulmonary Edema (HAPE): A serious condition where fluid builds up in the lungs. This makes breathing very difficult and can become life-threatening.
  • High Altitude Cerebral Edema (HACE): A dangerous swelling of the brain. It can cause confusion, poor balance, and even unconsciousness. 

How to Prevent It?

Here are some simple but important tips from our HEN experts. Some you follow yourself, and some are managed by our Sherpa team:

  • Gradual ascent with proper camp rotations
  • Follow the “climb high, sleep low” method
  • Drink plenty of water and eat high-energy food
  • Take enough rest between rotations
  • Regular health checks by guides and Sherpas
  • Use supplemental oxygen during the summit push, especially above Camp III

Note: Our expedition team carries medical kits, communication devices, and has a full evacuation plan ready in case of emergency.

Fitness and Mental Preparation Required

Climbing an 8,000-meter mountain like Mt. Makalu (8,463 m) is very demanding. It is one of the more technical peaks, so you need strong physical fitness and a tough mindset.

  • Proper preparation is a must.
  • You should train for several months before the expedition. Focus on:
    • Long endurance training (running, hiking, cycling)
    • Strength training, especially legs and core
  • Previous high-altitude trekking or climbing experience
  • Ice climbing and proper crampon use
  • Training with a heavy backpack

You should also have prior experience on at least a 6,000 m or 7,000 m peak before attempting Makalu. It is not just physically hard, it is mentally challenging too. So, you must be ready for:

  • Extreme cold and strong winds
  • Long expedition duration (around 45–50 days)
  • Remote and isolated environment
  • Basic comfort during the expedition
  • High-risk sections that need full focus

Strong determination, patience, and teamwork are very important for a successful Makalu expedition.

Accommodation and Food During the Entire Journey

During your Makalu expedition, accommodation and food change as you move higher. While trekking in the Makalu-Barun region, you will stay in local teahouses and basic mountain lodges. These are simple but comfortable, with shared rooms and common dining areas. Meals are fresh and filling. You can expect:

  • Dal Bhat (rice, lentils, vegetables)
  • Noodles and soups
  • Fried rice or pasta
  • Eggs, bread, and pancakes

Once you reach Makalu Base Camp, the setup becomes a full expedition camp. This includes:

  • Personal sleeping tents
  • Large dining tent
  • Kitchen tent
  • Communication tent
  • Medical and storage tents

You will also have experienced expedition cooks who prepare high-calorie meals to keep your energy strong during the climb. At higher camps (Camp I, II, and III), accommodation is in high-altitude tents.

Food here is more basic but designed for performance. It usually includes:

  • Freeze-dried meals
  • Soups and noodles
  • Energy bars and snacks

These meals are light, quick to prepare, and help you stay strong in high-altitude conditions.

Transportation to Get to Makalu Region

Your journey to Mount Makalu starts with a scenic flight from Kathmandu to Tumlingtar, about 40-45 minutes. You’ll enjoy views of eastern valleys and distant Himalayan peaks along the way. From Tumlingtar, you take a jeep to Num, driving through forests, rivers, and small villages.

From Num, the trek begins on foot, following trails through Makalu-Barun National Park. All your gear and supplies are carried by porters, yaks, or support staff, so you can walk light and enjoy the scenery. On the return, you follow the same route, trekking back to Num, driving to Tumlingtar, and flying to Kathmandu.

Everything is carefully organized by your HEN team, so you can relax and focus on your adventure.

Want to learn more? Directly contact us, and we'll offer the best advice and help you plan your Mt. Makalu Expedition!

Equipment Lists

Success and comfort on your Makalu Expedition hinge on proper preparation, and your equipment list plays a critical role in that. This comprehensive guide covers every essential item (from high-performance apparel to specialized trekking gear), ensuring you’re fully prepared for the diverse and demanding Himalayan environment. We strongly encourage you to review this list carefully; having the right equipment is not just important, it’s essential for a safe, smooth, and rewarding expedition.

Sun Hat (Wide-Brimmed or Baseball Cap):

  • Purpose: Essential for protection from the strong Himalayan sun at lower altitudes and even at higher altitudes where UV radiation is intense. A wide-brimmed hat offers more comprehensive face and neck protection.
  • Material: Lightweight, breathable, quick-drying.

Beanie / Warm Fleece Hat:

  • Purpose: For warmth, especially in the mornings, evenings, and at higher altitudes where temperatures drop significantly.
  • Material: Fleece, wool, or synthetic insulation. Something that covers your ears well.

Buff / Neck Gaiter / Balaclava:

  • Purpose: Highly versatile. Can be used as a neck warmer, pulled up over the face for dust/wind protection, worn as a headband, or even as a light hat. A full balaclava is excellent for extreme cold and wind, especially at higher camps or on pass days.
  • Material: Fleece, merino wool, or synthetic stretch fabric.

Headlamp (with extra batteries):

  • Purpose: Absolutely crucial for early morning starts (especially for Kala Patthar), navigating around the lodge at night, or if you're delayed on the trail.
  • Features: Brightness levels, red light option (preserves night vision), long battery life.

Headband (Optional but useful):

  • Purpose: For managing hair, wicking sweat, or providing light ear warmth without the bulk of a full hat.

Key Considerations for all Headgear:

  • Layering: Just like clothing, you'll layer your headgear. You might start with a beanie and a buff in the morning, switch to a sun hat during the day, and put the beanie back on in the evening.
  • Protection: The sun's intensity at altitude is often underestimated. Ensure good UV protection. Wind can also be a major factor, causing significant heat loss.
  • Comfort: Choose items that fit well and don't chafe, as you'll be wearing them for long periods.
  • Quick-Drying: Essential, especially for beanies or buffs that might get damp from sweat or light precipitation.

Base Layers (Wicking/Thermal Undershirts):

  • Purpose: Wicks sweat away from your body to keep you dry and regulate temperature. This is the foundation of your comfort.
  • Material: Lightweight and mid-weight merino wool or synthetic (polyester, polypropylene). Avoid cotton entirely, as it absorbs moisture and will chill you.
  • Recommended: 2-3 long-sleeved base layers; optionally, 1 short-sleeved for warmer days at lower altitudes.

Mid-Layers (Insulating/Fleece Jackets):

  • Purpose: To provide warmth by trapping air. You'll add or remove these layers as the temperature fluctuates throughout the day.
  • Material:
    1. Lightweight Fleece (100-200 weight): Ideal for active trekking and mild cold. (1 piece)
    2. Mid-weight Fleece (200-300 weight) or a thin synthetic insulated jacket: For colder conditions and higher altitudes. (1 piece)
  • Recommended: 2 versatile fleece or insulating jackets of varying thickness.

Outer Shell (Waterproof & Windproof Jacket):

  • Purpose: Your primary protection against wind, rain, and snow. It doesn't primarily add warmth, but it keeps you dry and protects your insulating layers from the elements.
  • Material: High-quality waterproof and breathable fabric (e.g., Gore-Tex, eVent, or similar). Look for features like sealed seams, an adjustable hood, and pit zips for ventilation.
  • Recommended: 1 durable, waterproof, and windproof hardshell jacket.

Down Jacket (or Heavy Synthetic Puffy Jacket):

  • Purpose: Your essential warmth layer for extreme cold, especially in the evenings, mornings, and at high camps (above 4,000 meters), or during breaks.
  • Material: High-fill power down (e.g., 600-800 fill) for excellent warmth-to-weight ratio and packability, or a very warm, high-quality synthetic equivalent.
  • Recommended: 1 very warm, packable down or synthetic insulated jacket.

Key Considerations for Upper Body Protection:

  • Layering is Key: The ability to add or shed layers is paramount for comfort and safety. Never rely on just one or two thick items.
  • "Cotton Kills": Avoid cotton clothing at all costs, as it retains moisture and dramatically increases heat loss.
  • Zippers and Vents: Ensure your layers have full or half zippers, and your shell jacket has pit zips for quick ventilation during strenuous activity.
  • Fit: Layers should fit comfortably over each other without being too bulky or restrictive, allowing for good circulation.

Lightweight Liner Gloves (Fleece or Merino Wool):

  • Purpose: These are your base layer. They provide a surprising amount of warmth, wick away sweat, and allow for dexterity for tasks like operating cameras, adjusting zippers, or handling trekking poles without exposing bare skin to cold.
  • Material: Thin fleece, merino wool, or synthetic wicking fabric.

Warm Fleece Gloves / Softshell Gloves:

  • Purpose: Your mid-layer. These provide more insulation than liners and are good for colder days at mid to higher altitudes when you still need some dexterity. They offer decent wind resistance.
  • Material: Mid-weight fleece, softshell fabric, or a blend.

Insulated Mittens (Waterproof/Windproof):

  • Purpose: Your outer, warmest layer, especially for early morning ascents, and evenings at higher camps. Mittens are generally warmer than gloves because they allow your fingers to share warmth.
  • Material: Outer shell should be waterproof and windproof (e.g., Gore-Tex, Pertex). Inner insulation should be down or high-loft synthetic. They should be large enough to wear over your liner gloves.

Heavy Duty Gloves (Optional but recommended for very cold sensitive hands or harsher conditions):

  • Purpose: A heavier, more insulated version of the fleece or softshell gloves, offering more warmth than typical mid-layers but still some dexterity compared to full mittens. Can be an alternative to or complement mittens.

Key Considerations for Hand Protection:

  • Layering: The most important concept. You'll layer your gloves just like your clothing. On a cold morning, you might wear liners inside your fleece gloves, or fleece gloves inside your mittens.
  • Waterproof/Windproof Outer Layer: Essential for high altitudes where snow, strong winds, and freezing temperatures are common. Wet hands lose heat rapidly.
  • Dexterity: While warmth is key, ensure you can still perform basic tasks. You'll find yourself taking gloves off less often if you have liners for fine motor skills.
  • Fit: Gloves and mittens should fit well – not too tight (restricts circulation) and not too loose (reduces warmth and dexterity).
  • Backup Pair: It's always a good idea to have a spare pair of liner gloves or a basic warm glove, as gloves can get wet or lost.

Base Layers (Thermal Leggings / Long Underwear):

  • Purpose: To wick sweat away from your skin, keeping you dry and preventing chafing. They provide foundational warmth.
  • Material: Lightweight and mid-weight merino wool or synthetic (polyester). Crucially, avoid cotton, as it retains moisture and chills you.
  • Recommended: 2-3 pairs for rotation.

Trekking Trousers (Durable & Quick-Drying):

  • Purpose: Your primary outer layer for trekking in most conditions.
  • Material: Made from durable, quick-drying nylon or a nylon/spandex blend for comfort and flexibility. Look for features like reinforced knees or articulated (pre-shaped) knees for better movement.
  • Recommended: 1-2 pairs. Convertible trousers (with zip-off legs) can offer versatility for warmer days at lower altitudes.

Softshell Trousers (Optional but Highly Recommended for Higher Altitudes):

  • Purpose: Provides excellent warmth and significant wind resistance, while offering more breathability and flexibility than a hard shell. They often have some water repellency. These are ideal for colder days at higher elevations or when crossing passes.
  • Material: Stretchy, durable softshell fabric.
  • Recommended: 1 pair, to be worn over base layers.

Hardshell / Rain Trousers (Waterproof & Windproof):

  • Purpose: Essential outer layer for complete protection against rain, snow, and severe winds.
  • Material: A high-quality waterproof and breathable membrane (e.g., Gore-Tex, eVent, or similar). Look for full-length side zippers, which are invaluable for putting them on/taking them off easily over boots and for ventilation.
  • Recommended: 1 pair.

Warm Camp Trousers (Optional but adds great comfort):

  • Purpose: A comfortable, warm pair of fleece pants, or lightweight down/synthetic insulated pants specifically for wearing around the teahouse in the evenings. They are excellent for warmth when static or for sleeping in on very cold nights.
  • Recommended: 1 pair (look for packable and compressible options).

Key Considerations for Lower Body Protection:

  • Layering System: The ability to combine or shed layers is paramount for adapting to the wide temperature swings and varying exertion levels.
  • Mobility: Choose pants that offer excellent freedom of movement, especially important on challenging ascents and descents.
  • Quick-Drying: All lower body layers should be quick-drying. Wet pants can lead to chafing and rapid heat loss.
  • Fit: Ensure layers fit comfortably over one another without bunching or being too tight (which can restrict blood flow and reduce warmth).
  • Durability: Trekking pants endure significant wear and tear. Invest in robust materials.
  • Avoid Cotton: Cotton material is unsuitable for trekking as it absorbs moisture, becomes heavy, and loses all insulating properties when wet.

Waterproof Trekking Boots (Mid to High-Cut):

  • Purpose: These are your most crucial piece of gear. They provide essential ankle support, stability on uneven and rocky trails, insulation from cold, and protection from moisture (snow, mud, stream crossings).
  • Features: Look for reputable brands known for their durability and comfort. Choose boots with a mid to high-cut design for optimal ankle support. They must be waterproof (e.g., with a Gore-Tex or similar lining) yet breathable. The sole should be stiff enough for rocky terrain but offer enough flex for comfortable walking.
  • Crucial Tip: Break-in Period: It is absolutely essential to break in your new boots thoroughly before the trek. Wear them on multiple long walks, ideally including some uphill and downhill sections, to mold them to your feet and identify any hot spots. New, unbroken-in boots are the leading cause of blisters.

Climbing Boots

  • Quality Single or Double Boots (insulated)

Camp Shoes / Lodge Shoes / Sandals:

  • Purpose: Provides immense relief for your feet after a long day of trekking. They are perfect for wearing around the teahouse, short strolls, or bathroom breaks at night, allowing your feet to breathe and recover.
  • Features: Lightweight, easy to slip on and off. Crocs, sturdy sandals, or comfortable slip-on shoes are popular choices.

Trekking Socks:

  • Purpose: Crucial for cushioning, wicking moisture away from your skin, regulating temperature, and preventing blisters.
  • Material: Opt for high-quality merino wool or good synthetic blends. Never wear cotton socks for trekking, as they absorb sweat, stay wet, and are a primary cause of blisters and cold feet.
  • Quantity: Bring 3-4 pairs of thick, warm trekking socks (for cushioning and warmth) and 2-3 pairs of thinner liner socks (optional, worn under thick socks, they can help reduce friction and prevent blisters).

Gaiters (Optional but Recommended):

  • Purpose: These are protective covers that attach to your boot and extend up your lower leg. They are excellent for preventing snow, scree, dirt, small rocks, or even leeches (at lower altitudes) from getting into your boots.
  • Features: Look for waterproof and breathable options. Mid-calf height is generally sufficient for most conditions.

Key Considerations for Your Footwear:

  • Fit is King: Ensure all footwear, especially your boots, fits perfectly with your trekking socks. Boots that are too tight restrict circulation (leading to cold feet), while boots that are too loose cause rubbing and blisters.
  • Moisture Management: While waterproof boots keep external water out, moisture-wicking socks are vital to keep your feet dry from sweat. Change socks regularly.
  • Blister Prevention: Be proactive! Address any hot spots immediately with moleskin or blister plasters. Carry a small personal blister kit.
  • Foot Hygiene: Daily foot care, including washing and drying your feet thoroughly, is important for overall foot health on the trek.

Passport:

  • Purpose: Your primary identification for international travel to and from Nepal, and for various trek permits.
  • Details: Must be valid for at least six months beyond your intended stay.

Nepal Visa:

  • Purpose: Required for legal entry into Nepal.
  • Details: Can be obtained upon arrival at Tribhuvan International Airport (TIA) in Kathmandu, or secured in advance from a Nepalese embassy or consulate in your home country. You'll typically need 2-4 passport-sized photographs for this.

Airline Tickets / E-tickets:

  • Purpose: For your international flights to and from Kathmandu, as well as your crucial domestic flights within Nepal (e.g., Kathmandu-Lukla-Kathmandu).
  • Details: Carry printouts and keep digital copies accessible on your phone or in cloud storage.

Travel and Medical Insurance Policy:

  • Purpose: Absolutely critical. This insurance should cover medical emergencies, emergency evacuation (especially helicopter evacuation from high altitudes), trip cancellation/interruption, and lost luggage.
  • Details: Carry a copy of your policy, emergency contact numbers for your insurance provider, and your policy number. Verify that high-altitude trekking up to your maximum elevation is explicitly covered.

Medical Information (Highly Recommended):

  • Purpose: Vital in case of a medical emergency.
  • Details: A small card or note listing any allergies (medications, food), existing medical conditions, current prescription medications (including generic names), and emergency contact information for your doctor.

Emergency Contact Information:

  • Purpose: For quick reference in unforeseen circumstances.
  • Details: List contact details for your next of kin, your tour operator's emergency number, and your country's embassy or consulate in Nepal.

Credit/Debit Cards & Cash (Nepalese Rupees):

  • Purpose: For payments for personal expenses, souvenirs, and tips. ATMs are generally scarce above Namche Bazaar, so cash is essential on the trail.
  • Details: Inform your bank about your travel dates to prevent card suspension. Keep emergency cash in a separate, secure location.

Passport-sized Photographs:

  • Purpose: Bring several extra copies (at least 4-6). They are frequently needed for permits, unexpected forms, or in case of lost documents.

Key Considerations for Your Travel Documents:

  • Originals and Copies: Always carry original documents, but keep high-quality photocopies (both physical and digital) stored separately from the originals. This is your safeguard if originals are lost or stolen.
  • Protection: Store all important documents in a waterproof and durable pouch or bag within your daypack and main luggage.
  • Accessibility: Keep your passport, visa, and trekking permits easily accessible, as they will be required for check-ins and checkpoints.
  • Digital Backups: Scan or photograph all critical documents and save them to a secure cloud service (like Google Drive, Dropbox) or email them to yourself and a trusted contact.
  • Security: Utilize a money belt or secure inner pockets for your passport, large sums of cash, and credit cards, especially in crowded areas.

Sunscreen (High SPF):

  • Minimum SPF 30, preferably 50+. The sun's UV radiation is significantly stronger at altitude. Opt for a broad-spectrum, water-resistant formula. A stick formula can be convenient for face and ears.

Toothbrush & Toothpaste:

  • A lightweight toothbrush and a small, travel-sized tube of toothpaste. Consider a biodegradable option.

Biodegradable Soap / All-in-One Wash:

  • A small bar of biodegradable soap or a travel-sized bottle of biodegradable all-in-one body wash/shampoo. This is crucial for minimizing environmental impact when water might drain into local ecosystems.

Dry Shampoo / Cleansing Wipes:

  • Highly recommended for waterless hair washing when showers are unavailable or too cold. Biodegradable body wipes are excellent for quick "sponge baths."

Moisturizer / Lotion:

  • A small tube is essential. The high altitude and dry, cold air can severely dehydrate and chafe your skin.

Lip Balm (with SPF):

  • Absolutely critical. High UV exposure, wind, and cold can cause severe chapping. Choose a lip balm with high SPF (30+). Bring at least two.

Hand Sanitizer:

  • Indispensable for maintaining hygiene, especially before meals and after using teahouse facilities where water for handwashing may be limited or freezing cold.

Toilet Paper:

  • Essential to carry your own. While some lodges provide it, it's not guaranteed, especially for use on the trail. Pack it in a waterproof bag. Remember to pack out all used paper (do not leave it on the trail).

Small Quick-Drying Towel (Microfiber):

  • A lightweight, compact microfiber towel is great for quick washes or drying after the occasional hot shower (which usually comes with an extra charge).

Personal Medications:

  • Any prescription medications you require, plus a small supply of over-the-counter essentials like pain relievers, blister treatment, antiseptic wipes, and cold/flu remedies.

Feminine Hygiene Products (if applicable):

  • Pack an adequate supply, as availability in remote villages is extremely limited. Be prepared to pack out all used products.

Key Tips for Toiletries:

  • Go Minimalist: Every gram counts on the trek. Opt for travel sizes or decant into smaller containers.
  • Leak-Proof: Pressure changes at altitude can cause liquids to leak. Ensure all bottles are tightly sealed and ideally double-bagged.
  • Cold Protection: Keep liquids that can freeze (like toothpaste or contact lens solution) inside your sleeping bag at night.
  • Leave No Trace: Always pack out everything you pack in, including all waste from toiletries.

Energy Bars / Granola Bars:

  • Purpose: Provide quick, sustained energy.
  • Recommendation: Look for bars with a good balance of carbohydrates, protein, and healthy fats. Choose options that aren't overly reliant on sugar, to avoid energy crashes.

Nuts & Seeds:

  • Purpose: Excellent source of healthy fats, protein, fiber, and concentrated calories.
  • Recommendation: Almonds, walnuts, cashews, peanuts, pumpkin seeds, and sunflower seeds are all great choices. A mixed bag offers variety.

Dried Fruits:

  • Purpose: Deliver a quick energy boost from natural sugars, along with fiber and vitamins.
  • Recommendation: Raisins, apricots, dates, figs, cranberries, and mango slices are popular options.

Trail Mix (DIY or Pre-packaged):

  • Purpose: A versatile combination, often blending nuts, seeds, dried fruit, and sometimes a few chocolate pieces.
  • Recommendation: Customize your own mix with your favorite components or choose a high-quality pre-made blend.

Hard Candies / Gummy Bears / Jelly Beans:

  • Purpose: Offer an instant sugar rush for quick energy, can help with dry mouth or a sore throat, and provide a welcome morale boost.
  • Recommendation: Small, easy to carry, and non-messy options.

Chocolate (Dark Chocolate Recommended):

  • Purpose: High in calories, provides energy, and is a fantastic psychological pick-me-up. Dark chocolate offers additional antioxidants.
  • Recommendation: Pack robust bars that won't easily crush or melt (though melting is less of an issue at higher, colder altitudes).

Protein Bars / Jerky:

  • Purpose: Essential for muscle recovery and sustained fullness.
  • Recommendation: High-protein bars specifically designed for active individuals, or beef/vegan jerky for a savory protein source.

Nut Butter Packets:

  • Purpose: A super-dense source of calories and healthy fats.
  • Recommendation: Single-serving packets of peanut butter, almond butter, or other nut butters. Can be eaten directly or with crackers.

Crackers / Biscuits:

  • Purpose: Good carbohydrate source and can be a comforting, bland option if your stomach is sensitive at altitude.
  • Recommendation: Plain crackers or digestive biscuits.

Key Considerations for Your Trekking Snacks:

  • Taste at Altitude: Your taste buds can change at high altitudes. Bring a variety, as what you normally love might not appeal to you on the trek. Sometimes salty or blander foods are preferred.
  • Calorie-to-Weight Ratio: Prioritize snacks that pack a lot of energy for their weight, as every gram counts in your pack.
  • Durability & Packaging: Choose snacks that won't easily crush, melt, or make a mess. Ensure all packaging is airtight.
  • Pack Out All Waste: Always carry out all your snack wrappers and any other trash. Leave no trace in the pristine Himalayan environment.

Sleeping bag liner and a Synthetic/Down Sleeping Bag:

  • Purpose: To guarantee you stay warm in freezing mountain temperatures.
  • Recommendation: Aim for a sleeping bag with a "comfort rating" of at least -45°C (-49°F). This rating indicates the temperature at which an average person can sleep comfortably. If you're plaaning for a winter ascent, a bag rated for -73°C (-99°F) might be necessary. Always prioritize the "comfort" or "limit" rating over the "extreme" rating.

Key Considerations for Your Sleeping Bag:

  • Teahouse Nights: Lodges on the Manaslu Circuit trail provide warm duvets, and are sufficient for summer/spring treks. For winter, especially at higher altitudes, your sleeping bag is your primary source of warmth at night.
  • Protection: Always keep your sleeping bag in a waterproof stuff sack (even inside your duffel bag) to protect it from moisture.
  • Rental Option: If you don't plan to trek frequently in cold conditions, you can also rent a high-quality sleeping bag with Himalayan Ecstasy Nepal. Please contact us to inquire about availability
  • Air Out: Whenever possible, air out your sleeping bag during the day (e.g., at lunch stops if sunny) to remove moisture.

Your Daypack: The Essential Trail Companion

Your daypack is your constant partner on the Everest 3 Peak Challenge expedition, carrying all the immediate essentials you need for comfort, safety, and convenience during your daily hikes. Unlike your main duffel, which is carried by porters, your daypack stays with you, ensuring quick access to vital items. This is where you'll keep everything you might need between teahouse stops. Think of it as your portable base for a day's adventure – from staying hydrated and fueled to adapting to sudden weather changes.

Key Features to Look For:

  • Comfortable Fit: Paramount for multi-day trekking. Seek out adjustable padded shoulder straps, a breathable and padded back panel, and a functional hip belt. A good hip belt is vital for distributing the pack's weight comfortably onto your hips, taking pressure off your shoulders.
  • Hydration Compatible: A dedicated internal sleeve for a hydration reservoir (like a CamelBak) and a port for the drinking tube are highly convenient. This allows you to stay hydrated without constantly stopping to pull out a water bottle.
  • Accessible Pockets: Well-placed pockets are invaluable. Look for side pockets (ideal for water bottles or quick-grab items), a front stash pocket (for maps or a lightweight layer), and a top lid pocket (perfect for small items like a hat, gloves, lip balm, or sunscreen you need often).
  • Integrated Rain Cover: Essential protection for your daypack and its contents. Many quality daypacks come with a built-in, stowable rain cover. If not, purchase one separately.
  • Lightweight Design: Choose a daypack that is inherently light even when empty. Every extra gram adds up over hours and days of trekking.
  • Harness: A lightweight but fully adjustable climbing harness, suitable for mountaineering (padded legs are a bonus for comfort). Ensure it is rated for high-altitude use.
  • Crampons:Technical mountaineering crampons (automatic/step-in are preferred for climbing boots). Ensure they fit your climbing boots perfectly and practice putting them on before the trip.
  • Ice-Axe: A robust technical ice-axe (length appropriate for your height) for self-arrest and assistance on the glacier and steep slopes. A leash is highly recommended to prevent losing your axe.
  • Carabiners (Locking / Non-Locking): Bring 8-10 Locking Carabiners (pear-shaped/HMS types for belaying/safety) and 4-6 Non-Locking Carabiners for general purpose clipping. Keep them simple, lightweight, and rated for climbing.
  • Ice-Screws: Essential for setting anchors in ice. Bring 3-4 quality screws (16cm - 21cm), typically provided as part of the team's group gear but often good to have extras for personal use or safety.
  • Snow Anchor: A reliable snow picket or specialized deadman anchor. This is primarily a group gear item, but personal use on the summit push can be required.
  • Rock Piton: Usually considered group gear for emergency or establishing fixed anchors on rock sections. Not typically carried by every individual climber.
  • Helmet: A UIAA-approved, lightweight, and adjustable climbing helmet. Essential for protection from falling ice and rock. Ensure it fits comfortably over your balaclava/hat.
  • Ascender (Jumar): A mechanical rope grab device (Jumar or Petzl Ascender) for ascending fixed ropes. Bring one left-hand or right-hand model as per your preference.
  • Figure-8 Descender / Belay Device: A versatile rappel/belay device (e.g., ATC Guide, Reversos, or Figure-8) for safe descending and managing ropes.
  • Sling / Tape: 4-6 Slings/Runners (60cm, 120cm) and 1-2 Long Prusik Cords (6mm or 7mm x 5-6m) for setting up anchors, clipping into fixed lines, and emergency self-rescue.
  • Climbing Boot: High-altitude, insulated double or triple plastic/leather boots (e.g., La Sportiva Olympus Mons, Scarpa Phantom 8000). Absolutely non-negotiable for frostbite prevention at extreme altitudes.
  • Down Suit: A high-quality, full-body down suit (800+ fill power) rated for extreme cold ($8000\text{m}$ level). Essential for the summit push above Camp 3.
  • Poncho or Umbrella
  • Plastics for cover your personal bag
  • Camera /memory stucks
  • Mosquito protect creams (required only summer)
Plan Your Trip