Everest is the world’s most famous mountain and attracts climbers from across the globe, so its routes can be crowded. Despite this, climbing Everest offers an unparalleled experience and a chance to test your skill at the highest level. This expedition involves technical snow and ice climbing, requiring teamwork with experienced guides and Sherpas. Located in Nepal’s Solukhumbu region (Latitude: 27.9881° N, Longitude: 86.9250° E), we offer full-board services with optional support for Everest expedition. Choosing Everest means joining a historic adventure, experiencing iconic Himalayan landscapes, and challenging yourself on the world’s tallest peak.
Mt. Everest Expedition 8848.86m in 64 Days
EXPEDITION REQUIREMENTS
- Previous High-Altitude Experience (mandatory): Climbers must have successfully ascended at least one 7,000m peak (recently) as per the latest regulations and a certification as proof.
- Valid Climbing Permit: Issued by the Department of Tourism, Nepal.
- Registered Expedition Agency: The climb must be organized through a government-registered trekking/climbing agency like Himalayan Ecstasy Nepal (HEN).
- Experienced Guide Requirement: A licensed climbing guide (Sirdar/Guide) must be assigned to the expedition.
- Travel & Rescue Insurance: Comprehensive insurance covering high-altitude evacuation (helicopter rescue) is mandatory.
- Medical Fitness: A recent medical certificate confirming you are fit for extreme high-altitude climbing.
- Logistics & Documentation: Valid passport, visa, and all required expedition paperwork.
EXPEDITION HIGHLIGHTS
- Summit Mount Everest (8,848.86 m), the highest mountain on Earth.
- Difficulty/Grade Level: Extreme and technical 8,000m expedition for experienced climbers.
- Follow the classic south route through the famous Khumbu region.
- Trek through traditional Sherpa villages like Phakding, Namche Bazaar, Tengboche, Dingboche, and Lobuche.
- Explore Everest Base Camp (5,364 m) with a fully equipped expedition setup.
- Experience the traditional Puja Ceremony before the climb, led by a local lama for safety and success.
- Cross the challenging Khumbu Icefall using ladders, ropes, and expert guidance.
- Strategic acclimatization rotations between Camps I, II, and III for safe altitude gain.
- Climb through glaciers, crevasses, and the steep Lhotse Face using fixed ropes and technical gear.
- Final summit push via Camp IV (South Col ~7,950 m) in the extreme high-altitude zone.
- Enjoy breathtaking summit views of Lhotse, Makalu, and Cho Oyu.
- Full-board expedition supported by experienced Sherpa guides and the HEN team.
- Responsible climbing with proper waste management and “Leave No Trace” principles.
EXPEDITION CHALLENGES
- Khumbu Icefall (Base Camp to Camp 1): This is one of the hardest parts. You walk over moving ice, cross deep crevasses using ladders, and use ropes for safety. It looks scary at first, but our HEN Sherpas guide you step by step.
- High Altitude and Low Oxygen: As you go above 7,000 meters, the air becomes very thin. Breathing feels harder, and even small steps take more energy. You must walk slowly and stay patient.
- Extreme Cold and Wind: Higher camps are very cold, especially at night. Strong winds can make it feel even colder. Good gear and guidance from our HEN team help you stay safe.
- Avalanche and Ice Risks: There can be avalanches or falling ice in some areas. Our experienced Sherpa team always chooses the safest route and watches the conditions carefully.
- Weather Changes: Weather in the mountains can change very fast. One moment it is clear, and the next it can be windy or snowy. That’s why timing and guide decisions are very important.
The Ascent Plan
- From Base Camp to Camp 1, you go through the Khumbu Icefall. You walk on ice, use ropes, and cross ladders over crevasses. This is a technical section, so you move slowly and follow your guides carefully.
- From Camp 1 to Camp 2, the route is less technical but still long. You walk on glacier terrain in a wide valley. The sun can be strong during the day, so you need to keep a steady pace and stay hydrated.
- From Camp 2 to Camp 3, you climb the Lhotse Face. This is a steep ice wall where you use ropes and crampons. It feels more challenging, so moving slowly and carefully is very important.
- From Camp 3 to Camp 4, the altitude becomes very high. The air is thin, and it is very cold and windy. You conserve energy here and prepare your body for the final climb.
- For the summit push, you start at night with your Sherpa guides. You walk step by step using ropes and crampons. It is the hardest part, but also the most rewarding, as you move closer to the top.
IMPORTANT: Essential High-Altitude Gear & Safety Notice
For a successful Everest Expedition, having the right high-altitude equipment is not optional. These items are critical for both safety and performance in extreme conditions.
- Supplemental Oxygen: Plan for 5 oxygen bottles per climber and 3 bottles per Sherpa. Carrying an additional backup is strongly advised for safety during the summit push and in case of emergencies.
- Mask and Regulator: One of the most critical components. It must be in proper working condition, as any malfunction at high altitude can directly affect your ability to breathe and continue safely.
- Down Suit: A high-quality down suit is essential to withstand extreme cold at higher camps and during the summit push.
- High-Altitude Mountaineering Boots: Reliable options such as Scarpa or La Sportiva are recommended for proper insulation and support.
- Sleeping Bag (-50°C): A high-performance sleeping bag is necessary for protection against extreme temperatures and proper rest.
- Gloves: Insulated, high-quality gloves are required to prevent frostbite and maintain hand function.
- Helmet: A good-quality helmet is essential for protection in rocky and exposed sections.
Proper planning and ensuring the quality of these essential items play a vital role in the overall success and safety of the expedition.
Standing on the summit of Mount Everest is a dream for many climbers. But this journey is not just about reaching the top. It is about the people you meet, the mountains you walk through, and the strength you discover in yourself. At the same time, Everest is not an easy adventure. It needs serious preparation, both mentally and physically.
Flexible Everest Expedition Packages: Choose What Works for You
At Himalayan Ecstasy Nepal, we understand that every climber comes with a different level of experience, budget, and expectation of support on the mountain. That is why we have structured the Everest Expedition into three flexible options.
And here is something important to know. You do not need a group to book. Solo climbers are welcome. If you are joining alone, we handle all official formalities by coordinating your permits and documentation with other registered expedition teams on Everest. You focus on your climb. We take care of the process!
Option A: Full Board Everest Expedition
The complete, fully managed experience from Kathmandu to the summit and back.
Everything is handled by our team including airport transfers, hotel stays, Ministry briefings, all permits, experienced Sherpa guides and their insurance, porter support, and liaison officer coordination.
At Everest Base Camp, you will have a fully equipped expedition setup with dining tents, kitchen, communication systems, and high altitude support staff. Higher up, we manage route coordination, camp setup, oxygen support, weather updates, and summit planning.
You focus entirely on climbing. We handle everything else.
Option B: Company Service (Budget Everest Expedition)
A more flexible setup for experienced climbers who prefer partial independence.
HEN takes care of all essential and official requirements including your Everest climbing permit, Sherpa support with insurance, porter services, trekking permits, and liaison officer coordination. Transportation from Kathmandu to Base Camp is also arranged.
Beyond that, climbers manage their own gear, high altitude logistics, and personal setup.
A cost effective option without compromising the essentials.
Option C: Permit and Join Expedition Service
The most flexible and budget friendly option for independent climbers.
HEN arranges your Everest climbing permit and all required documentation, then coordinates your placement within an existing expedition team on the mountain.
You get access to base camp services and shared expedition support while maintaining flexibility with your own gear and climbing style.
Ideal for climbers who are self sufficient but need the official framework handled professionally.
Why is Preparation So Important For Summiting the World's Highest Mountain?

- Climbing Everest is not something you can do without experience.
- You need strong physical fitness and mental strength.
- You must be ready for cold weather, long days, and thin air.
- The climb includes technical sections with snow, ice, and glaciers.
- You need proper training before attempting the expedition.
Everest is not just a dream; it is a serious challenge that requires discipline and preparation!
Mountaineering skills are very important for safety. Here are the most essentual skills you need to learn:
- Using ropes for climbing and safety
- Walking with crampons on snow and ice
- Using an ice axe properly
- Moving safely on glaciers and steep terrain
- At first, gear like crampons can feel heavy and uncomfortable. Without practice, you can lose balance or even get injured.
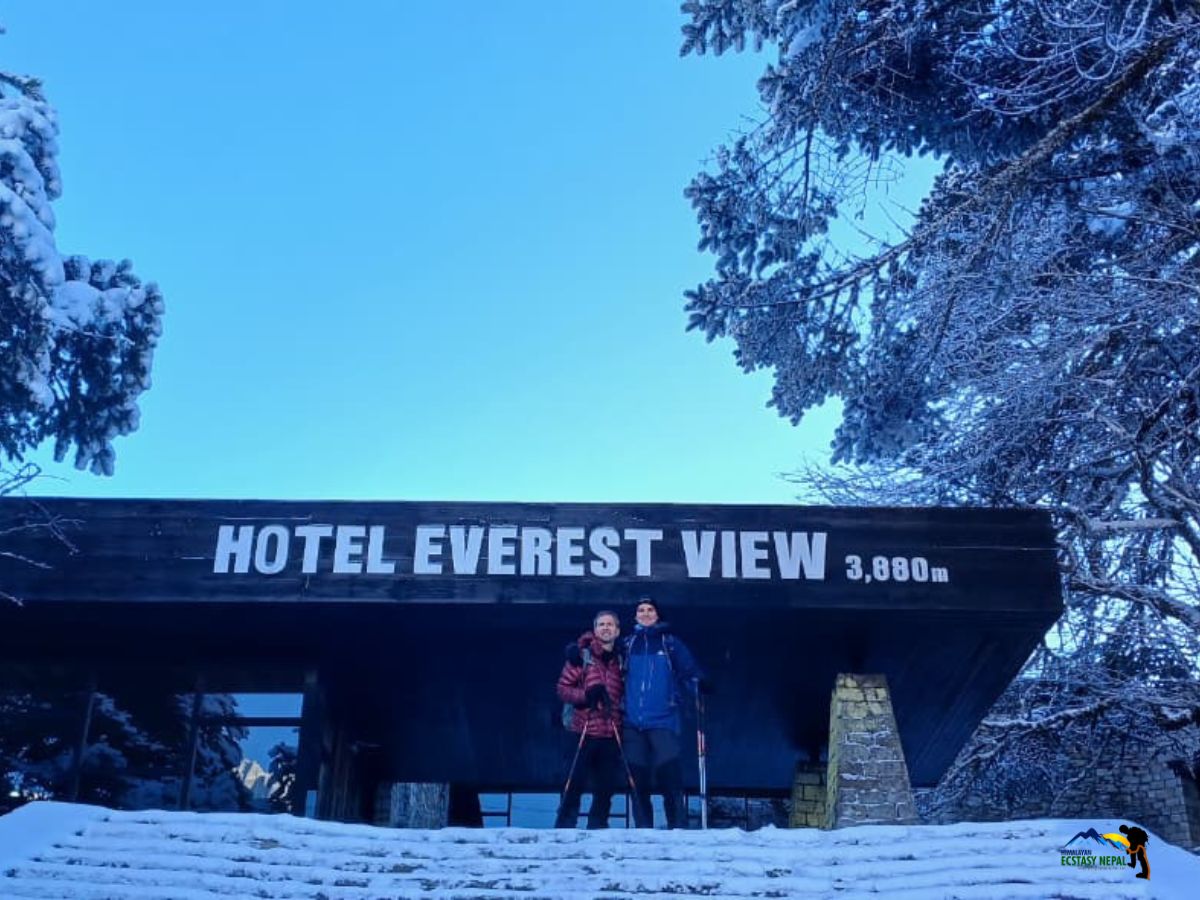
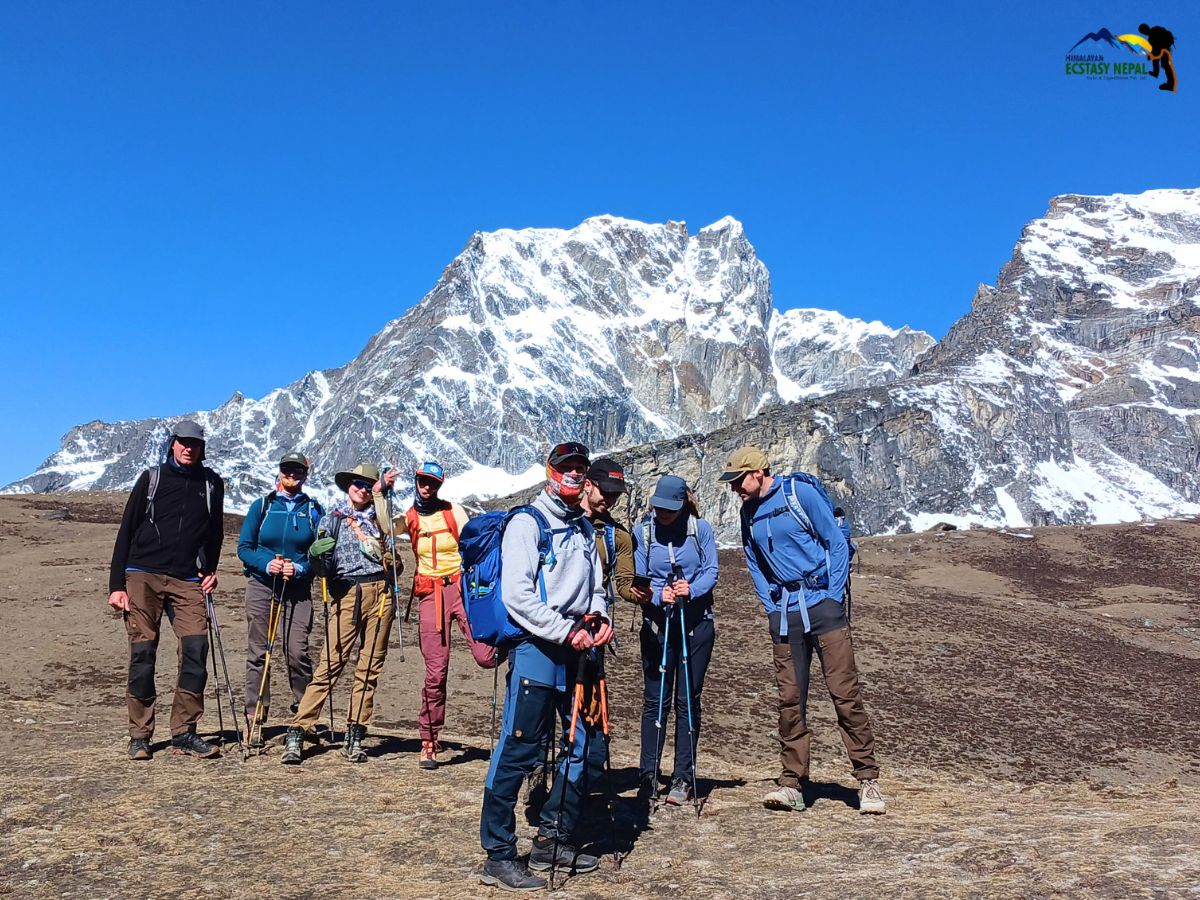
Recommended Treks Before Everest
Even if you have climbing experience, preparation is still important. You can do these treks to get ready:
These help you adjust to high altitude, build strength and endurance, and reduce the number of rotation days during the expedition.
Optional Preparation Peak Lobuche East
If you want extra preparation, you can climb the Lobuche East peak. In fact, many expedition companies (sometimes, even we at Himalayan Ecstasy Nepal) make it mandatory to ensure you acclimatize properly.
In fact, this optional preparation trek is best for practice using climbing gear, adjusting your body to the altitude again, and building confidence before that Everest summit. Indeed, it is a great option, especially if you have limited time.
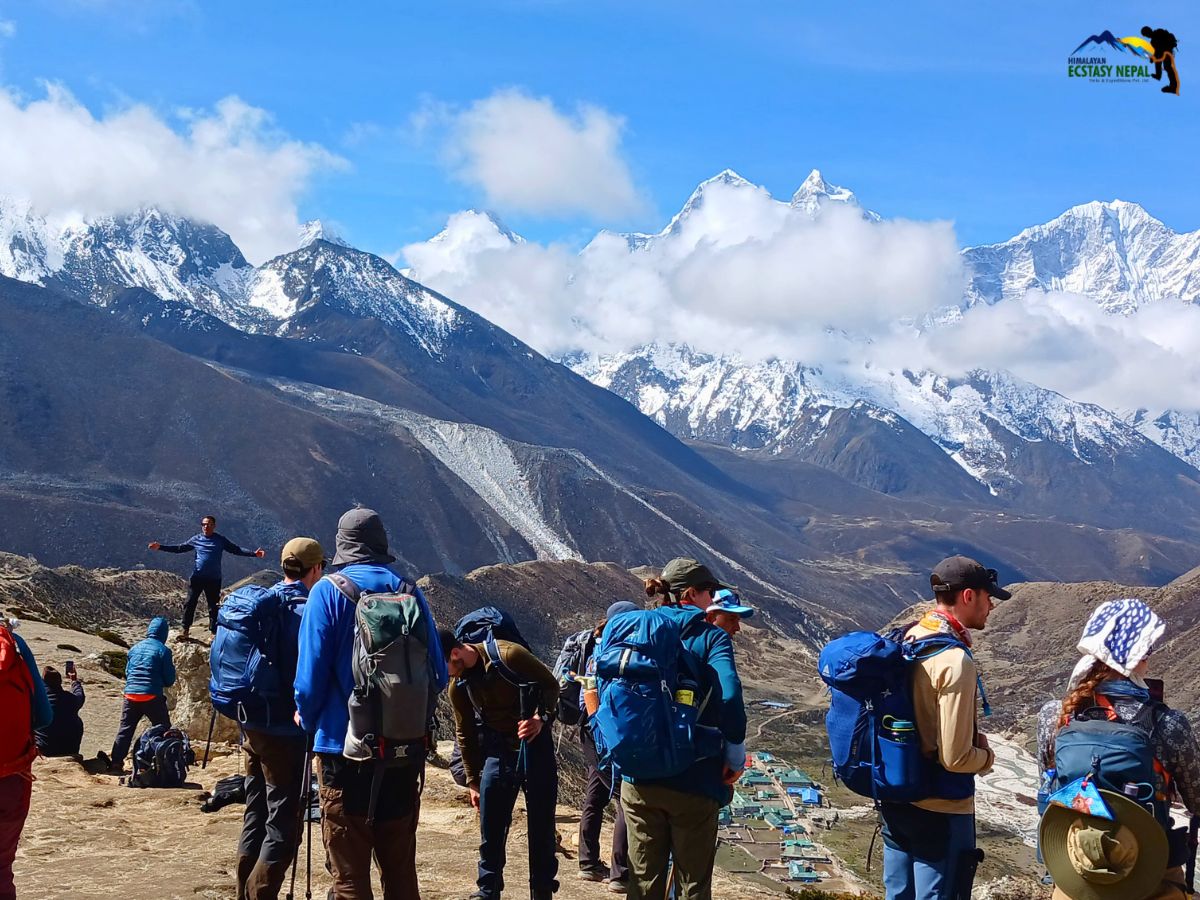
Walk Through the Legendary Khumbu Valley

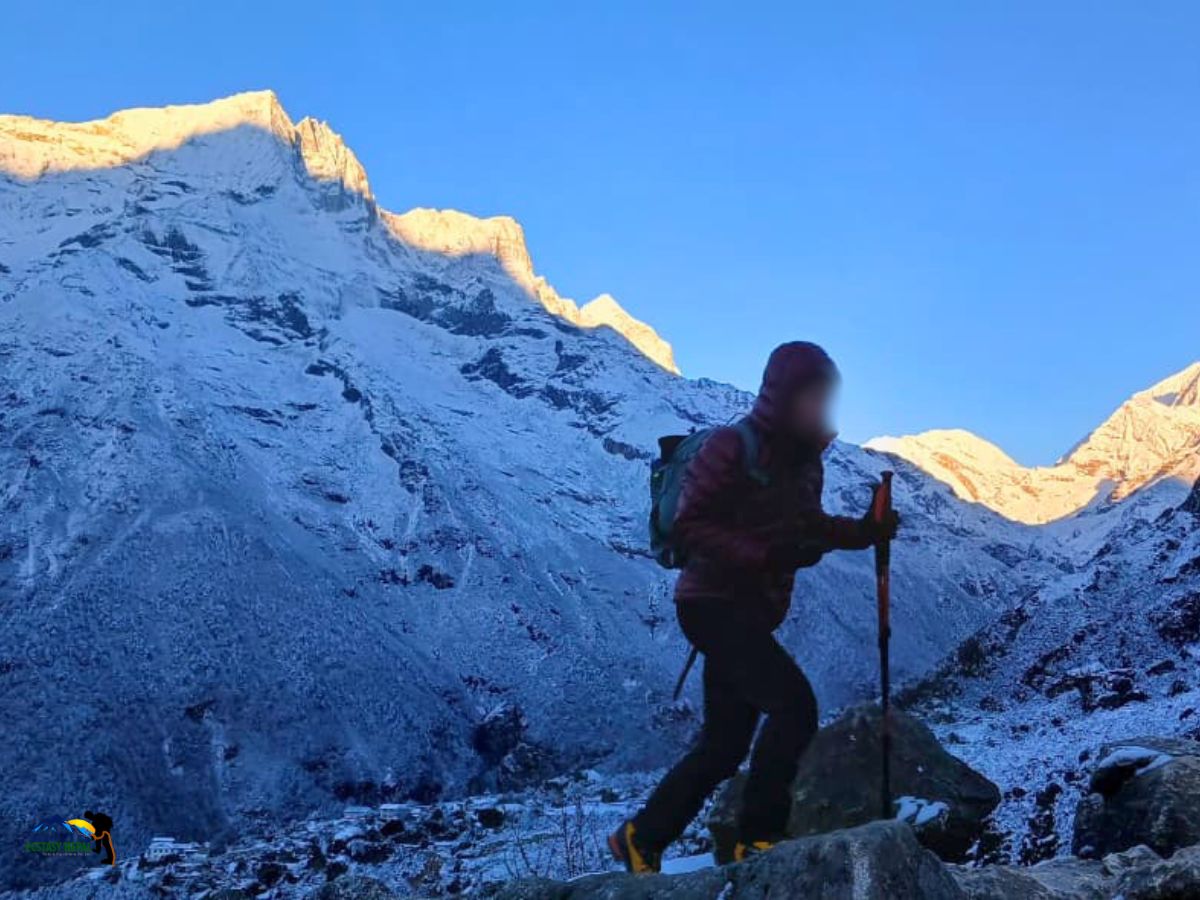
The journey into the Everest region begins with a trek through the Khumbu Valley, one of the most famous trekking routes in the world.
Here, the landscape constantly changes as you move higher into the mountains. Dense forests of pine and rhododendron slowly give way to open alpine terrain. Snow-covered peaks begin to dominate the horizon.
You walk beside the rushing Dudh Koshi River, cross suspension bridges high above deep gorges, and pass small mountain villages where life continues in harmony with nature. Every day brings new scenery, new views, and new experiences.
Discover the Sherpa Culture
The Everest region is not only about mountains. It is also home to the Sherpa community, known for their incredible mountaineering skills and warm hospitality. During the journey, you pass traditional villages with stone houses, colorful prayer flags, and spinning prayer wheels.
One of the cultural highlights is visiting Tengboche Monastery, the largest monastery in the region. Surrounded by Himalayan peaks, the monastery offers a peaceful moment where you can witness Buddhist prayers and experience the spiritual side of the mountains. These cultural encounters make the journey richer and more meaningful.
The Khumbu Adventure: Everest’s Legendary Route

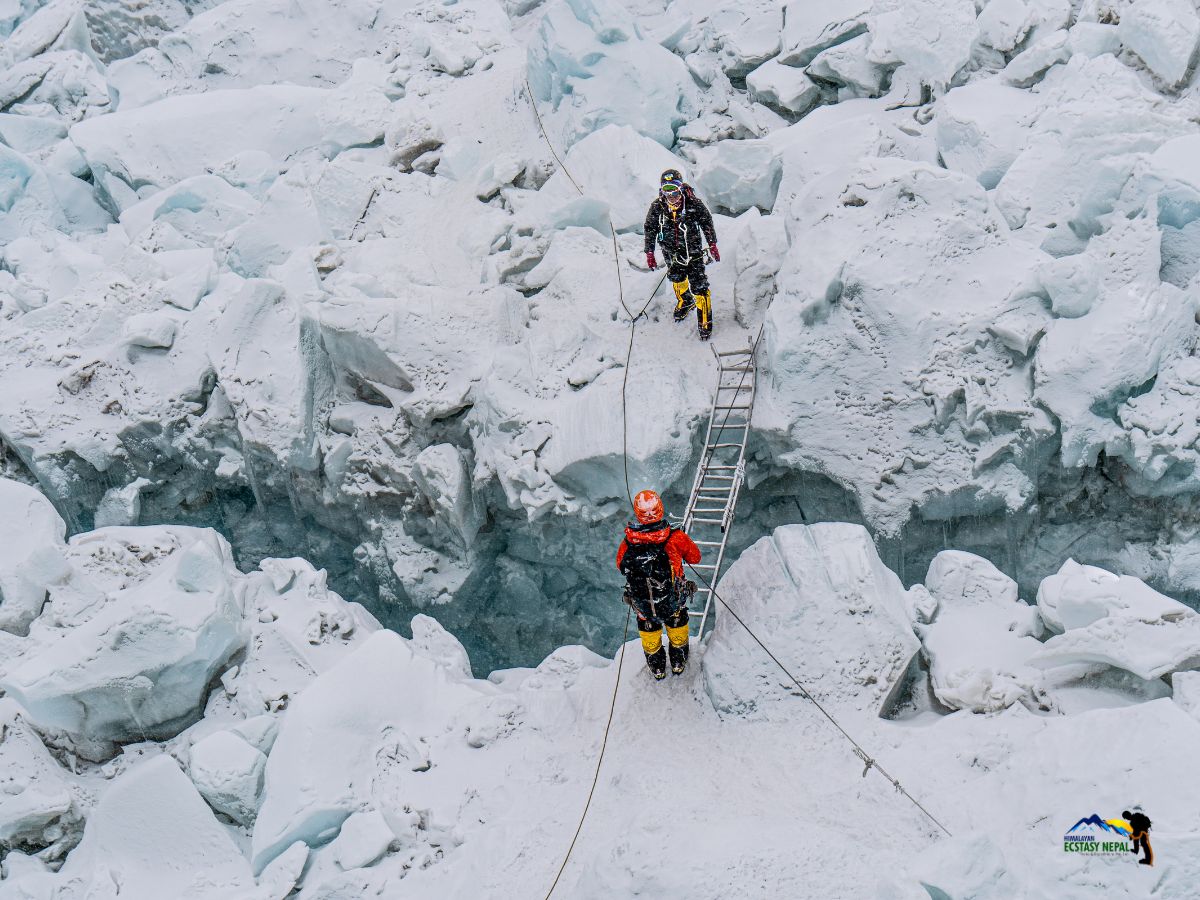
The Khumbu route is more than just a path to the summit. It has a unique value because it was one of the first and most historically significant routes used to climb Mount Everest. Over the years, it has become one of the most recognized trails in high-altitude mountaineering, and a major reason for that is the presence of the Khumbu Icefall.
The icefall is not just an obstacle; it defines the route. Massive towers of ice, deep crevasses, and constantly shifting glaciers create a landscape that looks almost unreal. At the same time, that beauty comes with real danger.
The ice moves, cracks form, and terrain can change overnight. Crossing it is both thrilling and intimidating, and this combination of challenge and natural beauty is exactly what makes the Khumbu route a symbol of adventure.
Without the icefall, climbing Everest would be a completely different experience. The technical challenges, the need for route-finding, ladder crossings, rope fixing, and teamwork would all be greatly reduced.
This is also where the expertise of Sherpas becomes invaluable. Their generations of experience allow them to set up ladders, fix ropes, and guide climbers safely through terrain that would otherwise be nearly impossible. Watching them at work in these extreme conditions highlights the value of their knowledge and skills.
Another factor that adds to Everest’s seriousness is the extreme altitude, particularly the area above 8,000 meters known as the death zone. At this height, oxygen levels are so low that even simple actions require immense effort.
Risks such as altitude sickness, frostbite, and exhaustion are very real. Sherpas often step in to help climbers, from carrying equipment to guiding them down when necessary, making them essential partners in high-altitude expeditions.
Everest expeditions now involve climbers, researchers, photographers, and adventure seekers from all over the world. Despite this international presence, Sherpas remain central to every climb. Their courage, technical ability, and deep familiarity with the mountain make them one of the most important elements of a successful expedition. They are the snow leopards of the Himalayas, moving with precision and expertise where few can follow.
Because of the historic significance of the route, the presence of the Khumbu Icefall, the technical challenges, the extreme altitude, and the unmatched expertise of Sherpas, the Khumbu route represents more than a path to the summit. It represents the spirit of adventure, where natural beauty, danger, human skill, and perseverance come together. This is why the Khumbu adventure continues to be respected and celebrated by climbers around the world.
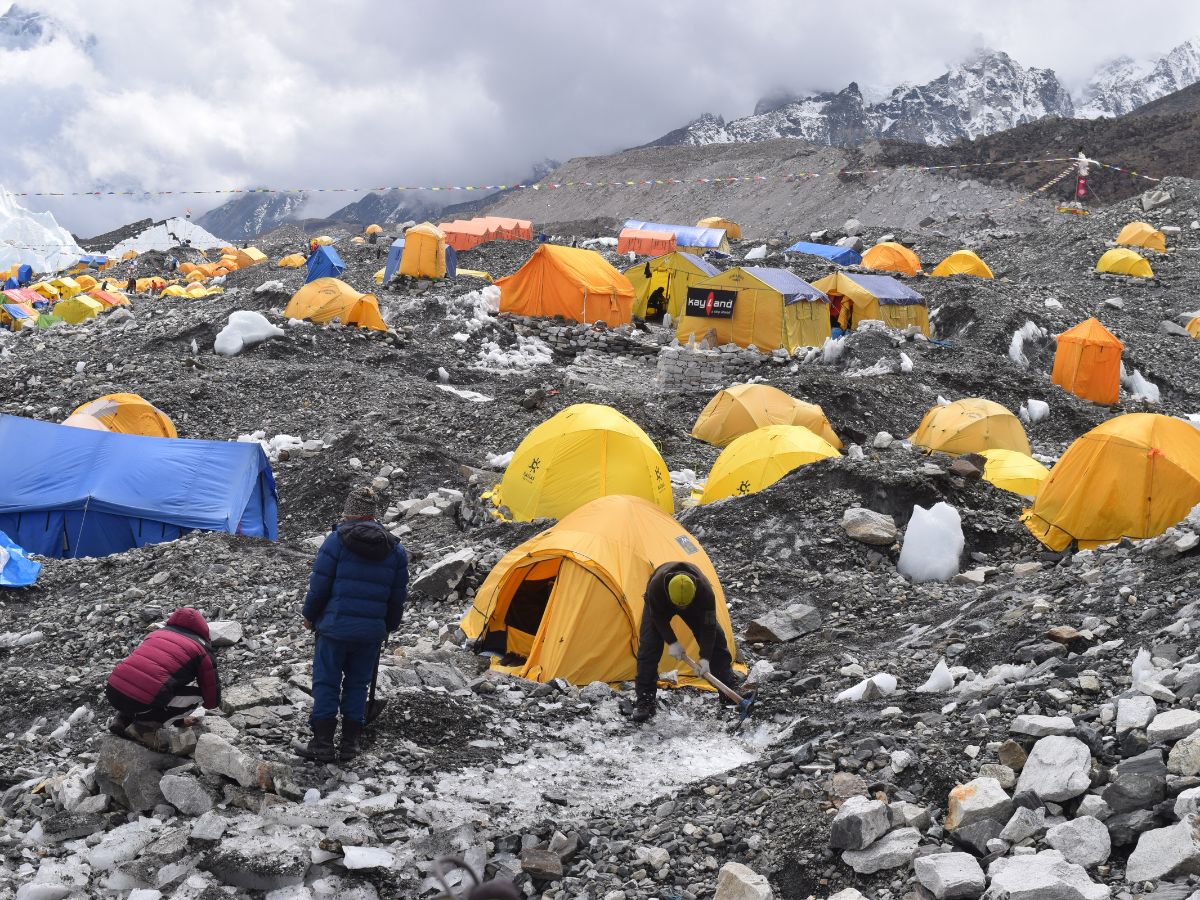
Everest Base Camp: The Heart of the Expedition
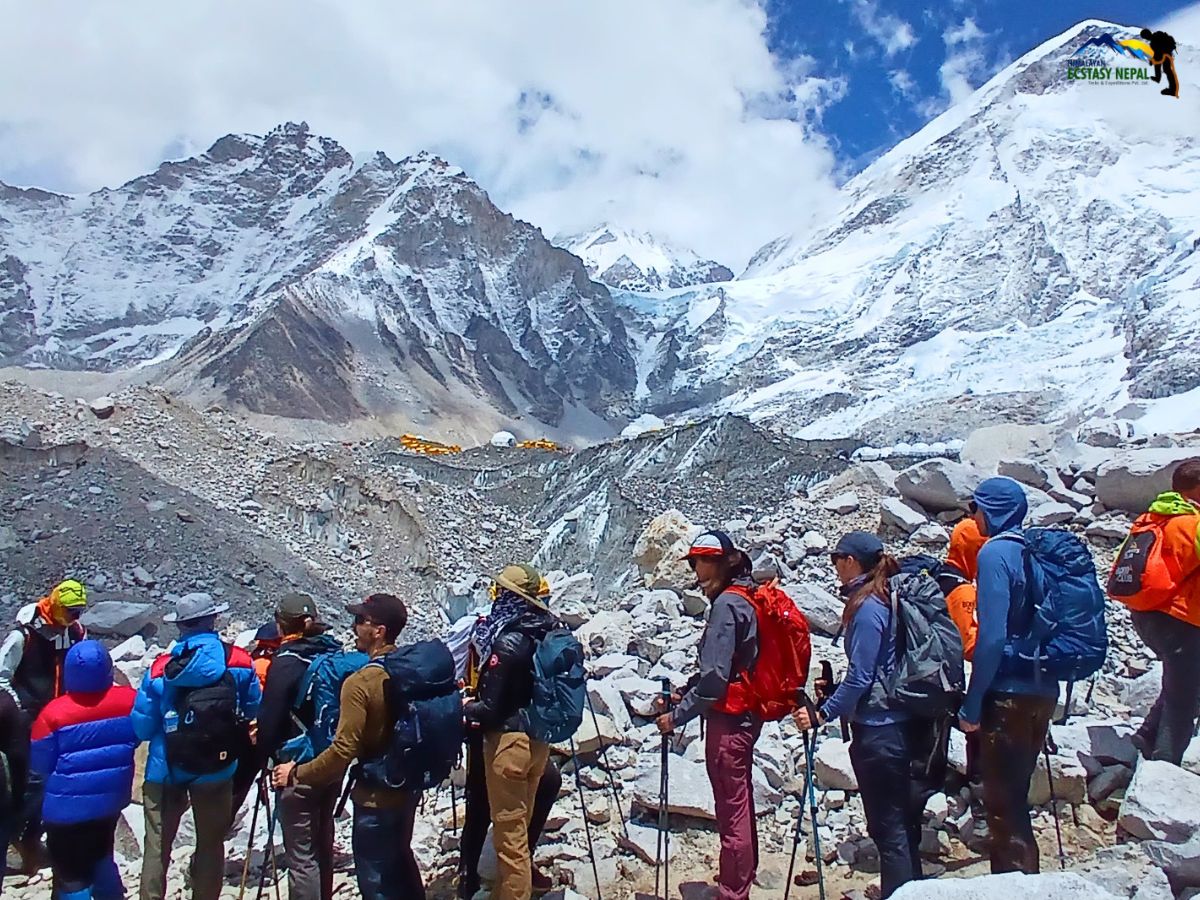
Reaching Everest Base Camp is an unforgettable moment. This is where climbers from all over the world gather to prepare for the summit climb. Tents are spread across the glacier, and the atmosphere is full of excitement and determination.
From Base Camp, you can see the towering Khumbu Icefall rising above the valley, reminding you of the adventure ahead. It is also where the traditional puja ceremony takes place, bringing climbers and Sherpas together to pray for a safe journey.
Life at High Altitude Camps

Beyond Base Camp, your real climbing journey begins. You move slowly from one high camp to another, going higher each time.
Each camp feels different and more challenging:
- The air gets thinner, so breathing feels harder
- The temperature drops, and it becomes very cold
- The wind can be strong, especially at night
You will learn how to:
- Walk slolwy and save your energy
- Listen carefully to your HEN guides
- Drink water and take rest at the right time
At night, you sleep in tents set up on snow and ice. Sometimes the wind is loud, and the tent shakes. It may feel uncomfortable at first, but this is part of the real Everest experience.
When you look outside, you see huge mountains all around you. You are standing in one of the highest places on Earth. These moments may feel tough, but they are also very special. Many climbers say these nights in the mountains become some of the most unforgettable parts of the journey.
The Ultimate Goal: Standing on the Summit
The final climb to the top of Mount Everest is the most important and emotional part of your journey. You usually start the climb at night and expect the following:
- It is dark and very cold
- You walk slowly, step by step
- You use ropes and crampons for safety
- Your HEN Sherpas guide you the whole way
This part is not easy. The air is very thin, and every step takes effort. But you keep moving slowly, focusing on one step at a time.
After many hours, something magical happens. The sun starts to rise over the Himalayas. The sky turns orange and gold, and slowly, the summit comes closer. And then you reach the top. Standing on the highest point on Earth is a feeling you cannot fully explain.
You feel proud, emotional, and full of joy at the same time. All the hard work, training, and effort finally come together in this one moment. It is not just about reaching the top, it is about everything you went through to get there. And this is a memory you will carry with you for the rest of your life.
Why Choose Himalayan Ecstasy Nepal for Mt. Everest Expedition?
Choosing the right team for an Everest expedition is extremely important. Climbing at such a high altitude requires careful planning, experienced guides, and strong support.
At Himalayan Ecstasy Nepal (HEN), our goal is to make your expedition safe, well organized, and enjoyable from beginning to end.
Our guides and Sherpa climbers have years of experience in the Everest region. They know the mountains, the weather patterns, and the safest climbing techniques. Throughout the journey, they are always there to guide you, monitor your health, and manage your pace.
Safety is always our first priority. We carefully plan acclimatization days, rotation climbs, and training sessions so your body can adjust gradually to the altitude.
At the same time, we believe that a successful expedition is not only about reaching the summit. It is also about the overall experience along the way. Our team supports you in every step, from permits and logistics to gear, meals, and daily guidance on the trail.
Because we are a local Nepali company, we bring deep knowledge of Himalayan culture, traditions, and environment, creating a more authentic and meaningful experience.
With Himalayan Ecstasy Nepal, you are not just joining a climb; you are joining a team that truly cares about your journey.
The expedition begins with your arrival in Kathmandu, where you meet the team and complete your final preparations.
A scenic mountain flight to Lukla takes you to the gateway of the Everest region. From there, the trek continues through Phakding, Namche Bazaar, Tengboche, and Dingboche, passing rivers, monasteries, and the stunning landscapes of the Khumbu Valley.
After reaching Everest Base Camp, the climbing phase begins. Over several weeks, climbers move between high camps, focusing on acclimatization and technical preparation.
When conditions are right, the team begins the final summit push to Mount Everest. After the summit, the journey continues with a safe and careful descent back through the same valleys before returning to Kathmandu.
Mt. Everest Expedition 8848.86m in 64 Days Itinerary
Trip Cost Details
Includes
[Full-Board Services]
Arrival & Kathmandu Services
- Airport pick-up and drop-off in a private vehicle
- 4 nights hotel stay (3-star or 4-star) with breakfast
- Welcome and farewell dinner at a traditional Nepali restaurant
- Trekking and climbing map (included)
Permits & Government Fees
- Everest expedition permit and royalty fees
- Sagarmatha National Park permit
- Khumbu Pasang Lhamu Rural Municipality fee
- Garbage deposit and waste management fees
- Government Liaison Officer with full support
Trekking & Base Camp Logistics
- Kathmandu to Lukla flight and return
- Teahouse/lodge accommodation during trek (twin-sharing)
- 3 meals per day (breakfast, lunch, dinner) with tea/coffee
- Fresh and hygienic food throughout the journey
- Personal baggage allowance (40–50 kg, carried by porters/yaks)
At Base Camp, you will have:
- Personal sleeping tent with mattress and pillow
- Dining tent, kitchen tent, toilet and shower tent
- Staff tents, storage tents, tables, and chairs
- Gas heater in dining tent
- Solar panels or generator for lights and charging
Expedition Staff and Insurance
- 1:1 Climbing Sherpa per member for the entire climb and rotations.
- Climbing Sherpa assistance for carrying gear to high camps.
- Experienced Base Camp cook and kitchen helpers as required.
- All wages, insurance, equipment, and food for Nepalese staff and Sherpas.
- High Camp Setup & Climbing Logistics
- High altitude shared dome tents (2 members per tent).
- High altitude food at Camps I, II, III, IV.
- Gas stove, cooking equipment, and necessary kitchen facilities at high camps.
- Route fixing team for ropes and climbing lines (included; no extra charge).
- Summit oxygen: 3 bottles per climber with mask & regulator, plus 1 bottle per high-altitude Sherpa.
- Emergency oxygen mask & regulator for medical use at Base Camp.
- Comprehensive insurance coverage for all Nepali staff (climbing Sherpas, assistant guides, and kitchen crew)
- High-altitude insurance for staff, including emergency helicopter evacuation coverage (up to USD 10,000 liability)
High Camp & Climbing Support
- Shared high-altitude tents (2 climbers per tent)
- Food at Camp 1, 2, 3, and 4
- Cooking equipment and gas at high camps
- Fixed ropes and route setup by expert team (included)
Oxygen & Climbing Gear Support
- 5 oxygen bottles per climber with mask and regulator
- 3 oxygen bottles for each Sherpa
- Emergency oxygen system at Base Camp
Communication & Safety
- Walkie-talkie communication between camps
- Satellite phone for emergencies (personal use available)
- Daily weather updates from professionals
- Full medical kit at Base Camp
Extra Services
- HEN expedition T-shirt and duffle bag
- Official summit certificate from Nepal government after success
Excludes
- International airfare to/from Kathmandu.
- Nepal entry visa fee ($125 USD for 90 days).
- Meals not specified in the itinerary (e.g., lunch/dinner in Kathmandu beyond welcome/farewell).
- Extra nights in Kathmandu (early arrival, late departure, or early trek return).
- Personal insurance (medical, high-altitude evacuation, helicopter rescue, trip cancellation). Mandatory for climbers.
- Personal expenses: phone calls, internet, toiletries, hot showers, laundry, soft drinks, alcohol, snacks, etc.
- Personal climbing/trekking gear: clothing, packing items, bags, trekking poles, boots, gaiters, sunglasses, personal medical kit, etc.
- Filming/camera/drone permits (if applicable).
- Summit bonus for climbing guide: $1,800 to $2,000 USD (mandatory, not optional). This is a standard and non-negotiable part of Himalayan expedition culture. Your guide gives everything to get you to the summit safely, and this is the minimum expected acknowledgement of that effort.
- Tips for Base Camp staff (suggested minimum $200 to 400 USD per member).
- Additional supplementary oxygen cylinders if required beyond the included allocation: $500 per cylinder at Base Camp, $800 to $1,000 per cylinder at Camp 4. It is always better to plan for extra bottles in advance rather than face a shortage at an extreme altitude.
- Any service not specifically mentioned in the “Cost Includes” section.
- Any additional staff beyond what is included in the package.
- Costs arising from natural calamities, mishaps, or anything beyond control.
Additional Costs & Notes:
- Summit bonus for climbing guide: USD 1,800 to 2,000 per climber (mandatory as per expedition practice)
- Tips for Base Camp staff: Suggested USD 200 to 400 per member
- Extra oxygen cylinders (if required):
- USD 500 per bottle at Base Camp
- USD 800 to 1,000 per bottle at Camp 4
- Additional staff or services beyond the package
- Any costs arising due to weather, natural calamities, or circumstances beyond control
Optional Helicopter Return: After the summit, many climbers prefer to return by helicopter due to fatigue. Shared flights from Base Camp to Lukla are available at an estimated cost of USD 800 to 1,000 per person.
Essential Information
Now that you’ve seen the full itinerary and highlights of the Everest Expedition, let’s walk through the practical stuff that will help you prepare and feel confident before and during your journey.
This guide covers the best time to visit, permits, accommodation, food, packing tips, altitude advice, and more, all in a clear, down‑to‑earth way so you know exactly what to expect.
Best Time for Everest Expedition
Timing is one of the most important factors for a successful Everest expedition. Weather conditions in the Himalayas can change quickly, and certain seasons provide safer climbing conditions than others.
The spring season(April to May) is considered the best time for the Everest Expedition. During this period, temperatures are more stable, and the weather window for summit attempts is usually clearer. Many climbers from around the world choose this season because conditions are generally more predictable.
Another possible season is autumn(late September to early November). The skies are often clear after the monsoon season, offering beautiful mountain views. However, autumn expeditions are less common because summit weather windows can be shorter.
Seasons to avoid:
- The winter months(December to February) are extremely cold, with strong winds and heavy snowfall. Climbing during winter is very challenging and usually attempted only by highly experienced mountaineers.
- During the monsoon season(June to August), heavy rain in the lower regions and unstable weather in the mountains make climbing difficult and risky.
For most climbers, choosing the spring expedition season offers the best balance of weather stability, visibility, and summit opportunities.
Permits Required for Everest Expedition
Climbing Mount Everest requires several official permits issued by the Government of Nepal and local authorities. These permits help regulate climbing activities and support conservation efforts in the region.
- Expedition Permit (DoT): Issued by the Department of Tourism, this is the main permit for peaks above 7,000 m. The fee for foreign climbers is set to rise to USD 15,000 in 2026.
- Sagarmatha National Park Entry Permit: Required for entry into the park, roughly NPR 3,000 (USD 20–30).
- Khumbu Pasang Lhamu Rural Municipality Permit: Local area permit for the Khumbu region, approximately NPR 3,000 (USD 20–30).
- TIMS Card (Alternative): The Trekkers’ Information Management System card may still be required by some local regulations.
- Gaurishankar Conservation Area Permit: Only needed if trekking to Everest Base Camp via Jiri rather than flying into Lukla.
Altitude Sickness and Prevention in Everest
Climbing Mount Everest means entering extreme altitude, especially above 8,000 meters, known as the “death zone.” At this height, the air has very little oxygen, and the human body cannot stay for long without proper acclimatization and support.
Because of this, you may face serious altitude-related illnesses:
- Acute Mountain Sickness (AMS): This is the most common. Symptoms include headache, nausea, dizziness, fatigue, and trouble sleeping.
- High Altitude Pulmonary Edema (HAPE): A dangerous condition where fluid builds up in the lungs. It makes breathing very difficult and can become life-threatening if not treated quickly.
- High Altitude Cerebral Edema (HACE): A severe condition where the brain swells due to lack of oxygen. It can cause confusion, loss of balance, and even unconsciousness.
These risks are real on Everest, but with the right approach, they can be managed safely.
How to Prevent Altitude Sickness?
At HEN, we follow proven strategies to keep you safe during the expedition:
- Gradual ascent and proper acclimatization schedule
- Rotation system between camps to help your body adjust
- “Climb high, sleep low” method for better adaptation
- Regular health monitoring by guides and Sherpas
- Proper hydration and high-energy meals
- Enough rest between climbs
- Use of supplemental oxygen during high camps and summit push
Worry not! Our experienced Sherpa team and guides are trained to watch for early symptoms and take quick action if needed.
Note: Our expedition includes medical kits, oxygen support, communication systems, and emergency evacuation plans to handle any situation.
Fitness and Mental Preparation Required
Climbing an 8,000-meter mountain like Mount Everest requires a very high level of physical fitness and mental strength. This is not a normal trek. Proper preparation is a must.
You should start training several months before the expedition. Your body needs to be strong, and your endurance must be high.
Physical Preparation
We recommend the following training before your Everest climb:
- Long endurance training like running, hiking, or cycling
- Strength training focused on legs and core
- Practice hikes carrying a heavy backpack
- High-altitude trekking or mountaineering experience
- Basic ice climbing and crampon skills
- Prior experience on 6,000 m or 7,000 m peaks (strongly recommended)
These help your body handle long days, steep climbs, and thin air.
Mental Preparation
Mental strength is just as importantas physical fitness. On Everest, you must be ready for:
- Extreme cold and strong winds
- Long expedition duration (often 50-60 days)
- Simple living conditions and limited comfort
- Risky terrain that requires focus and careful movement
There will be hard days. You may feel tired, slow, or uncomfortable. This is normal. And to succeed, you need:
- Patience to move slowly
- Strong determination to keep going
- Ability to listen to your guides
- Good teamwork with your group and Sherpas
With the right mindset and proper training, you can face these challenges step by step. Our HEN team will guide you, support you, and help you stay strong throughout the journey.
Accommodation from the Start of Your Expedition to the High Camps
Accommodation during the Everest Expedition varies depending on where you are in the journey. In Kathmandu, climbers usually stay in comfortable hotels where they can relax, prepare gear, and meet the expedition team before the journey begins.
During the trek to Everest Base Camp, accommodation is provided in traditional mountain teahouses. These small lodges are run by local families and provide simple but cozy rooms. Rooms typically have twin beds, blankets, and shared bathrooms.
Teahouses also serve as social spaces where trekkers and climbers gather in the dining area to eat, warm up near the stove, and share stories from the trail. Once you reach Everest Base Camp, accommodation changes to expedition tents set up on the glacier. These tents provide sleeping areas, dining tents, kitchen tents, and communication areas for the climbing team.
At higher camps during the climbing phase, climbers stay in high-altitude tents designed to handle strong winds and extreme weather conditions. Although the accommodation becomes more basic as you go higher, the experience of sleeping in the heart of the Himalayas is unforgettable.
Transportation to Reach Everest Region
The Everest journey begins with travel to the famous mountain airstrip of Lukla, which serves as the main gateway to the Everest region. From Kathmandu, climbers usually take a short scenic flight to Lukla. The flight lasts about 30 to 40 minutes and offers incredible aerial views of the Himalayas.
Because Lukla Airport has a short runway and mountain weather can change quickly, flights sometimes experience delays or rescheduling. It is always wise to keep a flexible schedule when traveling in the Everest region.
After landing in Lukla, the rest of the journey continues on foot. The trek follows traditional mountain trails through villages, forests, and valleys. Helicopters are sometimes used for emergency evacuations or special logistics during the expedition.
Want to learn more? Directly contact us, and we'll offer the best advice and help you plan your Mt. Everest Expedition!
Equipment Lists
Success and comfort on your Everest Expedition hinge on proper preparation, and your equipment list plays a critical role in that. This comprehensive guide covers every essential item (from high-performance apparel to specialized trekking gear), ensuring you’re fully prepared for the diverse and demanding Himalayan environment. We strongly encourage you to review this list carefully; having the right equipment is not just important, it’s essential for a safe, smooth, and rewarding expedition.
Sun Hat (Wide-Brimmed or Baseball Cap):
- Purpose: Essential for protection from the strong Himalayan sun at lower altitudes and even at higher altitudes where UV radiation is intense. A wide-brimmed hat offers more comprehensive face and neck protection.
- Material: Lightweight, breathable, quick-drying.
Beanie / Warm Fleece Hat:
- Purpose: For warmth, especially in the mornings, evenings, and at higher altitudes where temperatures drop significantly.
- Material: Fleece, wool, or synthetic insulation. Something that covers your ears well.
Buff / Neck Gaiter / Balaclava:
- Purpose: Highly versatile. Can be used as a neck warmer, pulled up over the face for dust/wind protection, worn as a headband, or even as a light hat. A full balaclava is excellent for extreme cold and wind, especially at higher camps or on pass days.
- Material: Fleece, merino wool, or synthetic stretch fabric.
Headlamp (with extra batteries):
- Purpose: Absolutely crucial for early morning starts (especially for Kala Patthar), navigating around the lodge at night, or if you're delayed on the trail.
- Features: Brightness levels, red light option (preserves night vision), long battery life.
Headband (Optional but useful):
- Purpose: For managing hair, wicking sweat, or providing light ear warmth without the bulk of a full hat.
Key Considerations for all Headgear:
- Layering: Just like clothing, you'll layer your headgear. You might start with a beanie and a buff in the morning, switch to a sun hat during the day, and put the beanie back on in the evening.
- Protection: The sun's intensity at altitude is often underestimated. Ensure good UV protection. Wind can also be a major factor, causing significant heat loss.
- Comfort: Choose items that fit well and don't chafe, as you'll be wearing them for long periods.
- Quick-Drying: Essential, especially for beanies or buffs that might get damp from sweat or light precipitation.
Base Layers (Wicking/Thermal Undershirts):
- Purpose: Wicks sweat away from your body to keep you dry and regulate temperature. This is the foundation of your comfort.
- Material: Lightweight and mid-weight merino wool or synthetic (polyester, polypropylene). Avoid cotton entirely, as it absorbs moisture and will chill you.
- Recommended: 2-3 long-sleeved base layers; optionally, 1 short-sleeved for warmer days at lower altitudes.
Mid-Layers (Insulating/Fleece Jackets):
- Purpose: To provide warmth by trapping air. You'll add or remove these layers as the temperature fluctuates throughout the day.
- Material:
- Lightweight Fleece (100-200 weight): Ideal for active trekking and mild cold. (1 piece)
- Mid-weight Fleece (200-300 weight) or a thin synthetic insulated jacket: For colder conditions and higher altitudes. (1 piece)
- Recommended: 2 versatile fleece or insulating jackets of varying thickness.
Outer Shell (Waterproof & Windproof Jacket):
- Purpose: Your primary protection against wind, rain, and snow. It doesn't primarily add warmth, but it keeps you dry and protects your insulating layers from the elements.
- Material: High-quality waterproof and breathable fabric (e.g., Gore-Tex, eVent, or similar). Look for features like sealed seams, an adjustable hood, and pit zips for ventilation.
- Recommended: 1 durable, waterproof, and windproof hardshell jacket.
Down Jacket (or Heavy Synthetic Puffy Jacket):
- Purpose: Your essential warmth layer for extreme cold, especially in the evenings, mornings, and at high camps (above 4,000 meters), or during breaks.
- Material: High-fill power down (e.g., 600-800 fill) for excellent warmth-to-weight ratio and packability, or a very warm, high-quality synthetic equivalent.
- Recommended: 1 very warm, packable down or synthetic insulated jacket.
Key Considerations for Upper Body Protection:
- Layering is Key: The ability to add or shed layers is paramount for comfort and safety. Never rely on just one or two thick items.
- "Cotton Kills": Avoid cotton clothing at all costs, as it retains moisture and dramatically increases heat loss.
- Zippers and Vents: Ensure your layers have full or half zippers, and your shell jacket has pit zips for quick ventilation during strenuous activity.
- Fit: Layers should fit comfortably over each other without being too bulky or restrictive, allowing for good circulation.
Lightweight Liner Gloves (Fleece or Merino Wool):
- Purpose: These are your base layer. They provide a surprising amount of warmth, wick away sweat, and allow for dexterity for tasks like operating cameras, adjusting zippers, or handling trekking poles without exposing bare skin to cold.
- Material: Thin fleece, merino wool, or synthetic wicking fabric.
Warm Fleece Gloves / Softshell Gloves:
- Purpose: Your mid-layer. These provide more insulation than liners and are good for colder days at mid to higher altitudes when you still need some dexterity. They offer decent wind resistance.
- Material: Mid-weight fleece, softshell fabric, or a blend.
Insulated Mittens (Waterproof/Windproof):
- Purpose: Your outer, warmest layer, especially for early morning ascents, and evenings at higher camps. Mittens are generally warmer than gloves because they allow your fingers to share warmth.
- Material: Outer shell should be waterproof and windproof (e.g., Gore-Tex, Pertex). Inner insulation should be down or high-loft synthetic. They should be large enough to wear over your liner gloves.
Heavy Duty Gloves (Optional but recommended for very cold sensitive hands or harsher conditions):
- Purpose: A heavier, more insulated version of the fleece or softshell gloves, offering more warmth than typical mid-layers but still some dexterity compared to full mittens. Can be an alternative to or complement mittens.
Key Considerations for Hand Protection:
- Layering: The most important concept. You'll layer your gloves just like your clothing. On a cold morning, you might wear liners inside your fleece gloves, or fleece gloves inside your mittens.
- Waterproof/Windproof Outer Layer: Essential for high altitudes where snow, strong winds, and freezing temperatures are common. Wet hands lose heat rapidly.
- Dexterity: While warmth is key, ensure you can still perform basic tasks. You'll find yourself taking gloves off less often if you have liners for fine motor skills.
- Fit: Gloves and mittens should fit well – not too tight (restricts circulation) and not too loose (reduces warmth and dexterity).
- Backup Pair: It's always a good idea to have a spare pair of liner gloves or a basic warm glove, as gloves can get wet or lost.
Base Layers (Thermal Leggings / Long Underwear):
- Purpose: To wick sweat away from your skin, keeping you dry and preventing chafing. They provide foundational warmth.
- Material: Lightweight and mid-weight merino wool or synthetic (polyester). Crucially, avoid cotton, as it retains moisture and chills you.
- Recommended: 2-3 pairs for rotation.
Trekking Trousers (Durable & Quick-Drying):
- Purpose: Your primary outer layer for trekking in most conditions.
- Material: Made from durable, quick-drying nylon or a nylon/spandex blend for comfort and flexibility. Look for features like reinforced knees or articulated (pre-shaped) knees for better movement.
- Recommended: 1-2 pairs. Convertible trousers (with zip-off legs) can offer versatility for warmer days at lower altitudes.
Softshell Trousers (Optional but Highly Recommended for Higher Altitudes):
- Purpose: Provides excellent warmth and significant wind resistance, while offering more breathability and flexibility than a hard shell. They often have some water repellency. These are ideal for colder days at higher elevations or when crossing passes.
- Material: Stretchy, durable softshell fabric.
- Recommended: 1 pair, to be worn over base layers.
Hardshell / Rain Trousers (Waterproof & Windproof):
- Purpose: Essential outer layer for complete protection against rain, snow, and severe winds.
- Material: A high-quality waterproof and breathable membrane (e.g., Gore-Tex, eVent, or similar). Look for full-length side zippers, which are invaluable for putting them on/taking them off easily over boots and for ventilation.
- Recommended: 1 pair.
Warm Camp Trousers (Optional but adds great comfort):
- Purpose: A comfortable, warm pair of fleece pants, or lightweight down/synthetic insulated pants specifically for wearing around the teahouse in the evenings. They are excellent for warmth when static or for sleeping in on very cold nights.
- Recommended: 1 pair (look for packable and compressible options).
Key Considerations for Lower Body Protection:
- Layering System: The ability to combine or shed layers is paramount for adapting to the wide temperature swings and varying exertion levels.
- Mobility: Choose pants that offer excellent freedom of movement, especially important on challenging ascents and descents.
- Quick-Drying: All lower body layers should be quick-drying. Wet pants can lead to chafing and rapid heat loss.
- Fit: Ensure layers fit comfortably over one another without bunching or being too tight (which can restrict blood flow and reduce warmth).
- Durability: Trekking pants endure significant wear and tear. Invest in robust materials.
- Avoid Cotton: Cotton material is unsuitable for trekking as it absorbs moisture, becomes heavy, and loses all insulating properties when wet.
Waterproof Trekking Boots (Mid to High-Cut):
- Purpose: These are your most crucial piece of gear. They provide essential ankle support, stability on uneven and rocky trails, insulation from cold, and protection from moisture (snow, mud, stream crossings).
- Features: Look for reputable brands known for their durability and comfort. Choose boots with a mid to high-cut design for optimal ankle support. They must be waterproof (e.g., with a Gore-Tex or similar lining) yet breathable. The sole should be stiff enough for rocky terrain but offer enough flex for comfortable walking.
- Crucial Tip: Break-in Period: It is absolutely essential to break in your new boots thoroughly before the trek. Wear them on multiple long walks, ideally including some uphill and downhill sections, to mold them to your feet and identify any hot spots. New, unbroken-in boots are the leading cause of blisters.
Climbing Boots
- Quality Single or Double Boots (insulated)
Camp Shoes / Lodge Shoes / Sandals:
- Purpose: Provides immense relief for your feet after a long day of trekking. They are perfect for wearing around the teahouse, short strolls, or bathroom breaks at night, allowing your feet to breathe and recover.
- Features: Lightweight, easy to slip on and off. Crocs, sturdy sandals, or comfortable slip-on shoes are popular choices.
Trekking Socks:
- Purpose: Crucial for cushioning, wicking moisture away from your skin, regulating temperature, and preventing blisters.
- Material: Opt for high-quality merino wool or good synthetic blends. Never wear cotton socks for trekking, as they absorb sweat, stay wet, and are a primary cause of blisters and cold feet.
- Quantity: Bring 3-4 pairs of thick, warm trekking socks (for cushioning and warmth) and 2-3 pairs of thinner liner socks (optional, worn under thick socks, they can help reduce friction and prevent blisters).
Gaiters (Optional but Recommended):
- Purpose: These are protective covers that attach to your boot and extend up your lower leg. They are excellent for preventing snow, scree, dirt, small rocks, or even leeches (at lower altitudes) from getting into your boots.
- Features: Look for waterproof and breathable options. Mid-calf height is generally sufficient for most conditions.
Key Considerations for Your Footwear:
- Fit is King: Ensure all footwear, especially your boots, fits perfectly with your trekking socks. Boots that are too tight restrict circulation (leading to cold feet), while boots that are too loose cause rubbing and blisters.
- Moisture Management: While waterproof boots keep external water out, moisture-wicking socks are vital to keep your feet dry from sweat. Change socks regularly.
- Blister Prevention: Be proactive! Address any hot spots immediately with moleskin or blister plasters. Carry a small personal blister kit.
- Foot Hygiene: Daily foot care, including washing and drying your feet thoroughly, is important for overall foot health on the trek.
Passport:
- Purpose: Your primary identification for international travel to and from Nepal, and for various trek permits.
- Details: Must be valid for at least six months beyond your intended stay.
Nepal Visa:
- Purpose: Required for legal entry into Nepal.
- Details: Can be obtained upon arrival at Tribhuvan International Airport (TIA) in Kathmandu, or secured in advance from a Nepalese embassy or consulate in your home country. You'll typically need 2-4 passport-sized photographs for this.
Airline Tickets / E-tickets:
- Purpose: For your international flights to and from Kathmandu, as well as your crucial domestic flights within Nepal (e.g., Kathmandu-Lukla-Kathmandu).
- Details: Carry printouts and keep digital copies accessible on your phone or in cloud storage.
Travel and Medical Insurance Policy:
- Purpose: Absolutely critical. This insurance should cover medical emergencies, emergency evacuation (especially helicopter evacuation from high altitudes), trip cancellation/interruption, and lost luggage.
- Details: Carry a copy of your policy, emergency contact numbers for your insurance provider, and your policy number. Verify that high-altitude trekking up to your maximum elevation is explicitly covered.
Medical Information (Highly Recommended):
- Purpose: Vital in case of a medical emergency.
- Details: A small card or note listing any allergies (medications, food), existing medical conditions, current prescription medications (including generic names), and emergency contact information for your doctor.
Emergency Contact Information:
- Purpose: For quick reference in unforeseen circumstances.
- Details: List contact details for your next of kin, your tour operator's emergency number, and your country's embassy or consulate in Nepal.
Credit/Debit Cards & Cash (Nepalese Rupees):
- Purpose: For payments for personal expenses, souvenirs, and tips. ATMs are generally scarce above Namche Bazaar, so cash is essential on the trail.
- Details: Inform your bank about your travel dates to prevent card suspension. Keep emergency cash in a separate, secure location.
Passport-sized Photographs:
- Purpose: Bring several extra copies (at least 4-6). They are frequently needed for permits, unexpected forms, or in case of lost documents.
Key Considerations for Your Travel Documents:
- Originals and Copies: Always carry original documents, but keep high-quality photocopies (both physical and digital) stored separately from the originals. This is your safeguard if originals are lost or stolen.
- Protection: Store all important documents in a waterproof and durable pouch or bag within your daypack and main luggage.
- Accessibility: Keep your passport, visa, and trekking permits easily accessible, as they will be required for check-ins and checkpoints.
- Digital Backups: Scan or photograph all critical documents and save them to a secure cloud service (like Google Drive, Dropbox) or email them to yourself and a trusted contact.
- Security: Utilize a money belt or secure inner pockets for your passport, large sums of cash, and credit cards, especially in crowded areas.
Sunscreen (High SPF):
- Minimum SPF 30, preferably 50+. The sun's UV radiation is significantly stronger at altitude. Opt for a broad-spectrum, water-resistant formula. A stick formula can be convenient for face and ears.
Toothbrush & Toothpaste:
- A lightweight toothbrush and a small, travel-sized tube of toothpaste. Consider a biodegradable option.
Biodegradable Soap / All-in-One Wash:
- A small bar of biodegradable soap or a travel-sized bottle of biodegradable all-in-one body wash/shampoo. This is crucial for minimizing environmental impact when water might drain into local ecosystems.
Dry Shampoo / Cleansing Wipes:
- Highly recommended for waterless hair washing when showers are unavailable or too cold. Biodegradable body wipes are excellent for quick "sponge baths."
Moisturizer / Lotion:
- A small tube is essential. The high altitude and dry, cold air can severely dehydrate and chafe your skin.
Lip Balm (with SPF):
- Absolutely critical. High UV exposure, wind, and cold can cause severe chapping. Choose a lip balm with high SPF (30+). Bring at least two.
Hand Sanitizer:
- Indispensable for maintaining hygiene, especially before meals and after using teahouse facilities where water for handwashing may be limited or freezing cold.
Toilet Paper:
- Essential to carry your own. While some lodges provide it, it's not guaranteed, especially for use on the trail. Pack it in a waterproof bag. Remember to pack out all used paper (do not leave it on the trail).
Small Quick-Drying Towel (Microfiber):
- A lightweight, compact microfiber towel is great for quick washes or drying after the occasional hot shower (which usually comes with an extra charge).
Personal Medications:
- Any prescription medications you require, plus a small supply of over-the-counter essentials like pain relievers, blister treatment, antiseptic wipes, and cold/flu remedies.
Feminine Hygiene Products (if applicable):
- Pack an adequate supply, as availability in remote villages is extremely limited. Be prepared to pack out all used products.
Key Tips for Toiletries:
- Go Minimalist: Every gram counts on the trek. Opt for travel sizes or decant into smaller containers.
- Leak-Proof: Pressure changes at altitude can cause liquids to leak. Ensure all bottles are tightly sealed and ideally double-bagged.
- Cold Protection: Keep liquids that can freeze (like toothpaste or contact lens solution) inside your sleeping bag at night.
- Leave No Trace: Always pack out everything you pack in, including all waste from toiletries.
Energy Bars / Granola Bars:
- Purpose: Provide quick, sustained energy.
- Recommendation: Look for bars with a good balance of carbohydrates, protein, and healthy fats. Choose options that aren't overly reliant on sugar, to avoid energy crashes.
Nuts & Seeds:
- Purpose: Excellent source of healthy fats, protein, fiber, and concentrated calories.
- Recommendation: Almonds, walnuts, cashews, peanuts, pumpkin seeds, and sunflower seeds are all great choices. A mixed bag offers variety.
Dried Fruits:
- Purpose: Deliver a quick energy boost from natural sugars, along with fiber and vitamins.
- Recommendation: Raisins, apricots, dates, figs, cranberries, and mango slices are popular options.
Trail Mix (DIY or Pre-packaged):
- Purpose: A versatile combination, often blending nuts, seeds, dried fruit, and sometimes a few chocolate pieces.
- Recommendation: Customize your own mix with your favorite components or choose a high-quality pre-made blend.
Hard Candies / Gummy Bears / Jelly Beans:
- Purpose: Offer an instant sugar rush for quick energy, can help with dry mouth or a sore throat, and provide a welcome morale boost.
- Recommendation: Small, easy to carry, and non-messy options.
Chocolate (Dark Chocolate Recommended):
- Purpose: High in calories, provides energy, and is a fantastic psychological pick-me-up. Dark chocolate offers additional antioxidants.
- Recommendation: Pack robust bars that won't easily crush or melt (though melting is less of an issue at higher, colder altitudes).
Protein Bars / Jerky:
- Purpose: Essential for muscle recovery and sustained fullness.
- Recommendation: High-protein bars specifically designed for active individuals, or beef/vegan jerky for a savory protein source.
Nut Butter Packets:
- Purpose: A super-dense source of calories and healthy fats.
- Recommendation: Single-serving packets of peanut butter, almond butter, or other nut butters. Can be eaten directly or with crackers.
Crackers / Biscuits:
- Purpose: Good carbohydrate source and can be a comforting, bland option if your stomach is sensitive at altitude.
- Recommendation: Plain crackers or digestive biscuits.
Key Considerations for Your Trekking Snacks:
- Taste at Altitude: Your taste buds can change at high altitudes. Bring a variety, as what you normally love might not appeal to you on the trek. Sometimes salty or blander foods are preferred.
- Calorie-to-Weight Ratio: Prioritize snacks that pack a lot of energy for their weight, as every gram counts in your pack.
- Durability & Packaging: Choose snacks that won't easily crush, melt, or make a mess. Ensure all packaging is airtight.
- Pack Out All Waste: Always carry out all your snack wrappers and any other trash. Leave no trace in the pristine Himalayan environment.
Sleeping bag liner and a Synthetic/Down Sleeping Bag:
- Purpose: To guarantee you stay warm in freezing mountain temperatures.
- Recommendation: Aim for a sleeping bag with a "comfort rating" of at least -45°C (-49°F). This rating indicates the temperature at which an average person can sleep comfortably. If you're plaaning for a winter ascent, a bag rated for -73°C (-99°F) might be necessary. Always prioritize the "comfort" or "limit" rating over the "extreme" rating.
Key Considerations for Your Sleeping Bag:
- Teahouse Nights: Lodges on the Manaslu Circuit trail provide warm duvets, and are sufficient for summer/spring treks. For winter, especially at higher altitudes, your sleeping bag is your primary source of warmth at night.
- Protection: Always keep your sleeping bag in a waterproof stuff sack (even inside your duffel bag) to protect it from moisture.
- Rental Option: If you don't plan to trek frequently in cold conditions, you can also rent a high-quality sleeping bag with Himalayan Ecstasy Nepal. Please contact us to inquire about availability
- Air Out: Whenever possible, air out your sleeping bag during the day (e.g., at lunch stops if sunny) to remove moisture.
Your Daypack: The Essential Trail Companion
Your daypack is your constant partner on the Everest 3 Peak Challenge expedition, carrying all the immediate essentials you need for comfort, safety, and convenience during your daily hikes. Unlike your main duffel, which is carried by porters, your daypack stays with you, ensuring quick access to vital items. This is where you'll keep everything you might need between teahouse stops. Think of it as your portable base for a day's adventure – from staying hydrated and fueled to adapting to sudden weather changes.
Key Features to Look For:
- Comfortable Fit: Paramount for multi-day trekking. Seek out adjustable padded shoulder straps, a breathable and padded back panel, and a functional hip belt. A good hip belt is vital for distributing the pack's weight comfortably onto your hips, taking pressure off your shoulders.
- Hydration Compatible: A dedicated internal sleeve for a hydration reservoir (like a CamelBak) and a port for the drinking tube are highly convenient. This allows you to stay hydrated without constantly stopping to pull out a water bottle.
- Accessible Pockets: Well-placed pockets are invaluable. Look for side pockets (ideal for water bottles or quick-grab items), a front stash pocket (for maps or a lightweight layer), and a top lid pocket (perfect for small items like a hat, gloves, lip balm, or sunscreen you need often).
- Integrated Rain Cover: Essential protection for your daypack and its contents. Many quality daypacks come with a built-in, stowable rain cover. If not, purchase one separately.
- Lightweight Design: Choose a daypack that is inherently light even when empty. Every extra gram adds up over hours and days of trekking.
- Harness: A lightweight but fully adjustable climbing harness, suitable for mountaineering (padded legs are a bonus for comfort). Ensure it is rated for high-altitude use.
- Crampons:Technical mountaineering crampons (automatic/step-in are preferred for climbing boots). Ensure they fit your climbing boots perfectly and practice putting them on before the trip.
- Ice-Axe: A robust technical ice-axe (length appropriate for your height) for self-arrest and assistance on the glacier and steep slopes. A leash is highly recommended to prevent losing your axe.
- Carabiners (Locking / Non-Locking): Bring 8-10 Locking Carabiners (pear-shaped/HMS types for belaying/safety) and 4-6 Non-Locking Carabiners for general purpose clipping. Keep them simple, lightweight, and rated for climbing.
- Ice-Screws: Essential for setting anchors in ice. Bring 3-4 quality screws (16cm - 21cm), typically provided as part of the team's group gear but often good to have extras for personal use or safety.
- Snow Anchor: A reliable snow picket or specialized deadman anchor. This is primarily a group gear item, but personal use on the summit push can be required.
- Rock Piton: Usually considered group gear for emergency or establishing fixed anchors on rock sections. Not typically carried by every individual climber.
- Helmet: A UIAA-approved, lightweight, and adjustable climbing helmet. Essential for protection from falling ice and rock. Ensure it fits comfortably over your balaclava/hat.
- Ascender (Jumar): A mechanical rope grab device (Jumar or Petzl Ascender) for ascending fixed ropes. Bring one left-hand or right-hand model as per your preference.
- Figure-8 Descender / Belay Device: A versatile rappel/belay device (e.g., ATC Guide, Reversos, or Figure-8) for safe descending and managing ropes.
- Sling / Tape: 4-6 Slings/Runners (60cm, 120cm) and 1-2 Long Prusik Cords (6mm or 7mm x 5-6m) for setting up anchors, clipping into fixed lines, and emergency self-rescue.
- Climbing Boot: High-altitude, insulated double or triple plastic/leather boots (e.g., La Sportiva Olympus Mons, Scarpa Phantom 8000). Absolutely non-negotiable for frostbite prevention at extreme altitudes.
- Down Suit: A high-quality, full-body down suit (800+ fill power) rated for extreme cold ($8000\text{m}$ level). Essential for the summit push above Camp 3.
- Poncho or Umbrella
- Plastics for cover your personal bag
- Camera /memory stucks
- Mosquito protect creams (required only summer)
