Our site is in soft launch as we enhance features and update content.
View Photos

Mt. Lhotse Expedition 8,516 m in 45 Days

15 Reviews in TripAdvisor
36 Reviews in Google

Lhotse is the fourth-highest mountain in the world and shares much of its route with Mount Everest, yet it remains far less crowded. This makes Lhotse an excellent choice for climbers seeking a more focused and less congested high-altitude experience. The mountain was first successfully climbed in 1956 by Fritz Luchsinger and Ernst Reiss as part of a Swiss expedition. The expedition involves steep and technical climbing, especially on the Lhotse Face, requiring strong mountaineering skills and close teamwork with experienced guides and Sherpas. Lhotse is located in Nepal’s Solukhumbu region (Latitude: 27.9617° N, Longitude: 86.9330° E) and you can join HEN's full-board services with optional support for its expedition. Choosing Lhotse means taking on a serious 8000-meter challenge while experiencing the same iconic Himalayan environment with a more technical and demanding ascent.

Grade: TD (Très Difficile / Very Difficult) to ED (Extrêmement Difficile)

Trip Overview
Duration64 Days
Trip GradeStrenuous
CountryNepal
Maximum Altitude8,516 m
Group Size1 - 20
StartsKathmandu
EndsKathmandu
ActivitiesMountaineering
Best TimeMarch - May, September - November

EXPEDITION REQUIREMENTS

  • Previous High-Altitude Experience (mandatory): Climbers must have successfully summited at least one 7,000 m peak as per the current regulations of the Department of Tourism, Nepal.
  • Valid Climbing Permit: Issued by the Department of Tourism, Nepal, specifically for Mount Lhotse.
  • Registered Expedition Agency: The climb must be organized through a government-registered trekking and climbing agency like Himalayan Ecstasy Nepal (HEN).
  • Experienced Guide Requirement: A licensed climbing Sherpa or Guide must be assigned to the expedition throughout.
  • Travel and Rescue Insurance: Comprehensive insurance covering high-altitude evacuation and helicopter rescue is mandatory.
  • Medical Fitness: A recent medical certificate confirming you are physically fit for extreme high-altitude climbing above 8,000 m.
  • Logistics and Documentation: Valid passport, Nepal entry visa, and all required expedition paperwork submitted prior to departure.

EXPEDITION HIGHLIGHTS

  • Summit Mount Lhotse (8,516 m), the fourth-highest mountain in the world, one of only 14 peaks above 8,000 m on Earth.
  • Follow the iconic Khumbu route through the Everest region, trekking through legendary Sherpa villages like Namche Bazaar, Tengboche, and Dingboche.
  • Tackle the famous Lhotse Face, a sweeping 55-degree wall of blue glacial ice that is one of the most iconic climbing features in the entire Himalaya.
  • Navigate the Khumbu Icefall with ladder crossings, fixed ropes, and the raw energy of one of the world's most technically demanding glacier approaches.
  • Sleep at Camp 4 on the South Col (7,906 m), the same high camp shared with Everest, with views that stretch across the entire Himalayan skyline.
  • Experience the full Death Zone above 8,000 m, pushing through the narrow Lhotse Couloir on the final summit push under starlit skies.
  • Optional: Attempt Mount Everest (8,848.86 m) in the same expedition, one of the most ambitious double-summit projects in high-altitude mountaineering.
  • Participate in the traditional Puja Ceremony at base camp, a sacred Buddhist blessing ritual that connects you to the deep spiritual culture of the Himalayan climbing community.
  • Enjoy panoramic summit views of Makalu, Cho Oyu, Kangchenjunga, Dhaulagiri, and the Tibetan plateau stretching endlessly to the north.
  • Full-board expedition with experienced HEN Sherpa guides, professional logistics, and a base camp setup built for comfort and performance.
  • Responsible expedition with full base camp cleanup and Leave No Trace principles throughout.

EXPEDITION CHALLENGES

  • The Khumbu Icefall (Base Camp to Camp 1) is the first major challenge of the Lhotse expedition, and one that never truly becomes routine. The icefall is a constantly shifting maze of seracs, deep crevasses, and unstable ice towers. Aluminum ladder crossings over crevasses require steady nerves and precise movement. Rated PD+ to AD-, this section demands fixed-rope discipline and efficient movement through exposed zones where lingering is genuinely dangerous.
  • The Lhotse Face (Camp 2 to Camp 3) is the defining challenge of this expedition. A near-continuous wall of blue glacial ice rising at 45 to 55 degrees over approximately 1,200 vertical meters, the Lhotse Face is one of the steepest sustained ice climbs on any 8,000 m route. Above Camp 2 at 6,400 m, you are already working in thin air. The combination of extreme angle, hard ice, and the effect of altitude building up on your body makes this section brutally demanding. Rated AD, this is where the mountain earns your full respect.
  • Altitude and Endurance Above 7,000 m From Camp 3 onward, you are in the extreme high-altitude environment. At 7,100 m and above, your body is working harder than it ever has before. Thin air, powerful winds, sustained cold, and the mental weight of operating this high all combine to make everything harder than it looks on paper. The Lhotse Couloir on summit day, steep, icy, and relentlessly exposed, demands everything you have at the exact moment your reserves are lowest.
  • The Death Zone: Camp 4 and the Summit Push Above 8,000 m, in what mountaineers call the Death Zone, your body is slowly losing the battle against altitude no matter how well you are acclimatized. Supplemental oxygen is essential here, not a luxury. The summit push from Camp 4 begins in the dark, in extreme cold, and requires sustained technical climbing through the upper couloir to a corniced, exposed summit point. Any mistake in judgment or equipment failure at this stage carries serious consequences.
  • Avalanche Risk Lhotse carries significant avalanche exposure, particularly on the upper face and in the couloir sections. Our HEN route-fixing Sherpa team is trained and experienced in setting the route away from primary avalanche paths, and weather monitoring is continuous throughout the expedition. That said, no Himalayan peak at this altitude is free from danger, and climbers must remain aware and responsive at all times.
  • Objective Hazards Serac fall, crevasse collapse on the glacier approach, sudden weather shifts, and the ever-present risk of frostbite and altitude illness are all real factors on Lhotse. Our expedition protocols, medical kits, and evacuation procedures are designed to respond to these. But preparation, physical fitness, and honest communication with your guide remain your most important tools.

THE ASCENT PLAN

  • Base Camp to Camp 1 (5,364 m to 5,943 m): Navigating the Khumbu Icefall. The climb begins at the crampon point just above base camp, where mountaineering gear goes on, and the Khumbu Icefall begins. The route navigates through a dynamic maze of seracs and crevasses using fixed ropes installed by the HEN Sherpa team. Ladder crossings over open crevasses are a regular feature of this section, requiring balance and full trust in your safety tethers. The route changes constantly as ice shifts, and your Sherpas reroute when necessary. Camp 1 sits on a flat glacial section above the icefall, offering a first commanding view back down the valley and forward into the Western Cwm.
  • Camp 1 to Camp 2 (5,943 m to 6,400 m): Crossing the Western Cwm. Above the icefall, the Western Cwm opens into a wide glacial valley enclosed by Everest, Lhotse, and Nuptse. The route crosses the upper Khumbu Glacier via fixed ropes, navigating crevasse zones with comparatively lower technical difficulty than the icefall below. The main challenges here are heat exposure during midday hours and sustained distance at altitude. Camp 2 at 6,400 m serves as the Advanced Base Camp for the expedition, the most established and comfortable of the high camps, and a familiar landmark across your rotation cycles.
  • Camp 2 to Camp 3 (6,400 m to 7,100 m): Climbing the Lhotse Face. This is the signature section of the Lhotse expedition. Fixed ropes run directly up the Lhotse Face, 45 to 55 degrees of hard blue glacial ice, from the base of the wall all the way to Camp 3. Movement requires continuous jumaring, efficient front-pointing with crampons, and strong endurance. The Yellow Band, a horizontal stripe of yellow limestone crossing the face, marks the change from glacial ice to mixed rock-and-snow terrain before Camp 3. Camp 3 is carved directly into the slope at 7,100 m, with small platforms cut into the ice by the route-fixing team, and is used primarily for strategic overnight stays during rotations and the summit push.
  • Camp 3 to Camp 4, South Col (7,100 m to 7,906 m): The Geneva Spur and Beyond From Camp 3, the route continues up the upper Lhotse Face before crossing left across the Geneva Spur, a rocky mixed ridge that requires careful crampon placements on rock-embedded ice in highly exposed conditions. Crossing the Geneva Spur brings you onto the South Col, a wind-swept saddle at 7,906 m that sits between Lhotse and Everest. Camp 4, here is your final high camp. Supplemental oxygen is essential from this point forward. You arrive in the afternoon, rest briefly, and prepare for the summit push that night.
  • The Summit Push: Camp 4 to Lhotse Summit (7,906 m to 8,516 m). Departure from Camp 4 happens in the early hours of the morning, typically between midnight and 2:00 AM. The route enters the Lhotse Couloir immediately, a steep, narrow gully of hard ice and compact snow that funnels directly toward the summit. Fixed ropes are your primary security throughout. The climbing is sustained and demanding, with oxygen flow management becoming a critical part of your rhythm alongside every physical step. The upper couloir narrows toward the summit pyramid, where a final section of steep snow and exposed rock leads to the corniced summit point. The descent is the most dangerous phase of the entire day. Exhausted legs on steep icy terrain require careful rappelling and constant communication with your guide all the way back to Camp 4, and ideally to Camp 3 or Camp 2 before the day ends.

IMPORTANT: Essential High-Altitude Gear & Safety Notice

For a successful Lhotse Expedition, having the right high-altitude equipment is not optional. These are critical for both safety and performance in extreme conditions.

  • Supplemental Oxygen: It is strongly recommended to plan for an extra oxygen bottle in advance. This acts as a safety backup during summit push or emergencies.
  • Mask and Regulator: Among the most important pieces of equipment. They must be in proper working condition. Any malfunction at high altitude can directly impact your ability to breathe and continue safely.
  • Down Suit: A high-quality down suit is essential to withstand extreme cold conditions during higher camps and summit attempts.
  • High-Altitude Mountaineering Boots: Reliable brands such as Scarpa or La Sportiva are recommended for proper insulation and support.
  • Sleeping Bag (-50°C): A high-performance sleeping bag is necessary to ensure proper rest and protection against extreme temperatures.
  • Gloves: Insulated, high-quality gloves are required to prevent frostbite and maintain dexterity.
  • Helmet: A good-quality helmet is essential for protection in rocky and exposed sections.

Proper planning and ensuring the quality of these essential items play a vital role in the overall success and safety of the expedition.

If you have already stood on a 7,000 m peak and the Himalaya has gotten into your blood, if Everest feels like the obvious next step but you want the mountain that serious high-altitude climbers quietly respect as the more technical, more pure, more demanding objective, then Lhotse is your mountain.

At 8,516 m, the fourth-highest peak on Earth sits right next to Everest, separated only by the South Col saddle. But Lhotse is its own expedition entirely. The Lhotse Face, nearly 1,200 vertical meters of sustained blue ice at 45 to 55 degrees, is one of the most iconic and demanding ice climbs on any 8,000 m route in the world.

The summit push through the narrow Lhotse Couloir, in the dark, in the Death Zone, is as serious as high-altitude mountaineering gets. This is not a mountain that accommodates half-preparation. But for those who arrive ready, it delivers one of the most extraordinary summit experiences in the Himalaya.

At Himalayan Ecstasy Nepal, we have organized high-altitude expeditions in Nepal for years, and the Lhotse Expedition is one we approach with the same care and precision we bring to every 8,000 m objective.

Our licensed Sherpa guides are not just experienced mountaineers. They know this route, they monitor it daily, and they make the calls that keep you safe when altitude and weather demand it.

From the moment you land in Kathmandu to the moment you stand on the South Col, our HEN team handles the logistics, the permits, the route fixing, the base camp infrastructure, and the weather monitoring so that you can focus entirely on the climb. We take the weight off your shoulders. You carry it to the summit.

The Lhotse Expedition with HEN is a 45-day full-board journey that begins in Kathmandu and moves through the legendary Khumbu Valley, past Namche Bazaar, Tengboche, and Dingboche, before reaching Lhotse Base Camp at 5,364 m.

From there, the real expedition unfolds: the Puja Ceremony, the rotation cycles between high camps, the progressive climb through the Khumbu Icefall, the Western Cwm, the Lhotse Face, and the South Col, building toward the summit push that puts you on the fourth roof of the world.

For those who want to push further, an optional Everest attempt is also possible within the same expedition window, one of the most ambitious double-summit projects available in Himalayan mountaineering today.

The sections below cover everything you need to know before committing: expedition packages, the approach trek, base camp life, technical climbing details, permits, fitness requirements, and the practical information that makes the difference between going in prepared and going in hoping. Let's get into it!

Flexible Expedition Packages for Mt. Lhotse Expedition

Every climberwho arrives at Lhotse Base Camp got there a different way, with a different experience, a different budget, and a different idea of how much support they need on the mountain. That is exactly why we have built the Lhotse Expedition into three distinct options at Himalayan Ecstasy Nepal.

And here is something worth knowing upfront: you do not need a full group to book. Individual climbers are completely welcome. If you are coming solo, we handle all the official coordination, your permits, documentation, and expedition registration by working with other registered expedition groups operating on the mountain in the same season. You climb your own journey. We handle the paperwork. 

Option A: Full Board Expedition

The complete, fully managed Lhotse experience from Kathmandu to the summit and back.

Every detail is handled by our team: airport pickup and drop-off, hotel stays in Kathmandu, the official Ministry of Tourism briefing, all trekking and expedition permits, licensed Sherpa guides with comprehensive insurance, porter support, liaison officer facilitation, and the full base camp infrastructure including dining tent, kitchen tent, sleeping tents, communication equipment, solar panels, and generator.

Our high-altitude cooks prepare meals throughout. Route fixing, camp establishment at all high camps, weather monitoring, oxygen supply, and full summit support are all included.  You focus entirely on climbing. We take care of everything else!

Option B: Company Service (Budget Expedition)

A more streamlined arrangement built for experienced climbers who are comfortable managing certain aspects of the expedition independently. 

HEN covers all the essential requirements: your Lhotse climbing permit, Sherpa assignment and insurance, porter support, trekking permits, liaison officer facilitation, and transportation from Kathmandu to base camp and back.

Beyond that, climbers take on greater personal responsibility for their own gear, food beyond what is specified, and individual logistics decisions on the mountain. It is a cost-effective option that keeps the critical framework in place without the full-service overhead. 

Option C: Permit and Join Service

The most flexible and budget-friendly option available. HEN arranges your climbing permit and all required official documentation, then coordinates your placement within an existing expedition group heading to Lhotse in the same season.

Base camp to summit support and base camp services are included within that group framework. This option is ideal for self-sufficient climbers who already have their own team and personal gear sorted but need the official structure and mountain logistics handled professionally.

If you know what you are doing on the mountain and just need the framework around it, this is your option.

Standing on the Fourth Roof of the World

There are 14 mountains above 8,000 m on this planet. Standing on top of any one of them is a defining achievement. Standing on the fourth-highest mountain, a mountain that demands a full mastery of everything high-altitude climbing involves, is something that stays with you for the rest of your life.

From the Lhotse summit at 8,516 m, the view is unlike anywhere else. Everest rises to your west, its Southeast Ridge sweeping upward above the South Col you departed from hours earlier. To the east, Makalu's pyramid cuts the sky. Further in every direction, the full sweep of the Himalayan range stretches beyond what your eyes can fully process.

And below all of it, the Khumbu Valley where your journey began seems impossibly far and impossibly small. The climb that gets you there, the Lhotse Face, the Geneva Spur, the Couloir, earns that view in a way that nothing easy ever could.

The Khumbu Trail: Where Your Expedition Begins

hillary suspension bridge

Long before the technical climbing starts, the approach through the Khumbu Valley is an experience in its own right. The trail from Lukla passes through some of the most culturally rich and scenically dramatic terrain in Nepal. 

Namche Bazaar, the bustling hub of the Khumbu Sherpa community, is where you begin to feel the altitude and the mountain culture at the same time. Tengboche Monastery, perched above the treeline with a direct view of Everest and Lhotse, is one of those places that stops conversation.

Dingboche, higher and quieter, is where the alpine landscape takes full hold, and the mountains begin to feel very close. This approach trek is not just acclimatization. It is your introduction to the world you are about to climb into, the people, the culture, the scale of it all. Take your time with it.

Sherpa Culture and The Spirit of the Khumbu 

The Khumbu region is the homeland of the Sherpa people, and no expedition here is complete without genuinely engaging with the culture that makes this place what it is.

From the mani walls and prayer flags that line the trails out of Lukla, to the monasteries at Tengboche and the stone-walled teahouses of Dingboche, to the Puja Ceremony at base camp itself, Tibetan Buddhist culture is woven into every part of this journey. 

Your climbing Sherpa is not just a guide. They carry centuries of mountain knowledge and a relationship with these peaks that goes far beyond technical skill.

The warmth you will encounter in teahouses, in base camp conversations, and in the quiet moments between climbing rotations is something that climbers consistently say they did not expect, and consistently remember as one of the most meaningful parts of the expedition.

A Once In a Lifetime Double Summit: Lhotse and Everest

everest and lhotse

Lhotse and Everest share the same base camp, the same route through the Khumbu Icefall, the same Western Cwm, the same Lhotse Face, and the same Camp 4 on the South Col. The shared infrastructure is not a coincidence. It is a rare geographic opportunity that a small number of climbers choose to use. 

If you are already fully acclimatized, already at Camp 4, and already operating above 8,000 m after a successful Lhotse summit, the highest mountain on Earth is within reach. Only about 5 to 10% of Lhotse climbers attempt both peaks in the same expedition. The ones who succeed carry that double summit as one of the rarest achievements inmountaineering.

This is not something we recommend without deep preparation and an honest conversation with yourself and your Sherpa guide about whether your body is genuinely ready for a second summit. But if you arrive ready, and conditions allow, we will support the attempt with everything we have.

Base Camp Life: Your Home at 5,364 meters!

camps in lhotse expedition

Life at Lhotse Base Camp is its own chapter of this expedition, and a more comfortable one than most people expect.

Our HEN team sets up a full expedition camp: individual sleeping tents per climber, a spacious dining tent with a gas heater, a fully equipped kitchen tent with professional cooks, communication equipment, solar panels for device charging, and a toilet and shower tent.

The food is high-calorie and properly prepared, because at altitude, nutrition is not just comfort, it is performance. Base camp days revolve around rest, gear organization, short acclimatization walks, and team briefings with your Sherpa guide.

The environment surrounding you, glaciers, ice towers, the enormous south wall of Lhotse above, and clear Himalayan skies at night, make the quieter moments as remarkable as anything on the climb itself.

Introducing HEN Guides: More Than Your Climbing Partner!

everest view during lhotse expedition

The HEN guides and Sherpas who accompany you on the Lhotse Expedition are experienced, licensed, and deeply committed to your success and safety on the mountain.

Every day at altitude, your guide is reading the weather, monitoring your physical condition, making route decisions, managing oxygen logistics, and carrying the quiet weight of responsibility that comes with leading someone through the Death Zone.

They know Lhotse. They know the route. And on the hard days, and there will be hard days, they are the steadiest thing on the mountain. Think of them the way you would a trusted partner who has done this before and is wholly invested in getting you to the top and back safely. 

A summit bonus at the end is the standard way to acknowledge that commitment, with $1,300 to $1,500 per climber being the expected amount. Tips for base camp staff are also appreciated!

But what truly matters to the HEN team, beyond anything else, is your story and your review. That is what helps other climbers find us, and what makes future expeditions possible.

Mt. Lhotse Expedition 8,516 m in 45 Days Itinerary

Kathmandu to KathmanduExpand all

Your Lhotse journey begins the moment you land at Tribhuvan International Airport in Kathmandu, the lively capital of Nepal. After clearing immigration and collecting your bags, step outside the terminal, and you will spot a Himalayan Ecstasy Nepal (HEN) representative waiting to welcome you in true Nepali style.

We will take care of your transfer to your hotel in Thamel, Kathmandu's expedition hub, with the option to stay at Hotel Thamel Park if you prefer a more comfortable base. After checking in and settling your bags, our team will arrange a short meet-and-greet where you will be introduced to your expedition leader and support crew.

In the evening, Thamel is all yours. Exchange currency, grab a local SIM card (NTC or Ncell), explore the trekking gear shops that line every street, or simply sit back and soak in the energy of the city. You have earned some rest after the long flight, because tomorrow, Lhotse preparation officially begins.

Max Altitude: 1,400 m Meals: DinnerAccommodation: 3-Star HotelTransportation: On a private basis

These two days are dedicated entirely to getting you ready for the fourth-highest mountain in the world. After breakfast at the hotel, our HEN guides will walk you through a detailed safety briefing covering the climbing plan, rotation schedules between high camps, altitude sickness protocols, and emergency procedures.

Nothing is left to assumption here. By the end of it, you will have a clear mental map of what the next two months look like. Your gear is next. We will inspect every piece of personal equipment: harnesses, crampons, ice axes, helmets, ropes, down suits, and layering systems.

If anything is missing, substandard, or needs replacing, our team will help you source or rent it right here in Thamel. Meanwhile, our office team handles your permits and expedition documentation in the background, so that is one less thing on your mind.

Use any downtime to explore Kathmandu, visit a cafe in Thamel, or grab last-minute supplies. Evenings are for rest. Your body is about to do extraordinary things. Let it start fresh.
 

Max Altitude: 1,400m Meals: B,DAccommodation: 3-Star Hotel

The day starts early in Kathmandu. After breakfast, our HEN team transfers you to Manthali Airport, roughly a 4 to 5-hour drive depending on traffic. We leave early because mountain flights to Lukla operate in the morning hours when the weather is most stable. 

The 20-minute flight to Lukla is something else. Green Himalayan foothills drop away below you, deep valleys cut through the landscape, and your first proper glimpse of high Himalayan peaks appears on the horizon.

You land at Tenzing-Hillary Airport, one of the most challenging airstrips in the world, perched at 2,860 m with a single short runway cut into the mountainside.  

Here, you will meet your trekking crew before beginning the first walk of the expedition. The trail descends gently through forests and traditional Sherpa villages, following the Dudh Koshi River downstream. It is an easy 8 km walk to Phakding (2,652 m), taking about 4 to 5 hours, perfectly paced to let your body begin adjusting to the mountain environment. 

Prayer wheels spin alongside the trail, mani stones line your path, and suspension bridges sway over the river. Check into your teahouse, eat a warm meal, and sleep well. Tomorrow you climb toward the gateway of the Khumbu.
 

Max Altitude: 2,652 m Meals: B,L,DAccommodation: Local LodgeTransportation: Jeep+Flight

From Phakding, the trail gradually builds in intensity. You will pass through several Sherpa settlements, crossing the Dudh Koshi River multiple times on long suspension bridges, before the trail makes its signature steep final climb up to Namche Bazaar. The ascent takes about 6 to 9 hours in total, covering steady elevation gain that first begins to test your lungs. 

Namche Bazaar (3,440 m) is the beating heart of the Khumbu region. It is where the expedition energy is palpable, with other mountaineers, trekkers, and support crews all converging here. Check into your lodge, eat well, and do not push further today. Your body has started working harder than it looks.
 

Max Altitude: 3,440 m Meals: B,L,DAccommodation: Local Lodge

An acclimatization day is not a passive rest day. It is strategic. The classic approach here is to go higher during the day and sleep lower, and that is exactly what we do. After breakfast, we take a short 3-hour hike toward the Everest View Hotel, one of the highest hotels in the world. 

The views from this vantage point are stunning. Mount Everest, Lhotse, and the surrounding giants reveal themselves together for the first time. Take a long look. That is your destination.

In the evening, we move to a lodge in Khumjung (3,800 m) for the night. Sleeping slightly higher than Namche speeds up your acclimatization without the risk of moving too fast.
 

Max Altitude: 3,800 Meals: B,L,DAccommodation: Local Lodge

A 6 km, roughly 5-hour hike from Khumjung today. The trail descends first toward Sansa and then drops further to Phunke Tenga along the Dudh Koshi River. From there, it climbs steadily through a dense forest of pine, juniper, rhododendron, and Himalayan birch before arriving at Tengboche. 

Tengboche Monastery is one of the most significant spiritual landmarks in the entire Khumbu region. Spend some time here, explore the monastery, sit with the mountain views, and let the place do what it does to everyone who visits it. 

From Tengboche, a gentle 25-minute descent through forest brings you to Deboche (3,716 m), a quieter settlement inside Sagarmatha National Park. Watch the tree line carefully, and you might spot wildlife on this stretch.

Max Altitude: 3,716 m Meals: B,LDAccommodation: Local Lodge

A longer day, approximately 10 km and 9 hours of walking. We climb the trail progressively as the forest thins and the landscape opens into wider alpine terrain.

You are now well inside the Khumbu, and Lhotse's scale begins to become real as the valley narrows toward it. Reach Dingboche (4,414 m), check in, eat, and rest.

Max Altitude: 4,414 m Meals: B,L,DAccommodation: Local Lodge

You will stay in Dingboche today and use the day for acclimatization hikes in the surrounding terrain. Short, steady walks above 4,500 m are the goal, going up and coming back down. Drink plenty of water. 

Eat even when you are not particularly hungry. Report any headaches or nausea to your guide immediately.

Max Altitude: 4,414 m Meals: B,L,DAccommodation: Local lodge

As you move toward Lobuche, the landscape becomes more bare, and the scale of the mountains surrounding you intensifies. You will see mountains like Nangkartshang (5,073 m) , Cholatse (6,423 m), and more. 

The air is noticeably thinner now. Keep a steady, unhurried pace. This is not the day to push.

Max Altitude: 4,940 m Meals: B,L,DAccommodation: Local lodge

A shorter walk today, but at a meaningfully higher altitude. Gorakshep is the last permanent settlement before Lhotse and Everest Base Camp. Gorakshep is usually the last suitable spot to talk to family on your phone or through local cell networks before you get to Lhotse Base Camp.

Service may not always be good, but it is available here. After this point, In Everest/Lhotse Base Camp (5,364m), cell phone service is often spotty or nonexistent; you need a satellite phone or expensive satellite internet

You can send messages and sometimes make calls in Gorakshep. You can usually get cellular service, but it can be weak because of the weather. During an emergency, your expedition team will have satellite phones that you can use for personal calls for about $3 per minute. The ground is mostly flat glacial sand and moraine.

Rooms here are basic and cold, but tonight's stay at 5,164 m is an essential part of your acclimatization before heading to base camp tomorrow.

Max Altitude: 5,164 m Meals: B,L,DAccommodation: Local lodge

From Gorakshep, the trail follows the lateral moraine of the Khumbu Glacier. The walk is shorter today, only 3.5 km, but every step feels different at this altitude. The glacial terrain is rugged and the landscape is surreal: ice towers, boulder fields, and the enormous wall of the Western Cwm ahead of you. 

When Lhotse Base Camp comes into view, it is a moment you will not forget. Arriving at 5,364 m, at the foot of the fourth-highest mountain in the world, the expedition truly begins.

Max Altitude: 5,364 m Meals: B,L,DAccommodation: Tent

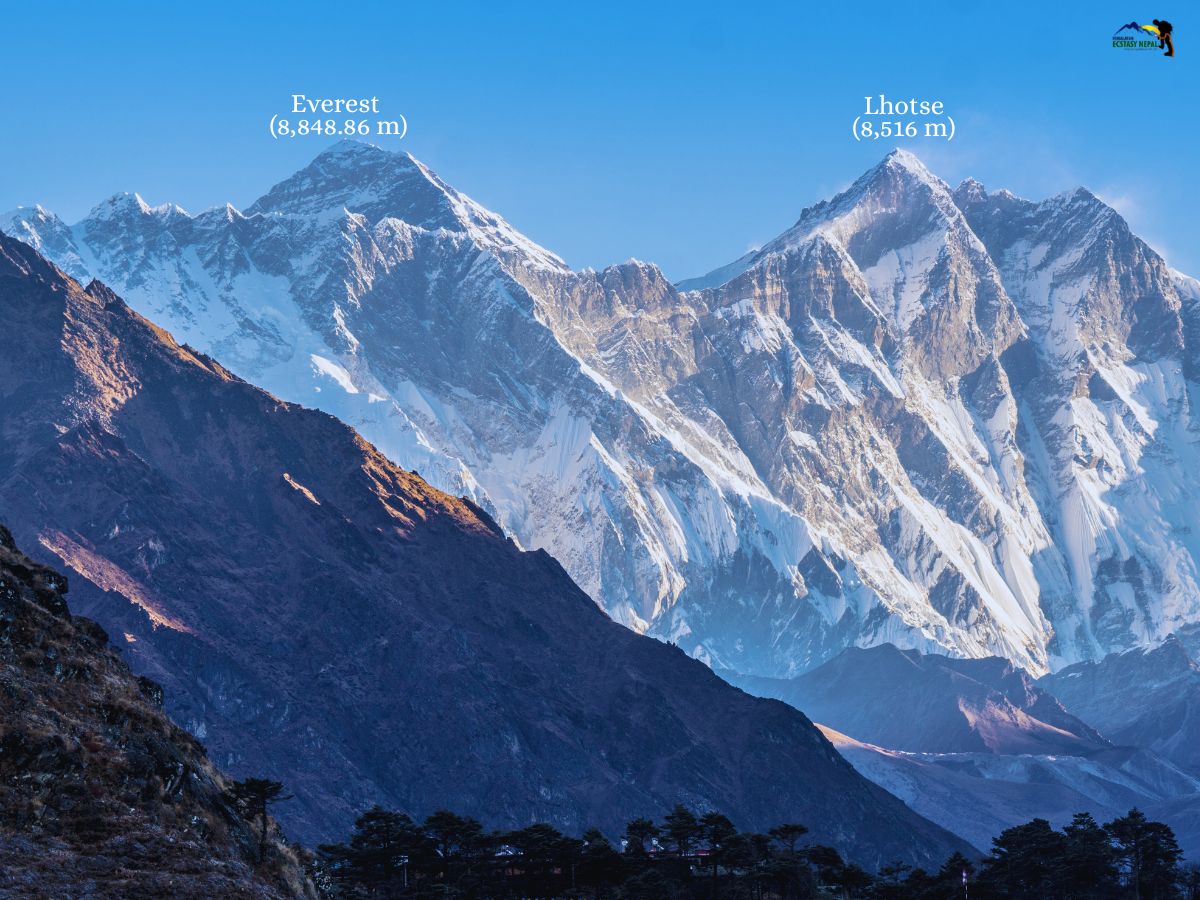
This is what you came for! Lhotse stands at 8,516 m, the fourth-highest mountain on Earth, separated from Everest by the South Col saddle. It is a serious, technically demanding objective. The South Face of Lhotse is one of the most imposing walls in the entire Himalayan range.

And yet, the standard route, approaching via the Khumbu Icefall, Western Cwm, and Lhotse Face, is a known, fixed-rope expedition that, with proper acclimatization and preparation, is achievable for experienced high-altitude climbers. Here is how the next several weeks unfold:

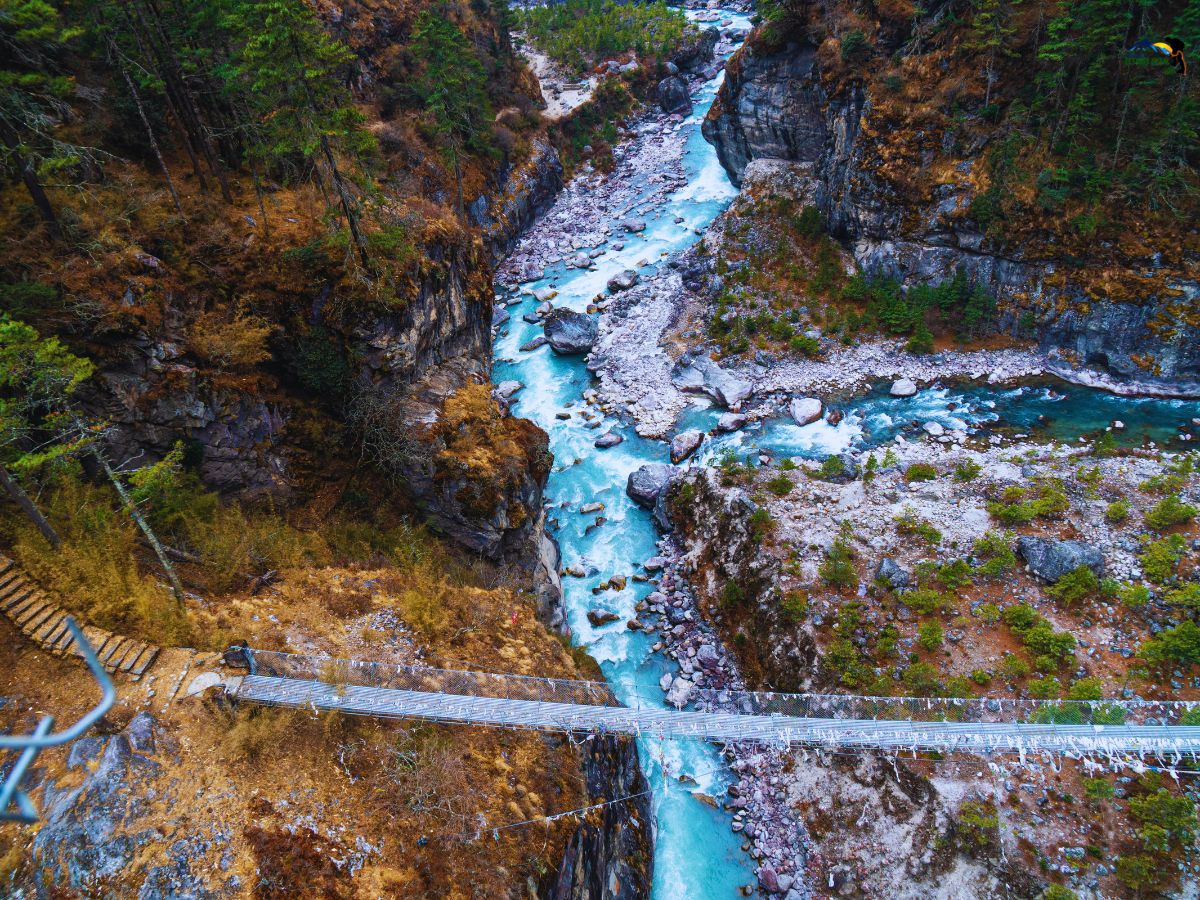
Base Camp Life and the Puja Ceremony

Once you arrive and settle into base camp, the first few days revolve around rest, organization, and one essential tradition: the Puja Ceremony.

Led by a local Lama, this sacred Buddhist ritual blesses the climbers, the equipment, and the mountain itself before any ascent begins. Prayer flags are raised, offerings are made, and the entire team, climbers, Sherpas, and kitchen staff, gathers together.  This ceremony is one of the most unexpectedly moving moments of any Himalayan expedition. Do not miss it!

Beyond the Puja, use these early base camp days wisely. Organize your technical equipment, review route maps with your HEN guide, and do short glacier walks to get comfortable with crampon movement and rope systems on real terrain.

The Khumbu Icefall: Base Camp to Camp 1 (5,943 m)

Technical Grade: PD+ / AD-

Ice Grade: AI 2 to 3

The Khumbu Icefall is your first true test, and it is a genuine one. From base camp, you walk to the crampon point, where trekking boots give way to full mountaineering gear. From here, the icefall begins.

The terrain is chaotic and always changing. Massive seracs tower overhead, crevasses open in unpredictable directions, and the ice shifts constantly. Fixed ropes installed by the HEN Sherpa team provide your primary security throughout. You will cross aluminum ladders over crevasses, sometimes one ladder wide, sometimes several lashed together, which demands balance, steady nerves, and full trust in your tethers.

The route through the icefall is never the same between visits. Ice moves. Seracs collapse. Your Sherpas monitor the route daily and reroute when necessary. The critical rule: move efficiently, do not linger in exposed zones, and always stay clipped to the fixed lines.

Camp 1 sits on a flat section of glacier above the icefall at 5,943 m. The sense of relief when you reach it is real. Looking back down at the icefall and forward into the Western Cwm, the scale of what you are doing becomes very clear.

Elevation gain: approximately 580 m. Time required: 3 to 5 hours.

Western Cwm: Camp 1 to Camp 2 (6,400 m)

Technical Grade: F+ / PD-

Terrain: Glacier travel, crevasse navigation

The Western Cwm is one of the most visually extraordinary places in Himalayan climbing. A wide, flat glacial valley enclosed on three sides by Everest, Lhotse, and Nuptse, it channels the sun intensely, making midday temperatures surprisingly warm, while nights remain brutally cold.

The route from Camp 1 to Camp 2 crosses the upper reaches of the Khumbu Glacier via fixed ropes, navigating around and over crevasses. The technical difficulty is lower here than the icefall below, but altitude, heat exposure, and the distance of the Cwm demand steady pacing and strong hydration discipline.

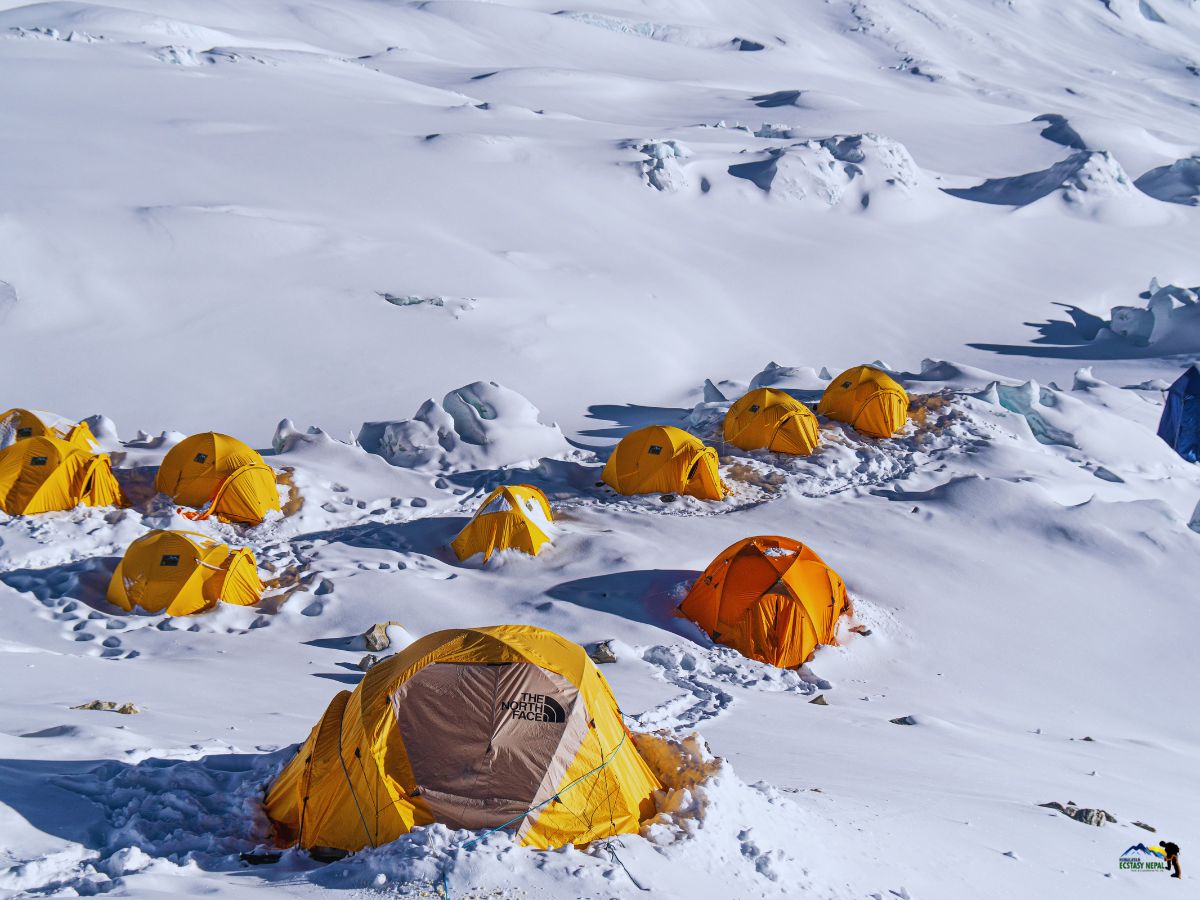
Camp 2 at 6,400 m is your Advanced Base Camp for the Lhotse expedition. It is the most established and comfortable of the high camps, and it will become a familiar place over the coming weeks of rotations.

Elevation gain: approximately 460 m.

Time required: 3 to 5 hours.

Lhotse Face: Camp 2 to Camp 3 (7,100 m)

Technical Grade: AD 

Ice Grade: AI 3

Average Slope: 45 to 55 degrees

This is where Lhotse announces itself properly. The Lhotse Face is a massive, sweeping wall of blue ice that rises above the Western Cwm at angles between 45 and 55 degrees.

It is one of the defining features of this part of the Himalaya, visible from Namche, Dingboche, and even lower in the valley on clear days. Standing at its base and looking up is a humbling experience.

The climb from Camp 2 to Camp 3 follows fixed ropes directly up this face. You will rely heavily on your ascender (jumar), front-pointing with your crampons on hard blue ice, and moving in a controlled, rhythmic pattern, not fast, not slow, but steady. The effort required increases significantly with every 100 meters gained, not just because of the angle, but because the air at 6,400 m and above has already thinned enough to make sustained effort genuinely taxing.

The Yellow Band, a distinctive stripe of yellow limestone running horizontally across the upper face, marks the transition zone between the glacial ice below and the mixed rock-and-snow terrain above. Crossing it requires careful footwork as the surface changes character.

Camp 3 at 7,100 m is carved into the steep slope itself, with small platforms cut into the ice by the route-fixing team. Sleeping here is not comfortable. But it is essential.

This camp marks your highest acclimatization point before the final push, and spending a night at 7,100 m is one of the most important things you can do to prepare your body for summit day.

Elevation gain: approximately 700 m.

Time required: 5 to 7 hours.

Acclimatization Rotations

Before any summit push, you will complete multiple rotation cycles between base camp and the higher camps. The approach at HEN follows the "climb high, sleep low" principle that every experienced Himalayan mountaineer will confirm: your body gets used to altitude not by staying at it, but by repeatedly going up to it and coming back down to recover.

A typical rotation sequence looks like this:

  • BC to C1 to C2 and back to BC (first rotation)
  • BC to C1 to C2 to C3 and back to BC (second rotation)
  • Rest days at BC between rotations

These rotations do two things at once. They help your body produce more red blood cells and get better at working with less oxygen. And they familiarize you with every section of the route, so that on summit day, your feet know the path even when your mind is exhausted.

Do not underestimate the rotations. Many Lhotse summits are won or lost here, weeks before the actual summit push begins.

Camp 3 to Camp 4, South Col (7,906 m)

Technical Grade: AD

Snow/Ice Grade: AI 2 to 3

Departing Camp 3, the route continues up the Lhotse Face before crossing left via the Geneva Spur, a rocky mixed ridge that requires careful crampon placements on rock-embedded ice.

This section is highly exposed to wind and demands methodical movement. You are now at an altitude where every decision carries real weight, and the margin for error narrows considerably.

Crossing the Geneva Spur brings you onto the South Col, a bare, wind-battered saddle between Lhotse and Everest at 7,906 m. Camp 4 sits here. It is a stark, inhospitable place, with shredded expedition tents from past seasons and discarded oxygen canisters in the gravel, but it is also the launching pad for the summit of the fourth-highest mountain on Earth.

Supplemental oxygen becomes essential here. You will arrive in the afternoon, rest briefly with oxygen, eat what you can, and prepare your summit kit for the night push.

Elevation gain: approximately 806 m.

Time required: 6 to 8 hours.

The Summit Push: Camp 4 to Lhotse Summit (8,516 m)

Technical Grade: AD / D-

Snow/Ice Grade: AI 3

Departure: Midnight to 2:00 AM

This is the day that everything has been building toward.

You depart Camp 4 in complete darkness, usually between midnight and 2:00 AM. The temperature at this hour on the South Col regularly drops to -25 degrees Celsius or lower, with wind chill making it feel significantly colder. Your down suit, insulated gloves, and supplemental oxygen are not optional. They are keeping you alive.

From the South Col, the Lhotse route heads directly up the Lhotse Couloir, a steep narrow gully of hard ice and compact snow that funnels directly toward the summit. The couloir is exposed, steep, and relentless. Fixed ropes are your lifeline throughout. You will jumar in long continuous sections, front-pointing on hard ice, managing your oxygen flow, and paying attention to your body's signals with every step.

The upper couloir narrows as you approach the summit pyramid. The final section demands complete focus, with a mix of steep snow and exposed rock requiring precise footwork and controlled rope management. The summit itself is a small corniced point with sheer drops on multiple sides.

Standing on the summit of Lhotse at 8,516 m is not like any other mountain experience. Looking north, you see the South Col and the Southeast Ridge of Everest rising above you.

Looking in every other direction, the entire Himalayan range stretches across the horizon, with Makalu, Cho Oyu, and Kangchenjunga visible on a clear day, and the vast Tibetan plateau beyond. You will have only minutes at the top before the cold and the oxygen situation make staying dangerous. Use them well.

The descent is without question the most demanding part of the entire expedition. Exhausted legs, reduced oxygen efficiency even with supplemental support, and icy conditions on the couloir make coming down a technically precise task.

Move carefully. Do not rush. Rappel each fixed-rope section deliberately, and keep communicating with your Sherpa guide throughout.

The goal is to reach at least Camp 3, and ideally Camp 2, before darkness on descent day.

Optional: Everest Summit After Lhotse

Because the routes to Lhotse and Everest share the same infrastructure all the way to Camp 4 on the South Col, a small but determined group of climbers choose to attempt both peaks in the same expedition.

The logic is straightforward. If you are already sleeping at 7,906 m with a fixed-rope route established above you, and your body has already adapted to the altitude, the opportunity to attempt the highest mountain on Earth is right there. Roughly 5 to 10% of Lhotse climbers make this attempt.

The typical sequence is Everest first, then Lhotse. After summiting Everest via the Southeast Ridge and returning to Camp 4 on the South Col, climbers rest for 2 to 4 hours, sometimes overnight, before beginning the Lhotse push. Some teams position their Camp 4 tents slightly closer to the Lhotse route in anticipation.

Do we recommend this to everyone? No. It requires extraordinary physical reserves, exceptional acclimatisation, and a very honest conversation with yourself and your Sherpa guide about whether your body is genuinely ready for a second summit. But for those who are prepared and conditions allow, it is one of the most remarkable double achievements in Himalayan mountaineering.

If this is your goal, let us know before the expedition begins so we can plan your timeline, oxygen allocation, and contingency days accordingly.

Summit Window and Contingency Days

The weather at 8,000 m is unpredictable and unforgiving. No amount of preparation changes that. Our team at HEN monitors professional meteorological forecasts throughout the expedition, and your Sherpa guide will be tracking conditions daily to identify the right window.

That is why contingency days are built into this itinerary, and they are not wasted time. Use them to rest at base camp, check your gear, go on shorter acclimatisation walks, and mentally reset. When the weather window opens, you want to be rested and ready, not rushed and depleted. Patience here is not passivity. It is strategy.

Max Altitude: 8,516 m Meals: B,L,DAccommodation: Tent

The expedition is complete. You begin the descent from base camp back toward Gorakshep, the same trail you walked weeks ago, now felt entirely differently on your body and in your memory. Reach Gorakshep and rest.

Max Altitude: 5,164 m Meals: B,LDAccommodation: Local Lodge

Dropping nearly 800 m in altitude today is a genuine relief. The air noticeably thickens as you descend through the Khumbu Valley back to Dingboche. Your appetite will return. Your sleep will deepen.

Max Altitude: 4,410 m Meals: B,L,DAccommodation: Local Lodge

Continuing the descent through terrain that now feels familiar, the mani walls, the suspension bridges, and the forests reappear as you lose altitude. Tengboche again, with its monastery unchanged and patient as ever.

Max Altitude: 3,860 m Meals: B,LDAccommodation: Local Lodge

Back to Namche, the Khumbu's lively hub. Treat yourself to a proper meal and a warm shower. You have earned both!

Max Altitude: 3,440 m Meals: B,LDAccommodation: Local Lodge

The final day on the trail. The descent to Lukla takes you back through Sherpa villages, pine forests, and suspension bridges over the Dudh Koshi. This last walk is usually a quiet, reflective one. You will know exactly why when you are doing it.

Max Altitude: 2,860 m Meals: B,LDAccommodation: Local Lodge

An early morning flight back from Lukla to Manthali, then the long drive back to Kathmandu. The city will feel enormous, noisy, and full of life, which after weeks at altitude is exactly what it is. Check into your hotel in Thamel and rest deeply.

Max Altitude: 1,400 m Meals: B,LDAccommodation: 3-star hotelTransportation: Flight + Jeep

Reserved for any flight delays from Lukla, unexpected route changes, or additional rest needed after the descent. If all goes smoothly, use this day however you see fit. Kathmandu has plenty to offer!

Meals: B, L, DAccommodation: 3-star hotel

Your Lhotse expedition ends where it began, at Tribhuvan International Airport. Our HEN team will transfer you from the hotel with enough time to clear check-in and immigration comfortably.
The farewell will be in true Nepali style.

Your guides, Sherpas, and support staff will see you off with the warmth and sincerity that defines every HEN expedition. A tip at this point is genuinely appreciated. These individuals gave everything to make your summit possible. 

If you are extending your stay in Nepal, just let us know. Whether it is a few days of sightseeing in Kathmandu, a cultural tour, or another trekking objective, we will handle the arrangements. Nepal has a way of making you want to stay longer than you planned. 

We have seen it happen countless times. Safe travels. And when you are ready to come back, we will be here.

Meals: Breakfast

Trip Cost Details

Includes

[Full-Board Services] 

Arrival & Kathmandu Services

  • Airport pick-up and drop-off in a private vehicle
  • 4 nights hotel stay (3-star or 4-star) with breakfast
  • Welcome and farewell dinner at a traditional Nepali restaurant
  • Trekking and climbing map (included)

Permits & Government Fees

  • Lhotse and Everest expedition permits and royalty fees 
  • Sagarmatha National Park permit
  • Khumbu Pasang Lhamu Rural Municipality fee
  • Garbage deposit and waste management fees
  • Government Liaison Officer with full support

Trekking & Base Camp Logistics

  • Kathmandu to Lukla flight and return
  • Teahouse/lodge accommodation during trek (twin-sharing)
  • 3 meals per day (breakfast, lunch, dinner) with tea/coffee
  • Fresh and hygienic food throughout the journey
  • Personal baggage allowance (40–50 kg, carried by porters/yaks)

At Base Camp, you will have:

  • Personal sleeping tent with mattress and pillow
  • Dining tent, kitchen tent, toilet and shower tent
  • Staff tents, storage tents, tables, and chairs
  • Gas heater in dining tent
  • Solar panels or generator for lights and charging

Expedition Staff and Insurance

  • 1:1 Climbing Sherpa per member for the entire climb and rotations.
  • Climbing Sherpa assistance for carrying gear to high camps.
  • Experienced Base Camp cook and kitchen helpers as required.
  • All wages, insurance, equipment, and food for Nepalese staff and Sherpas.
  • High Camp Setup & Climbing Logistics
  • High altitude shared dome tents (2 members per tent).
  • High altitude food at Camps I, II, III, IV.
  • Gas stove, cooking equipment, and necessary kitchen facilities at high camps.
  • Route fixing team for ropes and climbing lines (included; no extra charge).
  • Summit oxygen: 3 bottles per climber with mask & regulator, plus 1 bottle per high-altitude Sherpa.
  • Emergency oxygen mask & regulator for medical use at Base Camp.
  • Comprehensive insurance coverage for all Nepali staff (climbing Sherpas, assistant guides, and kitchen crew)
  • High-altitude insurance for staff, including emergency helicopter evacuation coverage (up to USD 10,000 liability)

High Camp & Climbing Support

  • Shared high-altitude tents (2 climbers per tent)
  • Food at Camps 1, 2, 3, and 4
  • Cooking equipment and gas at high camps
  • Fixed ropes and route setup by expert team (included)

Oxygen & Climbing Gear Support

  • 5 oxygen bottles per climber with mask and regulator
  • 3 oxygen bottles for each Sherpa
  • Emergency oxygen system at Base Camp

Communication & Safety

  • Walkie-talkie communication between camps
  • Satellite phone for emergencies (personal use available)
  • Daily weather updates from professionals
  • Full medical kit at Base Camp

Extra Services

  • HEN expedition T-shirt and duffle bag
  • Official summit certificate from Nepal government after success

Excludes

  • International airfare to/from Kathmandu.
  • Nepal entry visa fee ($125 USD for 90 days).
  • Meals not specified in the itinerary (e.g., lunch/dinner in Kathmandu beyond welcome/farewell).
  • Extra nights in Kathmandu (early arrival, late departure, or early trek return).
  • Personal insurance (medical, high-altitude evacuation, helicopter rescue, trip cancellation). Mandatory for climbers.
  • Personal expenses: phone calls, internet, toiletries, hot showers, laundry, soft drinks, alcohol, snacks, etc.
  • Personal climbing/trekking gear: clothing, packing items, bags, trekking poles, boots, gaiters, sunglasses, personal medical kit, etc.
  • Filming/camera/drone permits (if applicable).
  • Additional supplementary oxygen cylinders if required beyond the included allocation: $500 per cylinder at Base Camp, $800 to $1,000 per cylinder at Camp 4. It is always better to plan for extra bottles in advance rather than face a shortage at an extreme altitude.
  • Any service not specifically mentioned in the “Cost Includes” section.
  • Any additional staff beyond what is included in the package.
  • Costs arising from natural calamities, mishaps, or anything beyond control.

Additional Costs & Notes:

  • Summit bonus for climbing guide: USD 1,300 to 1,500 per climber (mandatory as per expedition practice)
  • Tips for Base Camp staff: Suggested USD 200 to 400 per member
  • Extra oxygen cylinders (if required):
    • USD 500 per bottle at Base Camp
    • USD 800 to 1,000 per bottle at Camp 4
  • Additional staff or services beyond the package
  • Any costs arising due to weather, natural calamities, or circumstances beyond control

Optional Helicopter Return: After the summit, many climbers prefer to return by helicopter due to fatigue. Shared flights from Base Camp to Lukla are available at an estimated cost of USD 800 to 1,000 per person

Essential Information

Now that you’ve gone through the itinerary and major highlights of the Lhotse Expedition, let’s focus on the practical side of things. This is the part that helps you prepare properly and feel confident before stepping into the mountains.

Here, I will walk you through the best time to climb, permits, altitude risks, fitness requirements, accommodation, food, and transportation, all explained in a simple and clear way so you know exactly what to expect

Best Time to Climb Lhotse

Choosing the right season is one of the most important decisions before attempting Mt. Lhotse. It directly affects your safety, summit success, and overall experience.
Lhotse is usually climbed during two main Himalayan climbing seasons:

Spring (April to May)

This is the most popular season for climbing Lhotse. In fact, most climbers attempt Lhotse alongside Everest during this time. The weather is relatively stable, and the route is already fixed by multiple expedition teams, especially up to the South Col.

Advantages of spring climbing are: More stable weather conditions, Better support from other expeditions, established climbing routes and fixed ropes, slightly warmer temperatures compared to autumn, etc.

Autumn (September to October)

Autumn is the second option for climbing Lhotse. After the monsoon ends, the skies become clear, and the mountain views are absolutely stunning. However, Lhotse is less climbed in autumn compared to spring, so support and logistics may be limited.

Advantages of autumn climbing are Clear skies and excellent visibility, less crowded compared to spring, cleaner and quieter climbing experience. That said, temperatures can be colder, and summit windows are usually shorter.

Seasons to Avoid

The monsoon season (June to August) should be avoided due to heavy snowfall, unstable ice sections, and high avalanche risk.

Winter (December to February) is also not suitable because of extreme cold, strong winds, and very harsh climbing conditions.

Permits Required for Lhotse Expedition

Climbing Lhotse requires several permits issued by the Government of Nepal. Since it lies in the Everest region, the permit system is similar to that of Everest expeditions.
Here are the main permits required:

  • Lhotse Expedition Permit: The primary permit issued by the Department of Tourism. This officially allows you to climb Mt. Lhotse. (and if you choose to do Everest on the same go, Everest Expedition permit is also required)
  • Sagarmatha National Park Entry Permit: Required to enter the protected Everest region.
  • Khumbu Pasang Lhamu Rural Municipality Permit: A local permit required for trekking and climbing in the Khumbu region.

You cannot arrange these permits individually. They must be processed through a registered expedition company, and when you book with us, all of your permits and logistics are handled smoothly by our team, so you can focus fully on your climb.

Altitude Sickness and Prevention Tips

Climbing Lhotse means entering extreme altitude, especially above 8,000 meters often called the “death zone.” At this height, oxygen levels are very low, and your body is under constant stress.

You may experience the following altitude-related illnesses:

  • Acute Mountain Sickness (AMS): Headache, nausea, dizziness, fatigue, and difficulty sleeping
  • High Altitude Pulmonary Edema (HAPE): Fluid buildup in the lungs, causing breathing problems
  • High Altitude Cerebral Edema (HACE): Swelling in the brain leading to confusion and loss of coordination

So, how do you prevent it? Here are some important strategies:

  • Gradual ascent with proper acclimatization rotations
  • Following the “climb high, sleep low” principle
  • Staying well hydrated and eating high-energy food
  • Taking enough rest between climbs
  • Monitoring your health regularly
  • Using supplemental oxygen during the summit push

Most importantly, listen to your body. If something feels wrong, inform your guide immediately.

Fitness and Mental Preparation Required

Lhotse is an 8,000 m expedition. You need to arrive fit, experienced, and mentally ready for two months in the mountains. On the physical side, focus on long endurance training, loaded hikes, trail running, stair climbing, and core strength work

Your legs and lungs are going to carry you up a 55-degree ice wall at over 7,000 m, so train them like it. Prior experience on at least one 7,000 m peak is mandatory as per current Nepal regulations, and for good reason. If technical terrain, crampons, and fixed-rope systems are not already second nature to you, address that before you arrive.

Start your preparation at least six months out. The climbers who summit Lhotse are rarely the most talented. They are the most consistent in their preparation. Mentally, be ready for patience as much as effort.

Weather delays, long rest days at base camp, and the slow grind of acclimatisation rotations test your mind before the mountain ever tests your body. Strong focus, honest communication with your guide, and genuine teamwork are what carry you through the hard moments.

Accommodation and Food During the Entire Lhotse Journey

  • Kathmandu: 3-star hotel in Thamel, with the option to upgrade to Hotel Thamel Park. Welcome and farewell dinners are included.
  • Approach Trek (Lukla to Base Camp): Local teahouses with basic but comfortable rooms. Food is a mix of Nepali and international dishes, dal bhat, noodle soups, fried rice, eggs, and hot drinks. Eat well and hydrate constantly. Prices increase as you go higher, which is normal across the Khumbu region.
  • Lhotse Base Camp: HEN sets up a full expedition camp with individual sleeping tents, a heated dining tent, a kitchen tent, a toilet and shower tent, solar panels, and a generator. Our professional high-altitude cooks prepare three proper meals a day plus snacks. Nutrition at base camp is performance, not comfort, and we take it seriously.
  • High Camps (C1 to C4): Shared high-altitude mountaineering tents built for extreme conditions. Meals are simpler here: freeze-dried food, instant noodles, soups, and energy snacks. At Camp 4 in the Death Zone, eating feels difficult but is essential. Your Sherpa will make sure you do.

Transportation Included on This Lhotse Package

  • Airport transfers in Kathmandu: private vehicle both ways.
  • Kathmandu to Manthali: private road transfer for your early morning Lukla flight, approximately 4 to 5 hours.
  • Lukla to Base Camp: entirely on foot over 9 trekking days. Porters and mules carry all expedition gear and personal baggage, with an allowance of 40 to 50 kg.
  • Return: same route back, trek to Lukla, fly to Manthali, drive to Kathmandu. All bookings handled by HEN.
  • High camps: all movement on foot and fixed ropes. The Sherpa team carries equipment, food, and oxygen to each camp.

One thing to plan for independently: personal high-altitude rescue and evacuation insurance. It must cover helicopter rescue above 5,000 m and is mandatory before the expedition begins. We verify this before departure.

Equipment Lists

Success and comfort on your Lhotse Expedition hinge on proper preparation, and your equipment list plays a critical role in that. This comprehensive guide covers every essential item (from high-performance apparel to specialized trekking gear), ensuring you’re fully prepared for the diverse and demanding Himalayan environment. We strongly encourage you to review this list carefully; having the right equipment is not just important, it’s essential for a safe, smooth, and rewarding expedition.

Sun Hat (Wide-Brimmed or Baseball Cap):

  • Purpose: Essential for protection from the strong Himalayan sun at lower altitudes and even at higher altitudes where UV radiation is intense. A wide-brimmed hat offers more comprehensive face and neck protection.
  • Material: Lightweight, breathable, quick-drying.

Beanie / Warm Fleece Hat:

  • Purpose: For warmth, especially in the mornings, evenings, and at higher altitudes where temperatures drop significantly.
  • Material: Fleece, wool, or synthetic insulation. Something that covers your ears well.

Buff / Neck Gaiter / Balaclava:

  • Purpose: Highly versatile. Can be used as a neck warmer, pulled up over the face for dust/wind protection, worn as a headband, or even as a light hat. A full balaclava is excellent for extreme cold and wind, especially at higher camps or on pass days.
  • Material: Fleece, merino wool, or synthetic stretch fabric.

Headlamp (with extra batteries):

  • Purpose: Absolutely crucial for early morning starts (especially for Kala Patthar), navigating around the lodge at night, or if you're delayed on the trail.
  • Features: Brightness levels, red light option (preserves night vision), long battery life.

Headband (Optional but useful):

  • Purpose: For managing hair, wicking sweat, or providing light ear warmth without the bulk of a full hat.

Key Considerations for all Headgear:

  • Layering: Just like clothing, you'll layer your headgear. You might start with a beanie and a buff in the morning, switch to a sun hat during the day, and put the beanie back on in the evening.
  • Protection: The sun's intensity at altitude is often underestimated. Ensure good UV protection. Wind can also be a major factor, causing significant heat loss.
  • Comfort: Choose items that fit well and don't chafe, as you'll be wearing them for long periods.
  • Quick-Drying: Essential, especially for beanies or buffs that might get damp from sweat or light precipitation.

Base Layers (Wicking/Thermal Undershirts):

  • Purpose: Wicks sweat away from your body to keep you dry and regulate temperature. This is the foundation of your comfort.
  • Material: Lightweight and mid-weight merino wool or synthetic (polyester, polypropylene). Avoid cotton entirely, as it absorbs moisture and will chill you.
  • Recommended: 2-3 long-sleeved base layers; optionally, 1 short-sleeved for warmer days at lower altitudes.

Mid-Layers (Insulating/Fleece Jackets):

  • Purpose: To provide warmth by trapping air. You'll add or remove these layers as the temperature fluctuates throughout the day.
  • Material:
    1. Lightweight Fleece (100-200 weight): Ideal for active trekking and mild cold. (1 piece)
    2. Mid-weight Fleece (200-300 weight) or a thin synthetic insulated jacket: For colder conditions and higher altitudes. (1 piece)
  • Recommended: 2 versatile fleece or insulating jackets of varying thickness.

Outer Shell (Waterproof & Windproof Jacket):

  • Purpose: Your primary protection against wind, rain, and snow. It doesn't primarily add warmth, but it keeps you dry and protects your insulating layers from the elements.
  • Material: High-quality waterproof and breathable fabric (e.g., Gore-Tex, eVent, or similar). Look for features like sealed seams, an adjustable hood, and pit zips for ventilation.
  • Recommended: 1 durable, waterproof, and windproof hardshell jacket.

Down Jacket (or Heavy Synthetic Puffy Jacket):

  • Purpose: Your essential warmth layer for extreme cold, especially in the evenings, mornings, and at high camps (above 4,000 meters), or during breaks.
  • Material: High-fill power down (e.g., 600-800 fill) for excellent warmth-to-weight ratio and packability, or a very warm, high-quality synthetic equivalent.
  • Recommended: 1 very warm, packable down or synthetic insulated jacket.

Key Considerations for Upper Body Protection:

  • Layering is Key: The ability to add or shed layers is paramount for comfort and safety. Never rely on just one or two thick items.
  • "Cotton Kills": Avoid cotton clothing at all costs, as it retains moisture and dramatically increases heat loss.
  • Zippers and Vents: Ensure your layers have full or half zippers, and your shell jacket has pit zips for quick ventilation during strenuous activity.
  • Fit: Layers should fit comfortably over each other without being too bulky or restrictive, allowing for good circulation.

Lightweight Liner Gloves (Fleece or Merino Wool):

  • Purpose: These are your base layer. They provide a surprising amount of warmth, wick away sweat, and allow for dexterity for tasks like operating cameras, adjusting zippers, or handling trekking poles without exposing bare skin to cold.
  • Material: Thin fleece, merino wool, or synthetic wicking fabric.

Warm Fleece Gloves / Softshell Gloves:

  • Purpose: Your mid-layer. These provide more insulation than liners and are good for colder days at mid to higher altitudes when you still need some dexterity. They offer decent wind resistance.
  • Material: Mid-weight fleece, softshell fabric, or a blend.

Insulated Mittens (Waterproof/Windproof):

  • Purpose: Your outer, warmest layer, especially for early morning ascents, and evenings at higher camps. Mittens are generally warmer than gloves because they allow your fingers to share warmth.
  • Material: Outer shell should be waterproof and windproof (e.g., Gore-Tex, Pertex). Inner insulation should be down or high-loft synthetic. They should be large enough to wear over your liner gloves.

Heavy Duty Gloves (Optional but recommended for very cold sensitive hands or harsher conditions):

  • Purpose: A heavier, more insulated version of the fleece or softshell gloves, offering more warmth than typical mid-layers but still some dexterity compared to full mittens. Can be an alternative to or complement mittens.

Key Considerations for Hand Protection:

  • Layering: The most important concept. You'll layer your gloves just like your clothing. On a cold morning, you might wear liners inside your fleece gloves, or fleece gloves inside your mittens.
  • Waterproof/Windproof Outer Layer: Essential for high altitudes where snow, strong winds, and freezing temperatures are common. Wet hands lose heat rapidly.
  • Dexterity: While warmth is key, ensure you can still perform basic tasks. You'll find yourself taking gloves off less often if you have liners for fine motor skills.
  • Fit: Gloves and mittens should fit well  not too tight (restricts circulation) and not too loose (reduces warmth and dexterity).
  • Backup Pair: It's always a good idea to have a spare pair of liner gloves or a basic warm glove, as gloves can get wet or lost.

Base Layers (Thermal Leggings / Long Underwear):

  • Purpose: To wick sweat away from your skin, keeping you dry and preventing chafing. They provide foundational warmth.
  • Material: Lightweight and mid-weight merino wool or synthetic (polyester). Crucially, avoid cotton, as it retains moisture and chills you.
  • Recommended: 2-3 pairs for rotation.

Trekking Trousers (Durable & Quick-Drying):

  • Purpose: Your primary outer layer for trekking in most conditions.
  • Material: Made from durable, quick-drying nylon or a nylon/spandex blend for comfort and flexibility. Look for features like reinforced knees or articulated (pre-shaped) knees for better movement.
  • Recommended: 1-2 pairs. Convertible trousers (with zip-off legs) can offer versatility for warmer days at lower altitudes.

Softshell Trousers (Optional but Highly Recommended for Higher Altitudes):

  • Purpose: Provides excellent warmth and significant wind resistance, while offering more breathability and flexibility than a hard shell. They often have some water repellency. These are ideal for colder days at higher elevations or when crossing passes.
  • Material: Stretchy, durable softshell fabric.
  • Recommended: 1 pair, to be worn over base layers.

Hardshell / Rain Trousers (Waterproof & Windproof):

  • Purpose: Essential outer layer for complete protection against rain, snow, and severe winds.
  • Material: A high-quality waterproof and breathable membrane (e.g., Gore-Tex, eVent, or similar). Look for full-length side zippers, which are invaluable for putting them on/taking them off easily over boots and for ventilation.
  • Recommended: 1 pair.

Warm Camp Trousers (Optional but adds great comfort):

  • Purpose: A comfortable, warm pair of fleece pants, or lightweight down/synthetic insulated pants specifically for wearing around the teahouse in the evenings. They are excellent for warmth when static or for sleeping in on very cold nights.
  • Recommended: 1 pair (look for packable and compressible options).

Key Considerations for Lower Body Protection:

  • Layering System: The ability to combine or shed layers is paramount for adapting to the wide temperature swings and varying exertion levels.
  • Mobility: Choose pants that offer excellent freedom of movement, especially important on challenging ascents and descents.
  • Quick-Drying: All lower body layers should be quick-drying. Wet pants can lead to chafing and rapid heat loss.
  • Fit: Ensure layers fit comfortably over one another without bunching or being too tight (which can restrict blood flow and reduce warmth).
  • Durability: Trekking pants endure significant wear and tear. Invest in robust materials.
  • Avoid Cotton: Cotton material is unsuitable for trekking as it absorbs moisture, becomes heavy, and loses all insulating properties when wet.

Waterproof Trekking Boots (Mid to High-Cut):

  • Purpose: These are your most crucial piece of gear. They provide essential ankle support, stability on uneven and rocky trails, insulation from cold, and protection from moisture (snow, mud, stream crossings).
  • Features: Look for reputable brands known for their durability and comfort. Choose boots with a mid to high-cut design for optimal ankle support. They must be waterproof (e.g., with a Gore-Tex or similar lining) yet breathable. The sole should be stiff enough for rocky terrain but offer enough flex for comfortable walking.
  • Crucial Tip: Break-in Period: It is absolutely essential to break in your new boots thoroughly before the trek. Wear them on multiple long walks, ideally including some uphill and downhill sections, to mold them to your feet and identify any hot spots. New, unbroken-in boots are the leading cause of blisters.

Climbing Boots

  • Quality Single or Double Boots (insulated)

Camp Shoes / Lodge Shoes / Sandals:

  • Purpose: Provides immense relief for your feet after a long day of trekking. They are perfect for wearing around the teahouse, short strolls, or bathroom breaks at night, allowing your feet to breathe and recover.
  • Features: Lightweight, easy to slip on and off. Crocs, sturdy sandals, or comfortable slip-on shoes are popular choices.

Trekking Socks:

  • Purpose: Crucial for cushioning, wicking moisture away from your skin, regulating temperature, and preventing blisters.
  • Material: Opt for high-quality merino wool or good synthetic blends. Never wear cotton socks for trekking, as they absorb sweat, stay wet, and are a primary cause of blisters and cold feet.
  • Quantity: Bring 3-4 pairs of thick, warm trekking socks (for cushioning and warmth) and 2-3 pairs of thinner liner socks (optional, worn under thick socks, they can help reduce friction and prevent blisters).

Gaiters (Optional but Recommended):

  • Purpose: These are protective covers that attach to your boot and extend up your lower leg. They are excellent for preventing snow, scree, dirt, small rocks, or even leeches (at lower altitudes) from getting into your boots.
  • Features: Look for waterproof and breathable options. Mid-calf height is generally sufficient for most conditions.

Key Considerations for Your Footwear:

  • Fit is King: Ensure all footwear, especially your boots, fits perfectly with your trekking socks. Boots that are too tight restrict circulation (leading to cold feet), while boots that are too loose cause rubbing and blisters.
  • Moisture Management: While waterproof boots keep external water out, moisture-wicking socks are vital to keep your feet dry from sweat. Change socks regularly.
  • Blister Prevention: Be proactive! Address any hot spots immediately with moleskin or blister plasters. Carry a small personal blister kit.
  • Foot Hygiene: Daily foot care, including washing and drying your feet thoroughly, is important for overall foot health on the trek.

Passport:

  • Purpose: Your primary identification for international travel to and from Nepal, and for various trek permits.
  • Details: Must be valid for at least six months beyond your intended stay.

Nepal Visa:

  • Purpose: Required for legal entry into Nepal.
  • Details: Can be obtained upon arrival at Tribhuvan International Airport (TIA) in Kathmandu, or secured in advance from a Nepalese embassy or consulate in your home country. You'll typically need 2-4 passport-sized photographs for this.

Airline Tickets / E-tickets:

  • Purpose: For your international flights to and from Kathmandu, as well as your crucial domestic flights within Nepal (e.g., Kathmandu-Lukla-Kathmandu).
  • Details: Carry printouts and keep digital copies accessible on your phone or in cloud storage.

Travel and Medical Insurance Policy:

  • Purpose: Absolutely critical. This insurance should cover medical emergencies, emergency evacuation (especially helicopter evacuation from high altitudes), trip cancellation/interruption, and lost luggage.
  • Details: Carry a copy of your policy, emergency contact numbers for your insurance provider, and your policy number. Verify that high-altitude trekking up to your maximum elevation is explicitly covered.

Medical Information (Highly Recommended):

  • Purpose: Vital in case of a medical emergency.
  • Details: A small card or note listing any allergies (medications, food), existing medical conditions, current prescription medications (including generic names), and emergency contact information for your doctor.

Emergency Contact Information:

  • Purpose: For quick reference in unforeseen circumstances.
  • Details: List contact details for your next of kin, your tour operator's emergency number, and your country's embassy or consulate in Nepal.

Credit/Debit Cards & Cash (Nepalese Rupees):

  • Purpose: For payments for personal expenses, souvenirs, and tips. ATMs are generally scarce above Namche Bazaar, so cash is essential on the trail.
  • Details: Inform your bank about your travel dates to prevent card suspension. Keep emergency cash in a separate, secure location.

Passport-sized Photographs:

  • Purpose: Bring several extra copies (at least 4-6). They are frequently needed for permits, unexpected forms, or in case of lost documents.

Key Considerations for Your Travel Documents:

  • Originals and Copies: Always carry original documents, but keep high-quality photocopies (both physical and digital) stored separately from the originals. This is your safeguard if originals are lost or stolen.
  • Protection: Store all important documents in a waterproof and durable pouch or bag within your daypack and main luggage.
  • Accessibility: Keep your passport, visa, and trekking permits easily accessible, as they will be required for check-ins and checkpoints.
  • Digital Backups: Scan or photograph all critical documents and save them to a secure cloud service (like Google Drive, Dropbox) or email them to yourself and a trusted contact.
  • Security: Utilize a money belt or secure inner pockets for your passport, large sums of cash, and credit cards, especially in crowded areas.

Sunscreen (High SPF):

  • Minimum SPF 30, preferably 50+. The sun's UV radiation is significantly stronger at altitude. Opt for a broad-spectrum, water-resistant formula. A stick formula can be convenient for face and ears.

Toothbrush & Toothpaste:

  • A lightweight toothbrush and a small, travel-sized tube of toothpaste. Consider a biodegradable option.

Biodegradable Soap / All-in-One Wash:

  • A small bar of biodegradable soap or a travel-sized bottle of biodegradable all-in-one body wash/shampoo. This is crucial for minimizing environmental impact when water might drain into local ecosystems.

Dry Shampoo / Cleansing Wipes:

  • Highly recommended for waterless hair washing when showers are unavailable or too cold. Biodegradable body wipes are excellent for quick "sponge baths."

Moisturizer / Lotion:

  • A small tube is essential. The high altitude and dry, cold air can severely dehydrate and chafe your skin.

Lip Balm (with SPF):

  • Absolutely critical. High UV exposure, wind, and cold can cause severe chapping. Choose a lip balm with high SPF (30+). Bring at least two.

Hand Sanitizer:

  • Indispensable for maintaining hygiene, especially before meals and after using teahouse facilities where water for handwashing may be limited or freezing cold.

Toilet Paper:

  • Essential to carry your own. While some lodges provide it, it's not guaranteed, especially for use on the trail. Pack it in a waterproof bag. Remember to pack out all used paper (do not leave it on the trail).

Small Quick-Drying Towel (Microfiber):

  • A lightweight, compact microfiber towel is great for quick washes or drying after the occasional hot shower (which usually comes with an extra charge).

Personal Medications:

  • Any prescription medications you require, plus a small supply of over-the-counter essentials like pain relievers, blister treatment, antiseptic wipes, and cold/flu remedies.

Feminine Hygiene Products (if applicable):

  • Pack an adequate supply, as availability in remote villages is extremely limited. Be prepared to pack out all used products.

Key Tips for Toiletries:

  • Go Minimalist: Every gram counts on the trek. Opt for travel sizes or decant into smaller containers.
  • Leak-Proof: Pressure changes at altitude can cause liquids to leak. Ensure all bottles are tightly sealed and ideally double-bagged.
  • Cold Protection: Keep liquids that can freeze (like toothpaste or contact lens solution) inside your sleeping bag at night.
  • Leave No Trace: Always pack out everything you pack in, including all waste from toiletries.

Energy Bars / Granola Bars:

  • Purpose: Provide quick, sustained energy.
  • Recommendation: Look for bars with a good balance of carbohydrates, protein, and healthy fats. Choose options that aren't overly reliant on sugar, to avoid energy crashes.

Nuts & Seeds:

  • Purpose: Excellent source of healthy fats, protein, fiber, and concentrated calories.
  • Recommendation: Almonds, walnuts, cashews, peanuts, pumpkin seeds, and sunflower seeds are all great choices. A mixed bag offers variety.

Dried Fruits:

  • Purpose: Deliver a quick energy boost from natural sugars, along with fiber and vitamins.
  • Recommendation: Raisins, apricots, dates, figs, cranberries, and mango slices are popular options.

Trail Mix (DIY or Pre-packaged):

  • Purpose: A versatile combination, often blending nuts, seeds, dried fruit, and sometimes a few chocolate pieces.
  • Recommendation: Customize your own mix with your favorite components or choose a high-quality pre-made blend.

Hard Candies / Gummy Bears / Jelly Beans:

  • Purpose: Offer an instant sugar rush for quick energy, can help with dry mouth or a sore throat, and provide a welcome morale boost.
  • Recommendation: Small, easy to carry, and non-messy options.

Chocolate (Dark Chocolate Recommended):

  • Purpose: High in calories, provides energy, and is a fantastic psychological pick-me-up. Dark chocolate offers additional antioxidants.
  • Recommendation: Pack robust bars that won't easily crush or melt (though melting is less of an issue at higher, colder altitudes).

Protein Bars / Jerky:

  • Purpose: Essential for muscle recovery and sustained fullness.
  • Recommendation: High-protein bars specifically designed for active individuals, or beef/vegan jerky for a savory protein source.

Nut Butter Packets:

  • Purpose: A super-dense source of calories and healthy fats.
  • Recommendation: Single-serving packets of peanut butter, almond butter, or other nut butters. Can be eaten directly or with crackers.

Crackers / Biscuits:

  • Purpose: Good carbohydrate source and can be a comforting, bland option if your stomach is sensitive at altitude.
  • Recommendation: Plain crackers or digestive biscuits.

Key Considerations for Your Trekking Snacks:

  • Taste at Altitude: Your taste buds can change at high altitudes. Bring a variety, as what you normally love might not appeal to you on the trek. Sometimes salty or blander foods are preferred.
  • Calorie-to-Weight Ratio: Prioritize snacks that pack a lot of energy for their weight, as every gram counts in your pack.
  • Durability & Packaging: Choose snacks that won't easily crush, melt, or make a mess. Ensure all packaging is airtight.
  • Pack Out All Waste: Always carry out all your snack wrappers and any other trash. Leave no trace in the pristine Himalayan environment.

Sleeping bag liner and a Synthetic/Down Sleeping Bag:

  • Purpose: To guarantee you stay warm in freezing mountain temperatures.
  • Recommendation: Aim for a sleeping bag with a "comfort rating" of at least -45°C (-49°F). This rating indicates the temperature at which an average person can sleep comfortably. If you're plaaning for a winter ascent, a bag rated for -73°C (-99°F) might be necessary. Always prioritize the "comfort" or "limit" rating over the "extreme" rating.

Key Considerations for Your Sleeping Bag:

  • Teahouse Nights: Lodges on the Makalu Circuit trail provide warm duvets, and are sufficient for summer/spring treks. For winter, especially at higher altitudes, your sleeping bag is your primary source of warmth at night.
  • Protection: Always keep your sleeping bag in a waterproof stuff sack (even inside your duffel bag) to protect it from moisture.
  • Rental Option: If you don't plan to trek frequently in cold conditions, you can also rent a high-quality sleeping bag with Himalayan Ecstasy Nepal. Please contact us to inquire about availability
  • Air Out: Whenever possible, air out your sleeping bag during the day (e.g., at lunch stops if sunny) to remove moisture.

Your Daypack: The Essential Trail Companion

Your daypack is your constant partner on the Lhotse expedition, carrying all the immediate essentials you need for comfort, safety, and convenience during your daily hikes. Unlike your main duffel, which is carried by porters, your daypack stays with you, ensuring quick access to vital items. This is where you'll keep everything you might need between teahouse stops. Think of it as your portable base for a day's adventure, from staying hydrated and fueled to adapting to sudden weather changes.

Key Features to Look For:

  • Comfortable Fit: Paramount for multi-day trekking. Seek out adjustable padded shoulder straps, a breathable and padded back panel, and a functional hip belt. A good hip belt is vital for distributing the pack's weight comfortably onto your hips, taking pressure off your shoulders.
  • Hydration Compatible: A dedicated internal sleeve for a hydration reservoir (like a CamelBak) and a port for the drinking tube are highly convenient. This allows you to stay hydrated without constantly stopping to pull out a water bottle.
  • Accessible Pockets: Well-placed pockets are invaluable. Look for side pockets (ideal for water bottles or quick-grab items), a front stash pocket (for maps or a lightweight layer), and a top lid pocket (perfect for small items like a hat, gloves, lip balm, or sunscreen you need often).
  • Integrated Rain Cover: Essential protection for your daypack and its contents. Many quality daypacks come with a built-in, stowable rain cover. If not, purchase one separately.
  • Lightweight Design: Choose a daypack that is inherently light even when empty. Every extra gram adds up over hours and days of trekking.
  • Harness: A lightweight but fully adjustable climbing harness, suitable for mountaineering (padded legs are a bonus for comfort). Ensure it is rated for high-altitude use.
  • Crampons:Technical mountaineering crampons (automatic/step-in are preferred for climbing boots). Ensure they fit your climbing boots perfectly and practice putting them on before the trip.
  • Ice-Axe: A robust technical ice-axe (length appropriate for your height) for self-arrest and assistance on the glacier and steep slopes. A leash is highly recommended to prevent losing your axe.
  • Carabiners (Locking / Non-Locking): Bring 8-10 Locking Carabiners (pear-shaped/HMS types for belaying/safety) and 4-6 Non-Locking Carabiners for general purpose clipping. Keep them simple, lightweight, and rated for climbing.
  • Ice-Screws: Essential for setting anchors in ice. Bring 3-4 quality screws (16cm - 21cm), typically provided as part of the team's group gear but often good to have extras for personal use or safety.
  • Snow Anchor: A reliable snow picket or specialized deadman anchor. This is primarily a group gear item, but personal use on the summit push can be required.
  • Rock Piton: Usually considered group gear for emergency or establishing fixed anchors on rock sections. Not typically carried by every individual climber.
  • Helmet: A UIAA-approved, lightweight, and adjustable climbing helmet. Essential for protection from falling ice and rock. Ensure it fits comfortably over your balaclava/hat.
  • Ascender (Jumar): A mechanical rope grab device (Jumar or Petzl Ascender) for ascending fixed ropes. Bring one left-hand or right-hand model as per your preference.
  • Figure-8 Descender / Belay Device: A versatile rappel/belay device (e.g., ATC Guide, Reversos, or Figure-8) for safe descending and managing ropes.
  • Sling / Tape: 4-6 Slings/Runners (60cm, 120cm) and 1-2 Long Prusik Cords (6mm or 7mm x 5-6m) for setting up anchors, clipping into fixed lines, and emergency self-rescue.
  • Climbing Boot: High-altitude, insulated double or triple plastic/leather boots (e.g., La Sportiva Olympus Mons, Scarpa Phantom 8000). Absolutely non-negotiable for frostbite prevention at extreme altitudes.
  • Down Suit: A high-quality, full-body down suit (800+ fill power) rated for extreme cold ($8000\text{m}$ level). Essential for the summit push above Camp 3.
  • Poncho or Umbrella
  • Plastics for cover your personal bag
  • Camera /memory stucks
  • Mosquito protect creams (required only summer)

Mt. Lhotse Expedition 8,516 m in 45 Days FAQs

You must have prior high-altitude experience, ideally having successfully summited at least one 7,000 m peak as required by Nepal's Department of Tourism. Strong physical fitness, endurance, and solid technical skills on steep ice and fixed ropes are essential before attempting Lhotse.

If you have the right experience and preparation, absolutely yes. Lhotse follows a well-established fixed-rope route with professional Sherpa support throughout. It is a serious 8,000 m expedition, but with proper training, a strong mindset, and the right team behind you, it is a very achievable objective.

For many serious climbers, yes. Lhotse is technically more demanding in sections, far less crowded, and the permit cost is a fraction of Everest. You still experience the full Khumbu journey, the same base camp, the same icefall, and genuine Death Zone climbing. It is one of the best value 8,000 m expeditions available anywhere in the Himalaya.

No, but both routes are identical from Base Camp through Camp 1, Camp 2, and Camp 3 on the Lhotse Face. The split happens just above Camp 3, after passing through the Yellow Band at around 7,300 m. From there, Everest climbers turn left toward the Geneva Spur and South Col, while Lhotse climbers turn right into the Lhotse Couloir to reach a separate Camp 4 at approximately 7,900 m.

Yes, and it is one of the most ambitious double-summit projects in high-altitude mountaineering. Since both peaks share the same route up to Camp 3 and the same base camp, some climbers summit Everest first, rest briefly at Camp 4, and then push for Lhotse. Only around 5 to 10 percent of climbers attempt both. It requires exceptional physical reserves, but our HEN team will fully support the attempt if you arrive prepared.

The Nepal government sets permit fees based on the prestige and demand of the peak. Everest carries the highest fee in the world, currently around $11,000 USD per climber in spring, due to its status as the highest mountain on Earth. Lhotse, despite sharing most of the same route, is priced significantly lower, making it one of the best value 8,000 m expeditions available.

Yes. The HEN Lhotse Expedition follows the standard Southeast Face route used by the vast majority of expeditions on this mountain. The route goes through the Khumbu Icefall, Western Cwm, up the Lhotse Face, through the Yellow Band, and into the Lhotse Couloir to the summit. It is a fixed-rope route with established camps at every stage.

The summit bonus is a mandatory payment to your climbing Sherpa upon reaching the summit, and it is a deeply respected tradition in Himalayan mountaineering. For the Lhotse Expedition, the expected amount is between $1,300 and $1,500 USD per climber. It is not included in the expedition package cost. Your Sherpa gives everything to get you to the top and back safely, and this is the standard acknowledgment of that commitment.

Absolutely yes. You do not need a pre-formed group to book with HEN. Individual climbers are fully welcome. We handle your permits, documentation, and expedition coordination by working with other registered groups on the mountain in the same season. You climb your own journey while we take care of all the official framework around it.

Yes. Every climber on a Lhotse Expedition with HEN is assigned a licensed, experienced climbing Sherpa with multiple high-altitude summits to their name. They know this route in real conditions, manage your oxygen, monitor weather, make route decisions, and stay with you from base camp all the way to the summit and back.

Lhotse has two main climbing seasons. Spring, from April to late May, is the most popular, with more stable weather and active route-fixing teams on the mountain. Autumn, from late September to early November, offers clear skies and excellent visibility but colder nights at high camps. Most HEN expeditions, and most successful Lhotse summits, happen during the spring season.

There is no single fixed deadline, but the expedition operates within the permitted climbing season, which for spring runs roughly from April to late May and for autumn from late September to early November. Within that window, your summit timeline is guided by weather conditions, your acclimatization progress, and the judgment of your Sherpa guide and expedition leader. No one will rush you unnecessarily, but equally, no one can extend the season beyond what the mountain and the permit allow. The final call on when to push and when to wait always comes down to safety first, and that decision rests with your HEN expedition team.

No. Once the expedition begins, the costs involved, including permits, Sherpa insurance, base camp setup, logistics, and staff wages, are fully committed and non-refundable regardless of how far you progress on the mountain. This is standard practice across all 8,000 m expeditions in Nepal. We strongly recommend purchasing comprehensive trip cancellation and rescue insurance before your departure to protect yourself against unforeseen circumstances.

We always recommend planning for more oxygen than you think you need rather than less. The full-board HEN package includes four oxygen bottles per climber with mask and regulator. If you need additional cylinders, an extra bottle costs approximately $500 USD at Base Camp and $800 to $1,000 USD at Camp 4. Discuss your oxygen plan with your Sherpa guide during the preparation days in Kathmandu, well before summit day.

Plan Your Trip